Ada, Adalo's AI builder, lets you describe what you want and generates your app. Magic Start creates complete app foundations from a description, while Magic Add adds features through natural language.
Building apps for clients no longer needs to be expensive or time-consuming. With white-label no-code platforms like Adalo, you can create a single master app, customize it for each client’s branding, and deploy it in days instead of months. Here’s how it works:
- Save Time and Money: Traditional app development can cost $50,000–Traditional app development can cost $50,000–$120,000 and take 6–12 months.20,000 and take 6–12 months. Using no-code tools, apps can launch 90% faster and at a fraction of the cost.
- Custom Branding: Add client logos, colors, and features without coding. Adalo’s drag-and-drop builder makes customization simple.
- Scalable Infrastructure: Adalo supports millions of users with 99%+ uptime, so you can grow without switching platforms.
- AI-Powered Tools: Features like Magic Start and X-Ray streamline app creation and ensure performance.
Whether it’s for restaurants, gyms, or real estate, white-label no-code apps let you deliver tailored solutions faster and more affordably than ever. Start with a master app, adjust for each client, and publish to iOS, Android, or the web - all from one platform.
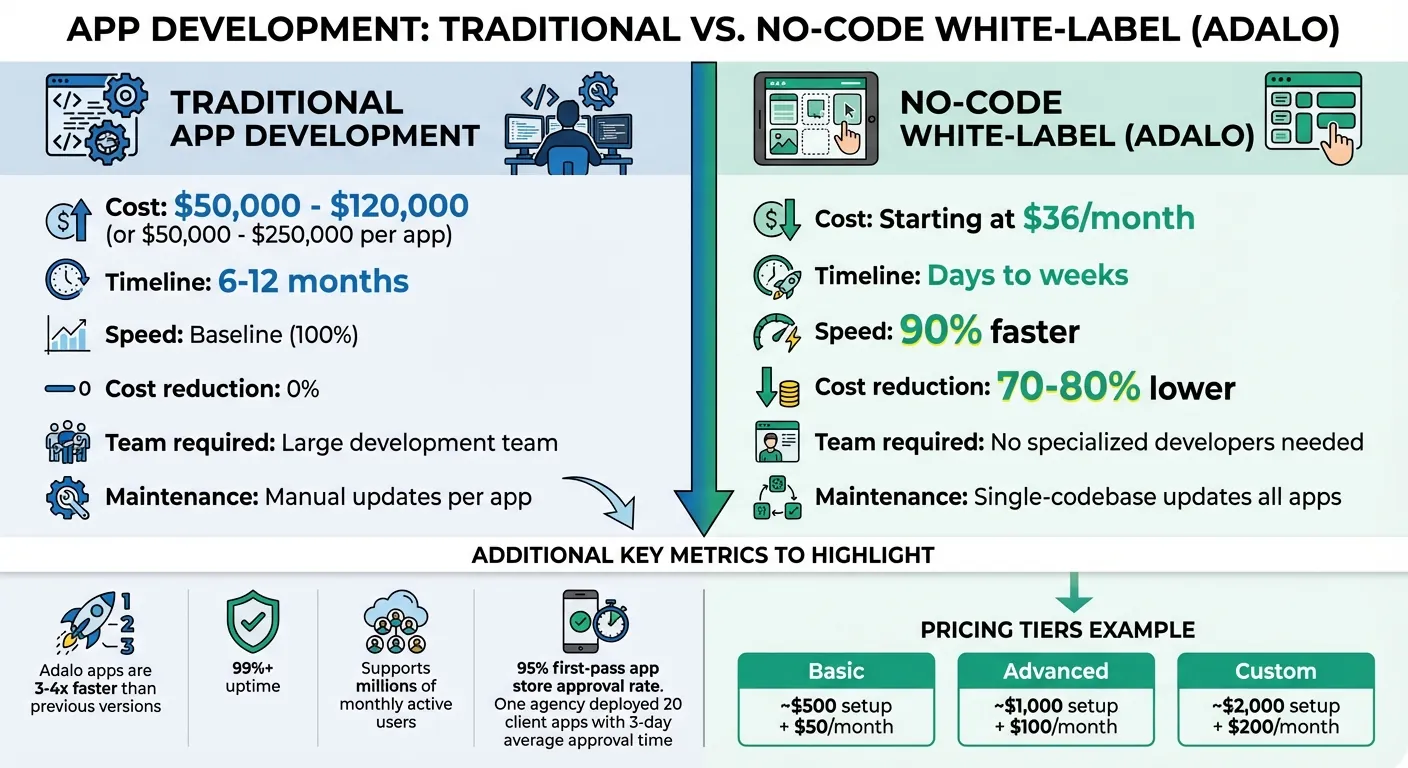
Traditional App Development vs No-Code White-Label Apps Cost and Time Comparison
Development and Maintenance of White-Label Android Apps | Dmitrii Nikitin | Conf42 Chaos Engr 2025
Preparing to Build White-Label Apps
Getting everything in order before you start building white-label apps is key to avoiding unnecessary delays. By setting up the right accounts and gathering client materials early, you can streamline the process and focus on customization.
Setting Up Accounts and Tools
Start by ensuring you have the necessary accounts and tools in place. Here’s what you’ll need:
- Adalo account: Choose a paid plan - Starter, Professional, Team, or Business. Features like native app publishing and custom domains aren’t available on the free tier. The Starter plan begins at $36 per month.
- Apple Developer account: This costs $99 per year. Keep in mind that standard accounts take 1–2 days for approval, while enterprise accounts may take 1–2 weeks, so apply early.
- Google Play Console account: This requires a one-time fee of $25. The setup is instant once payment is complete.
Make sure your Adalo account is upgraded to a paid plan before you begin development, as free accounts don’t support white-label features. Additionally, gather high-resolution logos (minimum 1024px) ahead of time to avoid issues when publishing apps to app stores.
Collecting Client Branding Materials
Having all client assets ready before you start development can save you a lot of headaches. Here’s what to ask for:
- App icons: A 1024 x 1024 pixel PNG with a solid background (no transparency) for Apple’s App Store, and a 512 x 512 pixel version for Google Play.
- Branding assets: Include the client’s color palette (primary, secondary, and text colors), logos, and any custom fonts they want to use.
- App store details: Request a display name (up to 30 characters, avoiding special characters like "~" or quotation marks), descriptive keywords for search optimization, and a tagline or description.
- Permission explanations: Provide clear details for any required features like camera access, location services, or photo library use.
To ensure smooth integration, standardize all assets and formats. Use US-specific settings like dollar currency formatting ($1,234.56), MM/DD/YYYY dates, imperial measurements (miles, °F), and American English spelling. Finally, create a checklist for clients to confirm you’ve received everything needed before you start building. This simple step can help you avoid delays caused by missing materials.
How to Build White-Label Apps in Adalo
Once you’ve gathered your client assets and set up their accounts, the next step is to create a master app. This app acts as your foundation - a template you can duplicate and customize for each client. By starting with a well-structured master app, you’ll save time and ensure consistency across all client projects.
Building the Master App with Adalo AI Builder
Adalo’s Magic Start feature makes it easy to kick off your app development. Simply describe the app you want to build - like “a fitness app with workout tracking, user profiles, and progress charts” - and it generates the basic structure for you. This includes screens, database tables, and user flows.
Once the initial framework is ready, use Magic Add to refine or expand the app. For example, you can request features like a booking calendar or a user profile page, and they’ll be added without needing manual setup. To speed things up even further, leverage pre-built Feature Templates such as User Chat, Appointment Booking, or Restaurant Ordering. These templates come fully wired with screens, actions, and database collections.
For branding consistency, create a Global Settings database collection. This is where you’ll store assets like logos, icons, and color codes. By centralizing these elements, you can make updates across the app in one go, rather than editing individual screens.
Applying Client Branding and Features
Once your master app is ready, you can customize it for each client using Adalo’s visual builder. Add their logos, adjust the color scheme, and upload any custom fonts they require. The drag-and-drop interface makes it easy to implement these changes without writing any code.
To streamline updates, use the Magic Text feature (the red “T” icon). This tool links elements like images and titles directly to your Global Settings database. For example, if you change a logo in the database, it will automatically update everywhere in the app. For client-specific functionality, you can connect external database integration options like Airtable, Google Sheets, or custom databases. This lets you personalize the app’s features without altering the core structure.
Before finalizing your master app, run Adalo’s X-Ray tool. This AI-powered feature helps identify any performance issues or scalability concerns, ensuring your app is ready to handle growth. Once you’ve tested and refined your master app, you can start duplicating it for individual clients.
Duplicating and Configuring Apps for Each Client
To create a client-specific version of your app, go to Settings > App Access and enable the “Cloneable” option. This allows you to copy the app’s structure and logic without including any test data from the master version. Use the share link to clone the app, rename it with the client’s name (e.g., “FitnessApp_ClientName”), and assign it to your team.
Each cloned app operates with its own database, so updates or changes for one client won’t affect others. After cloning, update the branding in the Global Settings collection, connect the client’s data sources, and set up a custom domain under Settings > Domains. The result? A fully branded, standalone app tailored to your client’s needs - all built from your master template.
If you’re managing multiple clients, consider offering tiered customization packages. For example:
- A basic package for simple logo and color updates.
- A mid-tier option for custom integrations.
- A premium package for advanced features like full UI redesigns or analytics.
This approach helps you scale your agency business while keeping development efficient and manageable.
Testing and Deploying Your Apps
Testing Performance with Adalo X-Ray
Before launching any client app, make sure to run Adalo X-Ray from the app builder dashboard. This AI-powered diagnostic tool scans your app in under five minutes and provides a detailed report identifying performance bottlenecks.
Here are some common issues X-Ray identifies:
- Unfiltered database searches: These can pull unnecessary client data, making queries up to five times slower. To fix this, apply filters like "Current User's Client ID" to limit the data being retrieved.
- Oversized images: Large images can increase load times by as much as 300%. Compressing images, especially logos, into WebP format can reduce file sizes by up to 50%.
- Nested lists: These can slow down custom UI components. Flattening list structures can significantly improve performance.
"Use X-Ray to identify performance issues before they affect users. This AI-powered feature highlights potential problems so you can address them proactively rather than discovering them after launch." - Sonia Rebecca Menezes
After resolving any issues flagged by X-Ray, test your app across all platforms. For iOS, distribute builds to testers using Apple Testflight. The Internal track allows up to 100 testers without requiring Apple review, ideal for fast iterations. For broader feedback, the External track supports up to 10,000 testers but requires Apple approval.
Once your app’s performance is validated, you’re ready to move on to publishing.
Publishing to App Stores and the Web
When your app is running smoothly, it’s time to deploy. To generate native builds, go to Publish > Native Builds in the app builder. Connect your verified Apple Developer and Google Play Console accounts to create native builds. Customize settings with your client’s branding - app name, icons, and metadata. Adalo will generate an IPA file for iOS and an AAB/APK file for Android. You can either download these files for manual submission or use Adalo’s auto-publish feature. Ensure that client-provided app icons meet the required dimensions and format.
For the Apple App Store, upload the IPA file via App Store Connect, add client-specific metadata and screenshots, and submit for review. The approval process usually takes one to two weeks. For the Google Play Store, upload the AAB file to the Play Console, set pricing in US dollars, add store listings, and publish. Pre-testing builds with X-Ray often leads to smoother approvals - one agency achieved a 95% first-pass approval rate this way.
If you’re deploying Progressive Web Apps (PWAs), go to Settings > Domains to add the client’s custom domain. Create a CNAME record with your DNS provider using the details provided by Adalo. DNS propagation typically completes within 30 minutes but can take up to 24 hours. Once verified, go to the Publish tab and select the custom domain. PWAs offer a faster launch timeline compared to native apps. For example, one no-code firm rolled out 20 client apps in 2025 with an average three-day store approval time, thanks to X-Ray.
This final deployment step ensures every app is rigorously tested and aligned with the client’s brand, ready to deliver a seamless experience.
Managing and Scaling White-Label Apps
Starting with a master app simplifies customization while setting the stage for efficient management and scalable growth.
Updating All Client Apps at Once
With a single-codebase approach, updates to your master app automatically apply to all client apps. This eliminates the need for tedious, manual updates across separate codebases - a process that could take weeks in traditional development.
Adalo 2.0 enhances this workflow with manual publishing for greater control. You can make changes in a draft environment, thoroughly test them, and ensure stability before pushing updates live. When ready, updates are deployed across all platforms simultaneously, maintaining consistency while saving time.
You can also choose between copying and cloning for structuring client apps:
- Copying: Best for shared databases. Changes in one app reflect across all copies, making it ideal for clients who share the same data collections.
- Cloning: Duplicates the app's structure (screens, components, actions) but keeps each client’s database separate. This is perfect for clients who need isolated data using no-code relational databases.
Once updates are streamlined, the next step is scaling your operations with Adalo’s infrastructure.
Scaling with Adalo Infrastructure
As your client base grows, Adalo's infrastructure grows with you. Paid plans offer unlimited database records, ensuring smooth performance even as user numbers increase.
"Adalo 3.0's infrastructure overhaul... introduced modular architecture that scales to serve apps with millions of monthly active users, with no upper ceiling." - Sonia Rebecca Menezes
Adalo 3.0 delivers apps that are 3–4 times faster than previous versions, and its architecture is built to handle millions of monthly active users. This eliminates the need for platform migrations, offering predictable scaling. For agencies managing multiple clients, this reliability allows you to offer tiered pricing packages - for example:
- Basic: ~$500 setup + $50/month
- Advanced: ~$1,000 setup + $100/month
- Custom: ~$2,000 setup + $250/mo
For enterprise clients, Adalo Blue provides advanced features like SSO, enterprise-grade permissions, and integration with legacy systems - even those without APIs. This flexibility means you can serve a wide range of clients, from small startups to large organizations, all on the same platform.
Conclusion
Adalo's no-code tools make building white-label apps for clients fast, efficient, and budget-friendly. Forget the need for large development teams or hefty budgets - now you can create fully branded web and mobile apps in just days. Compared to traditional custom development, which often costs between $50,000 and $250,000 per app, Adalo slashes development costs by 70-80%.
With a single-codebase approach, all client apps stay synchronized, making updates seamless and scalable. This setup not only simplifies maintenance but also ensures consistent branding across all apps. Whether you're working with a small startup or a large enterprise, Adalo's infrastructure can handle millions of monthly active users without performance issues or the need for platform migrations.
For agencies and freelancers, this means predictable profits and faster delivery. You can launch apps in weeks, customize them with simple drag-and-drop tools, and grow your business without hiring specialized developers. With fixed pricing starting at $36/month, it's easy to create tiered service packages that fit your business model - no surprise costs to worry about.
"I would absolutely recommend building on Adalo - especially for small businesses. Price wise for example, you can't beat it." - Alan Ogle, Business Owner
Whether you're just starting out or managing multiple clients, Adalo equips you with the tools and infrastructure to meet client needs while keeping your operations efficient and profitable.
FAQs
Should I use cloning or copying for each client app?
When deciding between cloning and copying an app, it all comes down to how you want the apps to interact with their data. Cloning creates a completely independent app with its own database, so any updates or changes in one app won’t impact the others. This is ideal if each client or project requires a standalone setup.
On the other hand, copying links multiple apps to the same database. This ensures that all the apps stay synchronized, making it a better choice when you need them to share data and operate as a connected system. Your decision should hinge on whether the apps need to function independently or work as part of a unified network.
How do I keep each client’s data separated in a white-label setup?
To manage client data securely in a white-label setup, you have two main options: cloned apps or a shared database with permissions.
- Cloned apps: Each client gets their own app and database, keeping their data completely isolated. This is ideal if strict separation is a priority.
- Shared database with permissions: A single database is used, but visibility rules and role-based permissions ensure clients can only access their own data. This approach works well when scalability is key.
Decide based on your specific requirements - opt for cloning when isolation is critical, or go with a shared database for efficient scaling.
What do I need from clients to avoid app store delays?
To avoid delays in the app store submission process, make sure to collect all necessary client information right from the start. This includes branding details, clear explanations for permissions, compliance documentation, and essential assets like app icons. Having everything ready and properly organized ensures you meet the app store's requirements and sidestep unnecessary hold-ups.
Related Blog Posts
Build your app fast with one of our pre-made app templates
Begin Building with no codeRelated Content
Adalo's 2026 Guide to AI-Powered No-Code Mobile App Builders
Adalo's 2026 Guide to AI-Powered No-Code Mobile App Builders
Adalo offers AI-powered no-code tools to help founders and startups build and publish responsive apps using APIs and custom integrations.

How To Easily Create No Code Responsive Web Apps with Adalo in 2026
Adalo provides founders and startups with AI-powered tools to build, deploy, and publish responsive web apps fast—no coding. Free to start.
The Complete No-Code Digital Marketing Stack: Build Client Apps with Adalo
Build native iOS, Android, and web marketing apps without code. Fast prototyping, real-time dashboards, lead capture, and predictable pricin

How AI Transforms No-Code Prototyping
How AI-powered no-code tools turn text prompts into production-ready web and mobile apps, cutting development time and cost while enabling s