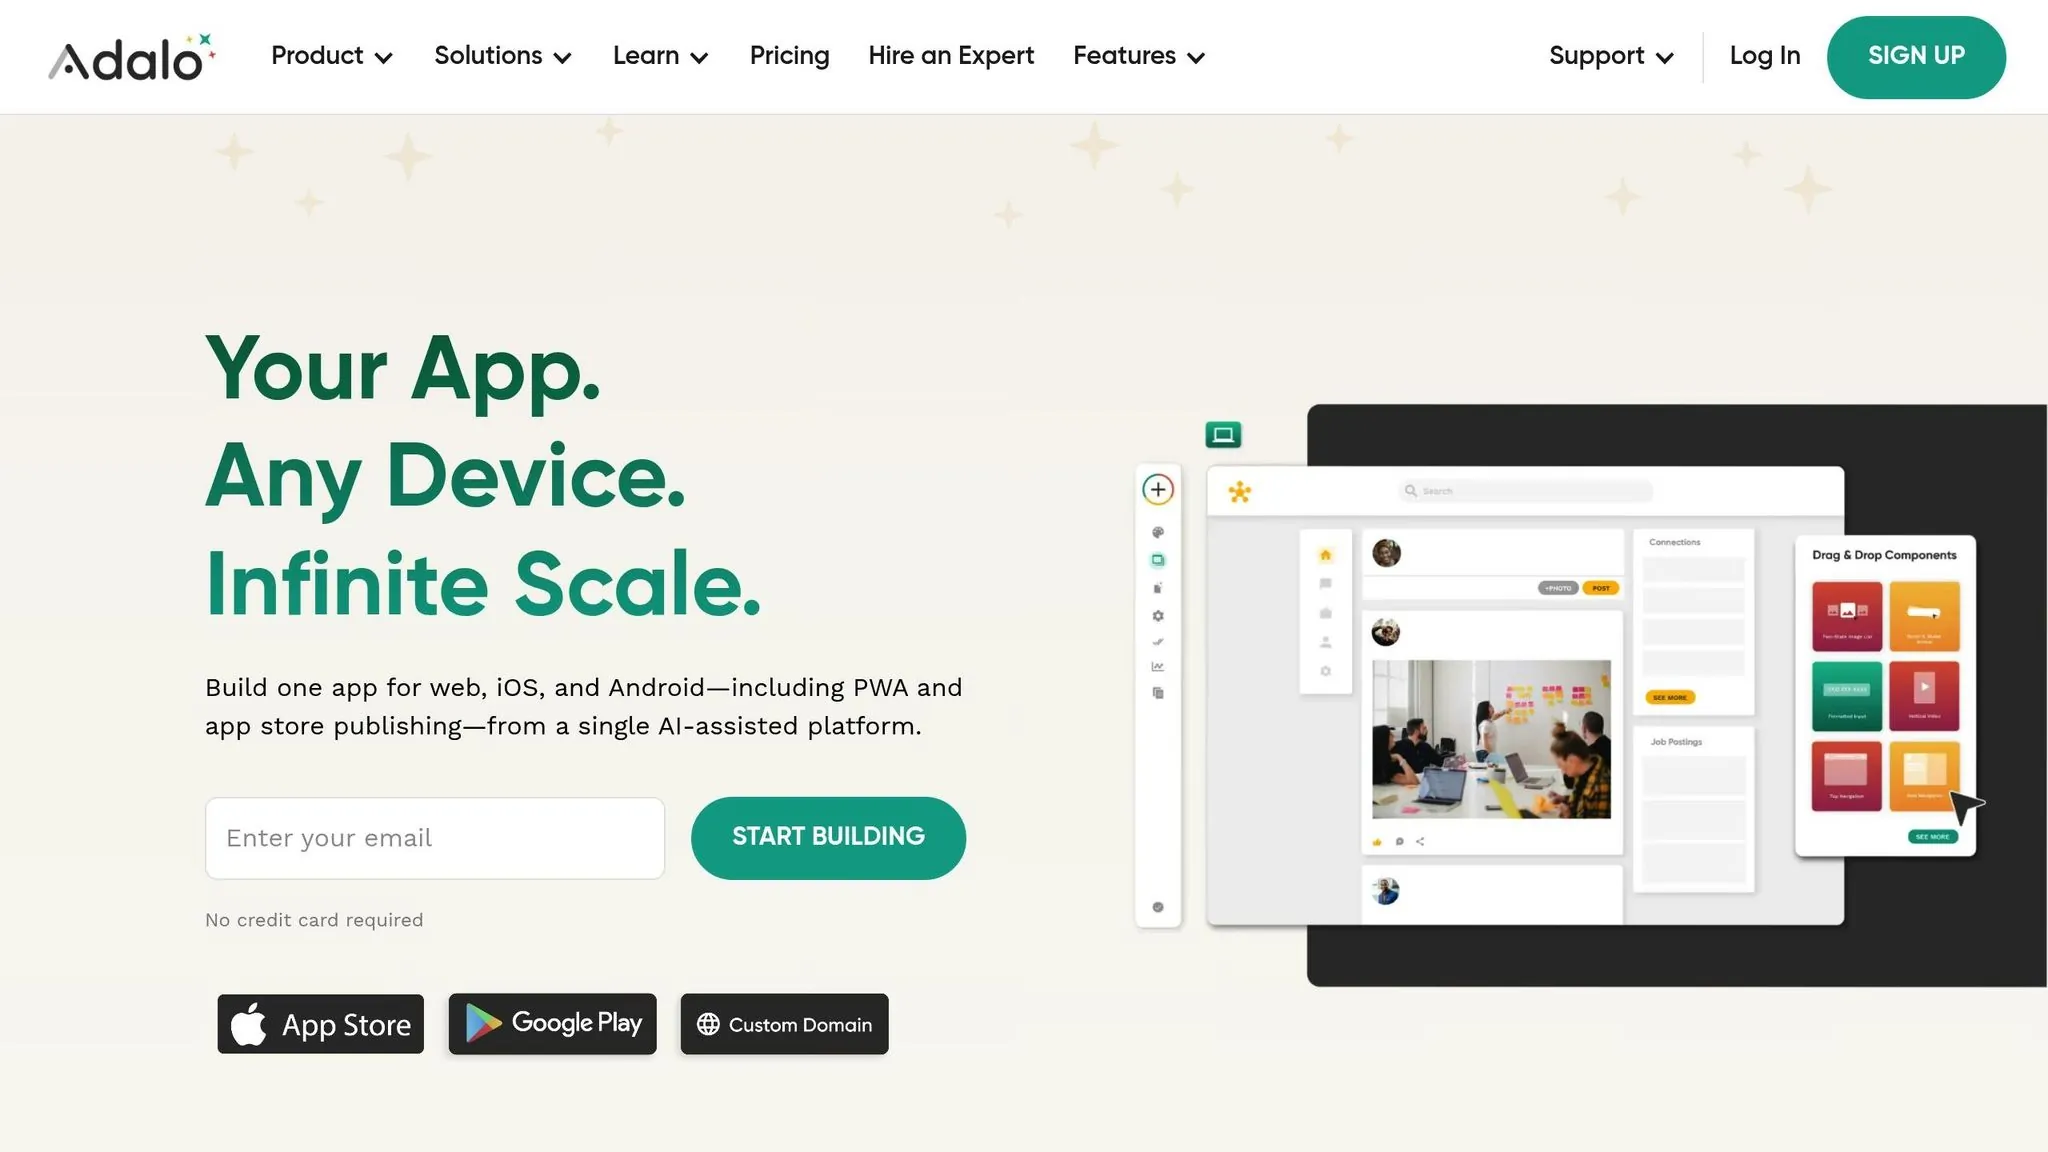
Why Adalo Works for Building Booking and Appointment Apps
Adalo is a no-code app builder for database-driven web apps and native iOS and Android apps—one version across all three platforms, published to the Apple App Store and Google Play. This makes it the perfect solution for creating booking and appointment apps that need to manage user schedules, store client information, and process reservations across multiple devices seamlessly.
For booking apps, native app store distribution is essential—your clients expect to find you where they already search for services. With Adalo, you can send push notifications to remind customers of upcoming appointments, reducing no-shows and keeping your schedule full. Whether you're running a salon, fitness studio, or consulting practice, having your booking app available on both iOS and Android ensures you reach every potential customer.
Ada, Adalo's AI builder, lets you describe what you want and generates your app. Magic Start creates complete app foundations from a description, while Magic Add adds features through natural language.
Building a booking app no longer requires coding skills or a massive budget. With no-code platforms like Adalo, you can create a fully functional app in just days. From scheduling tools to payment integration, these platforms handle everything with drag-and-drop simplicity. Here’s what you need to know:
- Cost: Launch your app for as little as $36/mo, compared to $50,000+ for custom development.
- Speed: Use tools like Adalo’s Magic Start to generate your app’s structure in minutes, saving weeks of setup time.
- Features: Include scheduling, push notifications, payment processing, and user authentication.
- Examples: Businesses like salons, gyms, and schools have already streamlined operations with booking apps built on Adalo.
Whether you’re managing appointments for a salon, fitness classes, or even school events, this guide walks you through every step - from setting up your app’s framework to publishing it on iOS, Android, and the web.
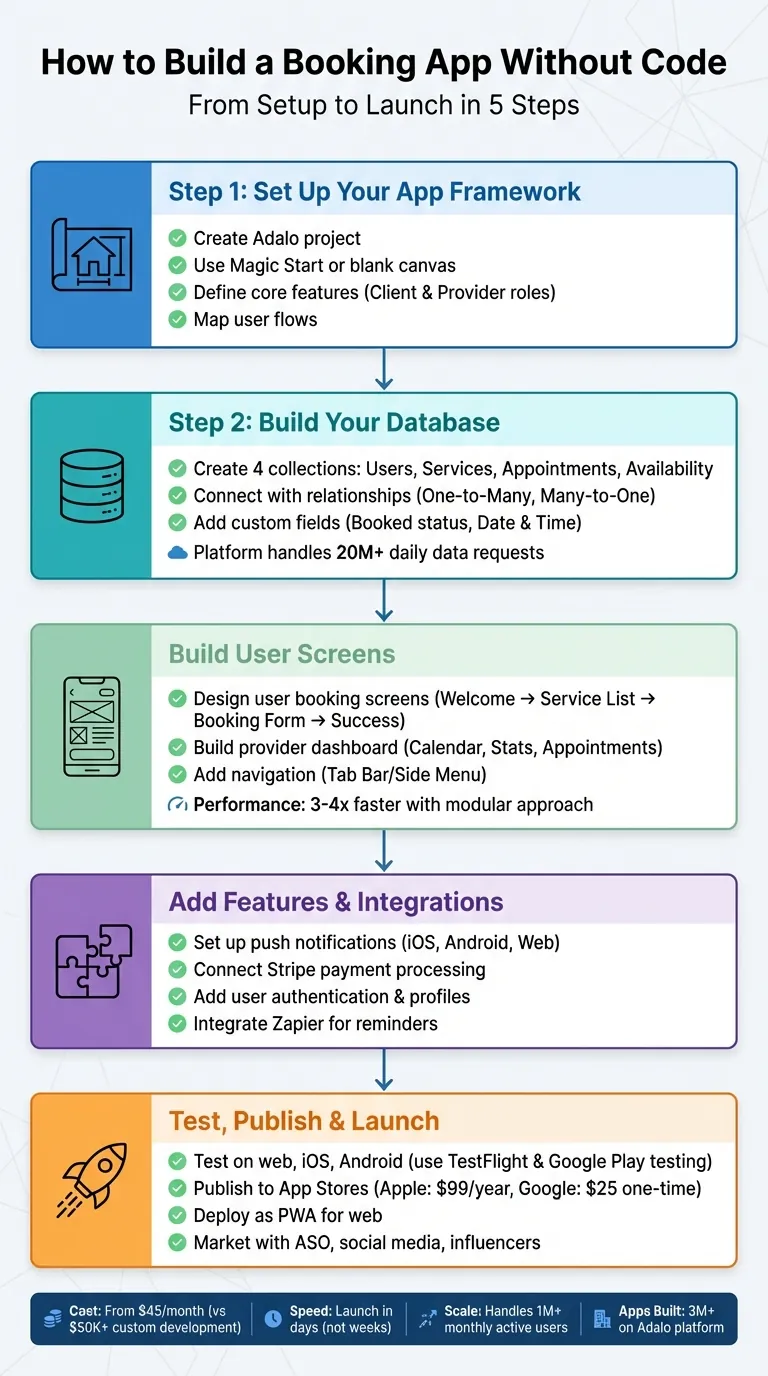
5-Step Process to Build a No-Code Booking App
Step 1: Set Up Your App Framework
Before diving into adding components, it's essential to lay a solid foundation for your app. This includes creating your project, identifying the key features, and mapping out how users will navigate through your app.
Create Your Adalo Project
Start by logging into Adalo and clicking the App Switcher in the top bar to create a new project. Choose a clear and descriptive name, such as "ScheduleNow" or "SalonBooker." To dramatically speed up the setup process, take advantage of Adalo's Magic Start feature—part of the AI Builder that generates complete app foundations from text descriptions. Simply describe your app idea in plain language, something like "a booking app for dog grooming with scheduling and payments," and Magic Start automatically generates the database structure, screens, and user flows. What used to take days of planning happens in minutes.
Prefer to have more control from the outset? You can start with a blank canvas instead. Either way, you'll land in the Builder Canvas, where you can design your screens using the tools in the Left Toolbar. These tools allow you to add components, manage your database, and eventually publish your app. A quick tip: avoid opening the same project in multiple browser tabs. Adalo doesn't support simultaneous editing, and this could lead to unsaved changes.
Define Your Core Features
Think about the essential features your app needs and adapt them to your project. Start by considering the roles of your users. For example:
- Clients: They should be able to browse services, pick available time slots, and view their booking history.
- Providers: They'll need tools to manage their schedules, view upcoming appointments, block unavailable times, and track earnings.
Sketch out each screen and number them to create a clear map of how everything connects. This approach ensures you account for all buttons, forms, and interactions, reducing the chance of missing details or needing to redo work later.
Map Out the User Flow
The user flow is essentially the journey a user takes through your app. For a client, the flow might look like this: Welcome Screen → Service List → Provider Profile → Booking Calendar → Payment → Confirmation Screen. For a provider, it could include steps like: Setup Flow (bio, working hours, services) → Provider Dashboard → Appointment Details → Availability Manager.
Sketch these flows in detail before you start building. Include every interaction—like what happens when a client taps "Book Appointment." What screen comes next? What information is required? How are cancellations handled? Planning these details upfront can save you from rebuilding screens later.
Adalo's modular infrastructure handles over 20 million data requests daily, so having a clean and logical structure will help you make the most of the platform's capabilities. With your user flow mapped out, you'll be ready to tackle your database design in Step 2.
Step 2: Build Your Database and Relationships
Once your app framework is in place, the next step is to create a structured backend to manage bookings effectively. This database is where all the essential details—users, services, appointments, and availability—are stored. Adalo uses a relational database system, which means you can link different collections, allowing information to flow seamlessly between them. With the platform maintaining 99%+ uptime and no caps on database records for paid plans, you can trust it to manage your data reliably as your business grows. Let's break down how to set up your collections for a smooth booking process.
Create Data Collections
Start by opening the Database tab in the left toolbar and adding collections. You'll need at least four: Users, Services, Appointments, and Availability. Each collection serves a specific purpose:
- Users: Include fields like Full Name, User Type (to distinguish between clients and providers), and Time Zone.
- Services: Add fields for Name, Duration (stored as minutes for scheduling calculations), and Price.
- Appointments: Include Date & Time, Status, and a Booked property (True/False) to track availability.
For a quicker setup, you can use Adalo's Appointment Booking feature template, which comes with a pre-configured database and built-in relationships. This is one reason why over 1 million apps have been built on the platform—templates like this help users launch in just days instead of weeks.
Connect Collections with Relationships
To ensure data flows correctly, you'll need to link your collections using relationships:
- Set up a One-to-Many relationship between Users and Appointments. Create two separate links: one for "Appointments as Provider" and another for "Appointments as Client" to allow flexibility for users who may serve both roles.
- Link Services to Users with a Many-to-One relationship, so a single provider can offer multiple services.
- Connect Services to Appointments, enabling the app to automatically pull in details like duration and price during booking.
As you create these relationships, rename them with clear, descriptive labels. For instance, replace generic terms like "Owner" with names like "My Bookings" or "Customer." This keeps your database organized as it grows. Remember, relationships in Adalo are reciprocal—linking one collection automatically creates a corresponding property in the connected collection.
Add Custom Fields for Booking Details
Custom fields can add functionality to your app. In the Appointments collection, include a Booked property (True/False) to filter available slots. Add a Status field to track stages like "Pending", "Confirmed", or "Cancelled." For providers, consider adding fields like Specialties or Profile Photo to help users find the right person. Use the Date & Time property type to store all time-related data, enabling calendar features and scheduling formulas.
Leverage the Set Automatically feature to capture data like user IDs and timestamps during booking. This minimizes errors and speeds up the process. Unlike platforms that charge based on database records or storage, Adalo's $36/month plan includes unlimited data storage—your booking history can grow without unexpected costs. With your database now neatly structured and connected, you're ready to move on to Step 3 and start designing interactive user screens.
Step 3: Build User and Provider Screens
Once your database is ready, it's time to create the interactive screens that make your app functional. These screens will allow clients to book services and providers to manage their schedules. For instance, Adalo's Appointments App Template offers pre-built screens like calendar views, booking forms, and admin tools. You can customize these templates with ease, much like editing a slide deck. With your database and user flows in place, here's how to design mobile app screens for both users and providers.
Design the User Booking Screens
Start with a Welcome screen for login and authentication, followed by a Home screen with a search bar to browse services. Next, create a Service List screen that pulls details like service name, duration, and price directly from your database. When a user selects a service, link them to a Booking Form screen. This form should include date and time selectors that automatically exclude already-booked time slots.
Add a summary section showing the service, provider, date, time, and cost, along with a text input field for special requests or notes. These notes will be stored in your Appointments collection and shared with providers.
After the booking is submitted, direct users to a Success screen. Here, they can choose to add the appointment to their calendar or return to the home screen. This flow ensures a seamless experience for users, from browsing services to finalizing their bookings.
Build the Provider Dashboard
Providers need tools to stay organized. Start with a Dashboard screen that includes a calendar view for appointments, summary stats, and a list of upcoming bookings. Filter this data to show only the logged-in provider's schedule. Add an Appointment Details screen, where providers can review bookings and take actions like approving (marking as confirmed), rejecting (marking as canceled), or rescheduling appointments. Use conditional visibility to display action buttons only when relevant.
Include an Availability Management screen where providers can set their working days, define start and end times, and block out specific dates. Since appointment times are stored in UTC, use formulas to display times in the provider's local time zone. This avoids any confusion and keeps scheduling straightforward.
Add a Home Screen and Navigation
Navigation is key to keeping your app user-friendly. Set up your Login/Sign Up form to direct users to the appropriate section—clients go to their home screen, while providers are sent to their dashboard. Add a Tab Bar or Side Menu for quick access to key sections like "My Bookings", "Profile", and "Home." Use the Building Canvas to map out your app's flow and ensure navigation paths are intuitive.
For advanced features, such as creating waitlists, take advantage of Magic Add. Simply describe the feature in plain language—"add a waitlist for fully booked time slots"—and Adalo's AI generates the necessary components for you. This AI-assisted approach not only keeps your app organized but also benefits from performance improvements, allowing your app to run significantly faster while handling higher user loads efficiently.
Step 4: Add Features and Integrations
Once your screens are set up, it's time to add essential features that keep users informed, handle payments securely, and safeguard data. These integrations will build on your earlier work, creating a smooth and reliable booking experience.
Set Up Notifications and Alerts
Notifications are crucial for keeping everyone informed and reducing no-shows. For instance, when a client books an appointment, both the client and the provider should be notified immediately. Adalo makes this easy with its Trigger Notification action, which supports push notifications for native iOS, Android, and Web (PWA) apps.
To set this up, link the "Trigger Notification" action to your "Confirm Booking" button. Use the appointment data to target the right recipient. For example:
- For new bookings, set the recipient to "Current Appointment > Provider" so the provider gets the alert.
- For cancellations, send the notification to the opposite party.
Make sure to include a "Request Notification Permission" action right after login so users can enable alerts. Keep in mind, push notifications only work if the app is installed as a native app or PWA, and the recipient has been active within the last two weeks.
For time-sensitive reminders—like a 24-hour alert before an appointment—integrate Adalo with an automation tool like Zapier or Make. Set Zapier's trigger to "New or Updated Appointment", filter for "Status = Confirmed", and configure it to send an email or push notification at the desired time. To avoid duplicate alerts, add a "Reminder Sent" flag in your Appointments database.
| Notification Type | Action | Recipient | Recommended Channel |
|---|---|---|---|
| Booking Confirmation | Adalo "Trigger Notification" | Client | Push Notification |
| New Request Alert | Adalo "Trigger Notification" | Provider | Push Notification |
| 24-Hour Reminder | Zapier Integration | Client & Provider | Email or Push |
| Cancellation Alert | Adalo "Trigger Notification" | Opposite Party | Push Notification |
Connect Payment Processing
To handle payments seamlessly, use Adalo's Stripe Payment component. This allows users to pay directly within the app, but they must be logged in for it to work.
Set up the component by specifying the payment amount. You can use a fixed value or dynamic data from your database, like "Current Appointment > Service > Price." Choose USD as the currency and add a charge description, such as "Appointment with [Provider Name]." Don't forget to fill in the Receipt Email field with the user's email so they receive payment confirmations and are easily identifiable in your Stripe Dashboard.
If your app operates as a marketplace, use the Stripe Marketplace component (Stripe Connect). This feature automatically handles split payments, ensuring providers get their share while your platform collects its commission.
Add User Authentication and Profiles
Start by implementing secure user authentication. Adalo includes a built-in Users Collection that stores key information like Email, Encrypted Password, Username, and Full Name. To save time, use the User Profile & Account Settings template to quickly set up login and profile management.
Enhance the user experience by adding custom fields to the Users collection. For a booking app, you might include properties like "Profile Photo", "Phone Number", or "Admin?" (a True/False field to control access to provider dashboards). Use relational fields to link the Users collection to the Appointments collection. For instance:
- "Appointment Owner" connects providers to their created slots.
- "Appointment Guest" links customers to their bookings.
Adalo enforces security by using authentication tokens that expire every 20 days. When a token expires, users must log in again, which helps prevent session hijacking. Additionally, sessions end if a user logs in on another device or clears their browser cache. To make things easier for users, include an Account Settings screen where they can update details like their email, address, or profile photo without needing admin assistance.
Before launching, test authentication on two devices with separate accounts. This ensures notifications and data changes work as expected while maintaining privacy and security.
Step 5: Test, Publish, and Launch Your App
Your booking app is almost ready to go live! With your framework, database, screens, and integrations set up, this final phase ensures your app transitions smoothly from development to launch. By thoroughly testing, publishing, and marketing your app, you'll set the stage for its success.
Test Your App for Issues
Start by testing your app on web, iOS, and Android platforms. Keep in mind that Adalo's "Preview" button only shows the web version, so you'll need to test mobile-specific features directly on devices. Use the Staging Preview feature to see how your app looks on various devices, such as iPhones and Samsung Galaxy phones, before publishing.
Create test accounts for both providers and clients to verify that key features—like booking, cancellations, rescheduling, payments, and notifications—work seamlessly across devices. Double-check that double-bookings are blocked and privacy settings function correctly.
For iOS testing, TestFlight is a handy tool. It allows you to distribute app builds to up to 100 internal testers without needing Apple's review or to 10,000 external testers (which requires Apple's Beta Review). Just remember that TestFlight builds expire after 90 days. For Android, use Google Play's internal testing track to catch any last-minute issues before your app goes live.
"Make sure you fully test your components before you publish. This prevents significant issues." - Adalo Developers
Pay extra attention to U.S.-specific formatting during testing. Dates should follow the MM/DD/YYYY format, times should use a 12-hour clock with AM/PM, phone numbers should look like (555) 123-4567, and prices should appear as $49.99. If your app serves users across multiple states, test its time zone handling to avoid scheduling mishaps.
Publish to App Stores and Web
Publishing your app to the Apple App Store and Google Play Store is where Adalo truly shines. At $36/month, Adalo offers the lowest price for native app store publishing among major platforms—competitors like Thunkable require $189/month for the same capability. For Apple, you'll need a $99/year developer account, while Google charges a one-time $25 fee.
Before publishing, configure your app's branding in Adalo and upload a 1024x1024 PNG icon with a solid background (Apple may reject icons with transparency). For Google Play, prepare a 512x512 icon along with feature graphics for the Play Console. Keep app names short—both stores limit them to 30 characters.
| Requirement | Apple App Store | Google Play Store |
|---|---|---|
| Account Cost | $99/year | $25 one-time |
| Icon Size | 1024 x 1024 px (PNG) | 512 x 512 px |
| Review Method | Human-led | Machine Learning + Human |
| Testing Tool | TestFlight | Internal/Closed/Open Tracks |
Adalo simplifies the build process—just follow the publishing steps in your dashboard. The platform handles the complex App Store submission process, so you can focus on your app's features and user experience instead of wrestling with certificates, provisioning profiles, and store guidelines. For web deployment, consider publishing your app as a Progressive Web App (PWA), which allows users to install it directly from their browsers. Once your app is live, shift your focus to onboarding and growing your user base.
Market Your App and Onboard Users
With your app live, it's time to focus on App Store Optimization (ASO) to improve its visibility. Research keywords, analyze competitors, and create polished screenshots and preview videos. Launch your app on platforms like Product Hunt, BetaList, and AppsThunder to attract early users and gather reviews.
Set up a simple landing page using tools like Carrd or Wix to collect emails and build anticipation before your full launch. Share updates on platforms like X, Reddit, Facebook Groups, and LinkedIn to connect with your target audience. Collaborate with micro-influencers who have a few thousand engaged followers in your niche.
"Excellent content marketing never takes a break. You need to consistently create and promote content - in fact, the more reliable and predictable you are with creating content, the better!" - Sonia Rebecca Menezes, Adalo
Make your app listing stand out with high-quality visuals and videos, and use referral programs and push notifications to encourage reviews and user engagement. Prompt users to leave app store reviews at key moments, like right after a successful booking. Track your app's performance using Adalo's analytics or integrate tools like Google Analytics to monitor downloads, daily visitors, and user engagement.
To reach more users, run Apple Search Ads and Google Mobile Campaigns targeting high-intent audiences. And don't worry about scaling—Adalo's modular infrastructure supports apps with 1 million+ monthly active users, so your booking app can grow without technical limitations or unexpected usage charges.
Conclusion
This guide walks you through creating a booking app without touching a single line of code. From sketching out your framework to launching and marketing your app, these steps turn your idea into a fully functional product.
With Adalo's AI Builder, the process becomes even smoother. Tools like Magic Start generate complete app foundations from simple descriptions, while Magic Add lets you add features by describing what you want. Your app will work seamlessly on iOS and Android, offering features like push notifications for a polished user experience. At $36/month with unlimited usage—no caps on actions, users, records, or storage—Adalo offers predictable pricing that scales with your business.
Whether it's a salon booking system, a fitness class scheduler, or a medical appointment app, this guide provides a clear path from concept to launch. You can start building for free, managing up to 500 records, and upgrade when you're ready to go live. With these tools and steps, your booking app could be up and running, serving customers, faster than you imagined.
Take the first step today and turn your app idea into reality.
Related Blog Posts
- How to Create a Barber Booking App
- How to Create a Hair Salon Booking App
- How to Create any Appointment App
- Building Booking and Reservation Apps with Adalo: A Complete Guide
FAQ
Why choose Adalo over other app building solutions?
Adalo is an AI-powered app builder that creates true native iOS and Android apps from a single codebase. Unlike web wrappers, it compiles to native code and publishes directly to both the Apple App Store and Google Play Store. At $36/month with unlimited usage—no caps on actions, users, records, or storage—it offers the lowest price for native app store publishing with the most predictable pricing model.
What's the fastest way to build and publish an app to the App Store?
Adalo's drag-and-drop interface combined with AI-assisted building through Magic Start and Magic Add lets you go from idea to published app in days rather than months. Describe your booking app concept, and Magic Start generates your database, screens, and user flows automatically. Adalo handles the complex App Store submission process, so you can focus on features instead of certificates and provisioning profiles.
How long does it take to build a booking app?
With Adalo's AI Builder and pre-built templates, you can create a fully functional booking app in days rather than weeks. Magic Start generates your app's foundation in minutes, and the Appointments App Template provides pre-configured databases, screens, and relationships that you can customize immediately.
Do I need coding experience to build a booking app?
No coding experience is required. Adalo's visual builder uses drag-and-drop components, and the AI Builder lets you add features by describing what you want in plain language. Over 1 million apps have been built on the platform by users without technical backgrounds.
How much does it cost to build a booking app with Adalo?
You can launch a booking app with Adalo for $36/month, compared to $50,000+ for custom development. This includes native iOS and Android apps, unlimited database records, and no usage-based charges. You can start building for free with up to 500 records and upgrade when ready to publish.
Can I publish my booking app to the App Store?
Yes, Adalo publishes native apps directly to both the Apple App Store and Google Play Store from a single codebase. You'll need an Apple Developer account ($99/year) and Google Play account ($25 one-time), but Adalo handles the complex submission process automatically.
What features should a booking app have?
Essential features include user authentication, service listings, calendar-based scheduling, payment processing (via Stripe integration), push notifications for reminders, and separate dashboards for clients and providers. Adalo's templates include all these features pre-built and ready to customize.
Can my booking app handle a large number of users?
Yes, Adalo's modular infrastructure scales to support apps with 1 million+ monthly active users. The platform processes 20 million+ data requests daily with 99%+ uptime, and there are no upper limits on users, records, or storage on paid plans.
How do push notifications work in Adalo booking apps?
Adalo supports native push notifications for iOS, Android, and web apps. You can trigger notifications automatically when bookings are confirmed or cancelled, and integrate with Zapier or Make to send timed reminders before appointments—helping reduce no-shows and keep schedules full.
Can I accept payments in my booking app?
Yes, Adalo includes a built-in Stripe Payment component for direct in-app payments. For marketplace apps where providers receive a portion of each booking, Stripe Connect handles automatic split payments between your platform and service providers.
Build your app fast with one of our pre-made app templates
Begin Building with no codeRelated Content
No-Code E-commerce App Development: Build Your Store with Adalo
Build a full-featured mobile and web e-commerce app without coding—product catalogs, carts, secure payments, user accounts, and store publis
No-Code Job Board and Career Platform: Build It with Adalo
Step-by-step guide to create a native mobile job board with search, filters, employer dashboards, push notifications, and app store publishi
How to Build a Food Delivery App Without Code in 2026
Step-by-step guide to build a multi-platform food delivery app without code—design screens, add payments and tracking, test, and launch in w

Build a No-Code Ticketing System in 3 Days
Build a complete no-code ticketing system in three days—database, user roles, notifications, and publish to web, iOS, and Android.