Creating a booking app no longer requires months of coding or a massive budget. With Adalo, a no-code app builder for database-driven web apps and native iOS and Android apps published to the Apple App Store and Google Play, you can design and launch a fully functional app in days. Here's how:
- Database Setup: Adalo’s Collections handle users, services, and bookings with simple relationships for seamless data management.
- AI-Powered Builder: Describe your app idea, and Adalo generates the database, screens, and user flows in minutes.
- Design Tools: Drag-and-drop interface for creating home screens, service listings, and booking forms.
- Booking Logic: Prevent double bookings, manage availability, and send reminders with native actions.
- Payment Integration: Securely process payments with Stripe.
- Push Notifications: Reduce no-shows with reminders sent directly to users’ devices.
- Publishing: Deploy as native iOS, Android apps, and PWAs from one build.
Adalo’s $36/month plan includes unlimited records, users, and actions, making it scalable for businesses of all sizes. Whether you’re managing salon appointments, restaurant reservations, or fitness classes, Adalo simplifies the process, saving you time and money.
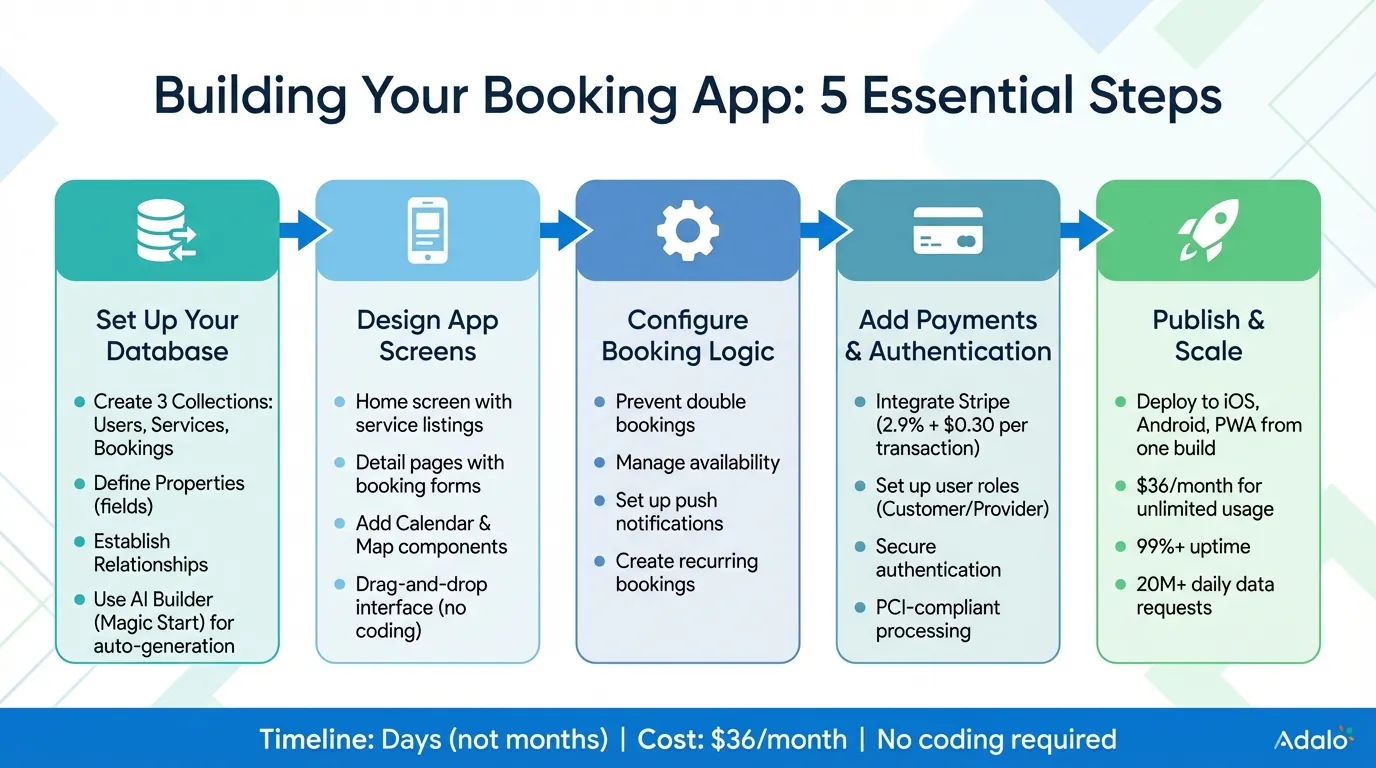
5-Step Process to Build a Booking App with Adalo
How to Make a Booking App in Adalo
Setting Up Your Database for Bookings
The database is the heart of your booking app, storing everything from customer profiles to service details and reservations. In Adalo, this is managed through Collections (tables), Properties (fields like name or price), and Records (individual entries). For a booking app, you'll need three main collections: Users, Services, and Bookings. These collections connect through relationships, enabling features like one user booking multiple services or one service accommodating many reservations.
Creating Collections for Users, Services, and Bookings
Start by building the Users collection, which stores profiles for both customers and service providers. Key fields include:
- Name (text)
- Email (email format)
- Phone (phone field)
- Role (choice field: Customer or Provider)
- Profile Image (image upload)
- Time Zone (used to store times in UTC and convert them for display)
Add a Provider relationship field to link users to services. This sets up a one-to-many relationship, allowing a single provider to offer multiple services.
Next, create the Services collection to define what users can book. Fields to include:
- Service Name (text)
- Description (long text)
- Duration (number in minutes, e.g., 30 or 60)
- Price (formatted as $75.00)
- Max Capacity (number, for group bookings)
Link this collection to the Users collection through the Provider relationship.
Finally, set up the Bookings collection to tie everything together. Important fields here are:
- User (relationship to Users)
- Service (relationship to Services)
- Date (formatted as MM/DD/YYYY)
- Start Time (12-hour AM/PM format)
- Status (choice field: Pending, Confirmed, Cancelled, Completed)
- Payment Status (choice field)
You can also calculate the End Time automatically by adding the service duration to the start time. These relationships ensure data stays organized and scalable. For example, a salon provider can manage unlimited bookings without duplicating their profile. You can also filter bookings by provider and date to display real-time availability. For restaurant apps, you can link table types (stored as Services with capacity limits) to bookings, filtering by date and time to prevent overbooking.
If manual setup feels overwhelming, Adalo's AI Builder can handle it for you.
Using AI Builder to Generate Your Database
Ada, Adalo's AI builder, lets you describe what you want and generates your app. Magic Start creates complete app foundations from a description, while Magic Add adds features through natural language.
Magic Start generates complete app foundations from a simple description. Tell it you need a booking app for a dog grooming business, and it creates your database structure, screens, and user flows automatically—what used to take days of planning happens in minutes. For instance, inputting "Build a salon booking app with users, services, and appointments" creates the Users, Services, and Bookings collections complete with fields and relationships.
You can further refine the database using Magic Add to describe additional features you want. Instead of manually creating fields, simply tell the AI you need "recurring bookings with a true/false toggle" or "a notes field for special requests." For better results, use detailed prompts. Instead of "booking app," try something like, "dog grooming app with prices in USD, dates as MM/DD/YYYY, and one-to-many relationships between providers and appointments." The AI adjusts to your needs, cutting setup time dramatically.
Once the database is generated, test it with sample data. Create a provider user, add a service, and book an appointment to ensure everything connects seamlessly. At $36/month, Adalo's paid plans include unlimited database records, users, and actions—making it easy to scale from 100 bookings to 100,000 without worrying about storage limits or hidden fees. Unlike competitors that charge based on workload units or impose hard caps, your costs remain predictable regardless of growth.
Designing Your App Screens
Once your database is ready, the next step is creating the screens your users will interact with. Adalo's drag-and-drop interface makes this process visual and straightforward—no coding required. On the left, you'll find the Editing Dashboard, your toolbox for adding components like lists, forms, buttons, and calendars directly to your screens. If you're unsure where to start, use Magic Start to create an app using AI by describing your idea, and it will generate a basic screen structure for you automatically. With your Users, Services, and Bookings collections as a foundation, you can design screens that guide users smoothly through your app, from home pages to detailed service views, all while keeping navigation intuitive and visually appealing.
Building the Home Screen and Service Listings
The home screen is the starting point for users to explore your app's services or appointments. Begin by adding a List component connected to your Services collection. Configure the list to show essential details like the service name, provider, price (e.g., $75.00), and availability status. To make searching easier, place a Search Bar at the top, allowing users to filter by service type, provider, or location. You can also include filter buttons for quick options like "Today", "This Week", or specific price ranges, letting users dynamically update the displayed services.
For service providers, consider creating a separate Provider Dashboard. Use Statistics Cards to show key metrics like "5 Appointments Today" and include a calendar view for managing schedules. To ensure your app looks polished, use the Branding button (the artist's palette icon) to set a consistent color scheme and font style across all screens.
Creating Detail Pages and Booking Forms
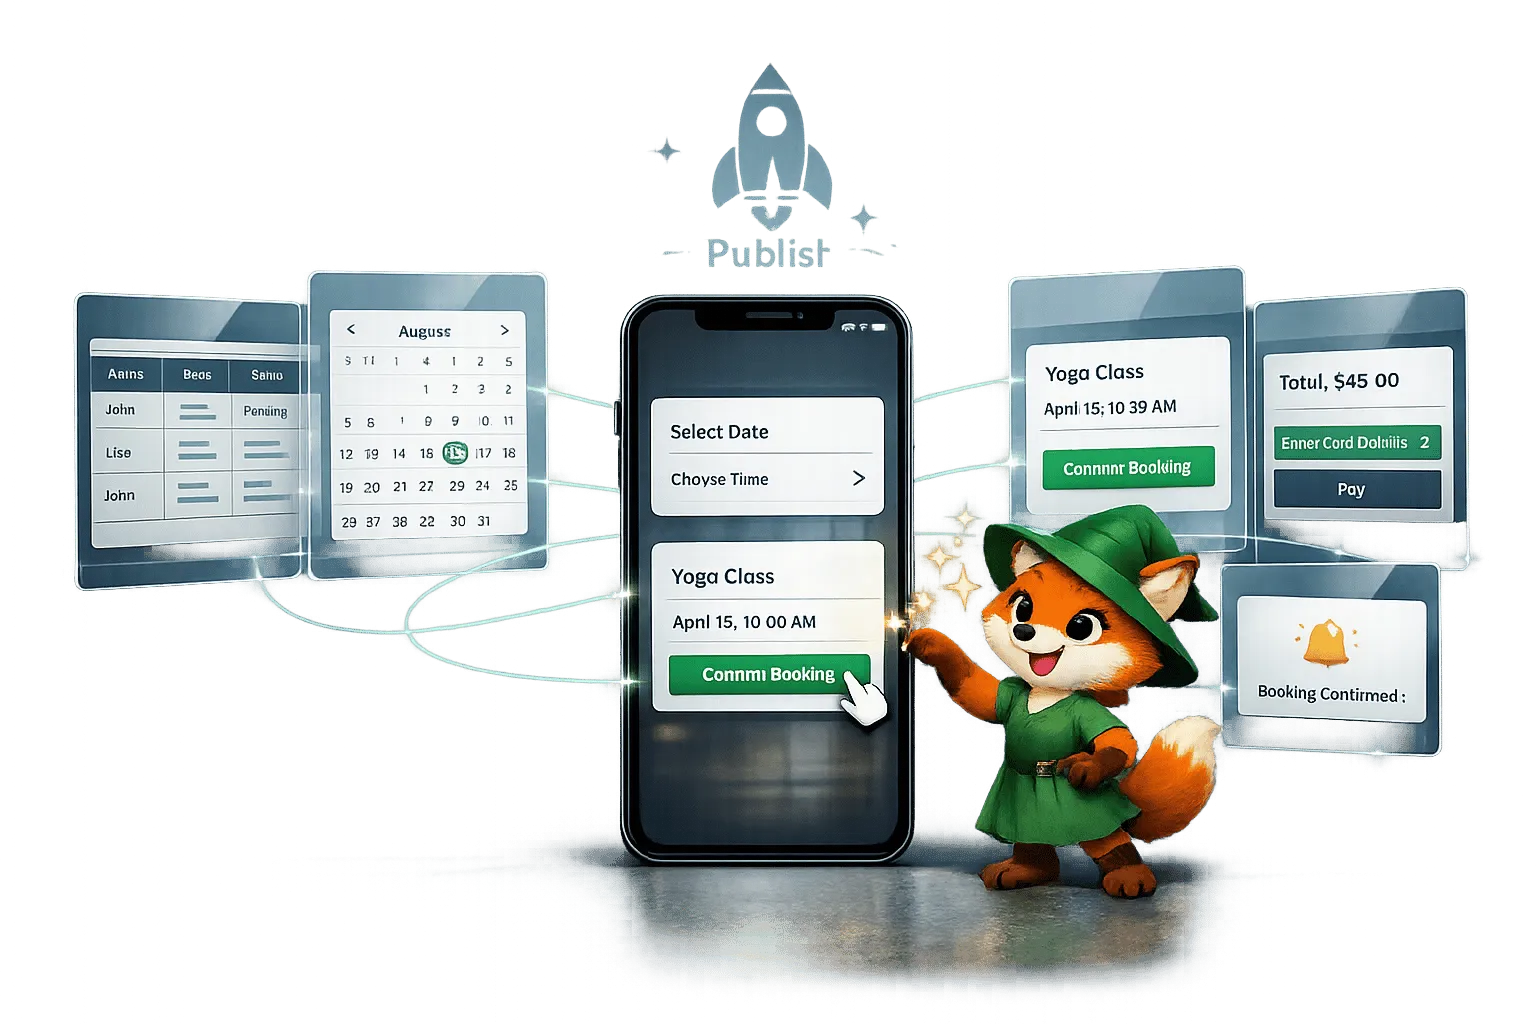
When a user selects a service from the home screen, they should be directed to a Detail Page with all the information they need. Include a large service image, provider bio, detailed description, duration (e.g., 60 minutes), and price. Add a Calendar component so users can pick a date for their appointment. Once a date is selected, show available time slots as clickable buttons, ensuring only open slots appear to prevent double bookings.
Below the time slots, add a Booking Form with fields for name, email, phone number (formatted as (555) 123-4567), and special requests. Keep the form simple by limiting it to 5–7 fields for better usability on mobile devices. Above the submit button, include a summary section that recaps the selected service, date, time, and total price, so users can review their choices before confirming. After submission, direct users to a Success Screen with a confirmation message, a booking reference number, and options to add the appointment to their calendar or set a notification reminder.
Adding Calendar and Map Components
To integrate scheduling features, drag the Calendar component from the Adalo Marketplace onto your detail page. Link it to your Bookings collection, mapping the date and time fields accordingly. Customize settings to match user preferences, such as starting the week on Sunday (common in the U.S.) and enabling month navigation. Apply filters like "Provider is equal to Logged In User" or "Status is Confirmed" to display relevant appointments only. This ensures your calendar reflects the availability stored in your database seamlessly.
For location-based services, include a Map component connected to your Services or Providers collection. Make sure each location in your database has latitude and longitude coordinates so the map can accurately place pins. Add a "Get Directions" button that opens the user's native maps app (Apple Maps for iOS or Google Maps for Android) with step-by-step directions from their current location to the service. For businesses with multiple locations, display all branches on the map using different colored pins, helping users easily identify the nearest option.
Setting Up Booking Logic and Notifications
Crafting the backend logic to prevent double bookings and set up notifications is a crucial step. Adalo's action-based system makes this process straightforward. Without writing any code, you can link your database to user actions. For example, when someone taps "Confirm Booking", the app checks the availability of the chosen time slot, creates the appointment record, and sends a confirmation message.
Configuring Availability and Booking Actions
Start by programming your "Confirm Booking" button to verify if a time slot is open before creating an appointment. Add a "Booked" Boolean property to your database to flag one-on-one appointments. When showing time slots, filter the list to display only those marked as "False" for "Booked".
For group bookings, use a Count action to track reservations. Once the capacity is maxed out, display a "Fully Booked" message and disable further bookings. To avoid double bookings, set filters that only allow reservations during provider hours, without overlapping existing appointments, and on the selected date. You can also use conditional visibility so the "Confirm Booking" button only appears when a valid, unbooked slot is selected.
Store appointment times in UTC format, then use formulas to adjust them to the user's local time zone. Before going live, leverage Adalo's X-Ray tool to spot any performance issues in your booking logic or database queries. X-Ray highlights potential bottlenecks so you can optimize before users encounter slowdowns.
Setting Up Push Notifications for Reminders
Push notifications are a great way to reduce no-shows and keep users engaged. Adalo supports native push notifications for iOS and Android apps, which pop up on the user's device even if the app is closed. For native apps, add a "Notification Permission" action on the Home Screen to prompt users to enable notifications during their first visit. For PWAs, include a "Settings" screen where users can opt in.
To send booking confirmations, attach a "Trigger Notification" action to your "Confirm Booking" button. Choose the recipient (usually the current user), and craft a Title like "Booking Confirmed" and a Body message such as "Your appointment at [Service Name] is scheduled for [Date] at [Time]." For native apps, you can also assign a target screen (like the Booking Details page) that opens when the notification is tapped. PWAs, on the other hand, will redirect users to the Home Screen.
For reminders—like notifications sent 24 hours before an appointment—connect to automation tools like Make.com through the Adalo API. These tools allow you to schedule notifications at specific times. To avoid redundant alerts, add a "Reminder Sent" property (True/False) to your Appointments collection, and set it to True once the notification is sent. Keep in mind, users must be logged in, have the app installed, and have been active within the last two weeks to receive notifications. Test your notifications thoroughly by using two separate accounts on different devices, as notifications can't be sent to the same account.
Managing Recurring Bookings with Automations
For recurring appointments—like weekly classes or monthly check-ups—automated workflows can save time. Tools like Make.com or Zapier can create new records in your Appointments collection based on a set schedule, such as every Monday at 10:00 AM. You can set up a trigger to detect when a booking is marked as recurring and automatically generate future appointments at the desired intervals.
To help users add recurring events to their personal calendars, integrate Agical. This tool can generate "Add to Calendar" buttons using URL parameters. For example, you can specify recurrence with recur=weekly or recur=monthly and set an end date with recuruntil:
https://ics.agical.io/?subject=Yoga%20Class&recur=weekly&recuruntil=2026-12-31&dtstart=2026-02-17T09:00:00
Additionally, include a "Reminder Time" property (in minutes) in your Appointments collection. This allows users to decide when they want to be notified—whether it's 15 minutes, 1 hour, or 24 hours before their appointment. Use this value in your automation workflows to ensure reminders are sent at the right time.
Adding Payments and User Management
Once your booking logic and notifications are in place, it's time to integrate payments and manage user access. These features elevate your app from a simple scheduler to a fully functional business tool.
Adding Payment Processing
Adalo simplifies payment handling with its native Stripe Payment component. This tool processes card transactions securely using Stripe Elements, meaning sensitive card information never touches your servers—keeping you compliant with PCI standards without extra effort. To get started, drag the Stripe component onto your booking confirmation screen and link it to your Stripe account using your API keys. Begin testing with your test keys (pk_test) and switch to live keys when you're ready to launch.
You can configure a "Receipt Email" field to send payment confirmations and identify customers. If your app requires variable pricing, use Magic Text or Custom Formulas to pull the correct amount dynamically from your collections. In the U.S., Stripe's standard rate for online card processing is 2.9% + $0.30 per successful transaction.
Before going live, take advantage of Adalo's Test Mode, which works with Stripe's test card numbers. This allows you to simulate different scenarios, such as successful payments, declined cards, or 3D Secure authentication, helping you troubleshoot any issues before real customers use the app. Keep in mind, users must be logged in to make payments. Once payments are set up, you can focus on managing user authentication and roles to secure your app further.
Setting Up User Authentication and Roles
With payment processing secure, the next step is managing user access. Adalo apps come with a built-in "Users" collection. To differentiate between service providers and customers, add a "User Type" property (a Text field) to this collection. On your Sign-Up screen, include options like dropdowns or radio buttons to let users select their role—"I am a Customer" or "I am a Service Provider." This choice updates the "User Type" field in your database.
Set up your Login and Sign-Up buttons to direct users to different screens based on their role. For instance, service providers might be routed to a dashboard, while customers land on the Home Screen. Use Conditional Visibility to control what each user type sees. For example, only service providers should see an "Edit Availability" button, while customers see a "Book Now" option. Adalo also automatically expires authentication tokens every 20 days to enhance security and prevent unauthorized access.
For a smoother user experience, consider creating separate dashboards tailored to each user type. Service providers might need tools for managing availability and viewing booking lists, while customers would benefit from features like browsing services and viewing their reservation history. By organizing these functions into distinct spaces, you ensure a cleaner and more intuitive app for everyone.
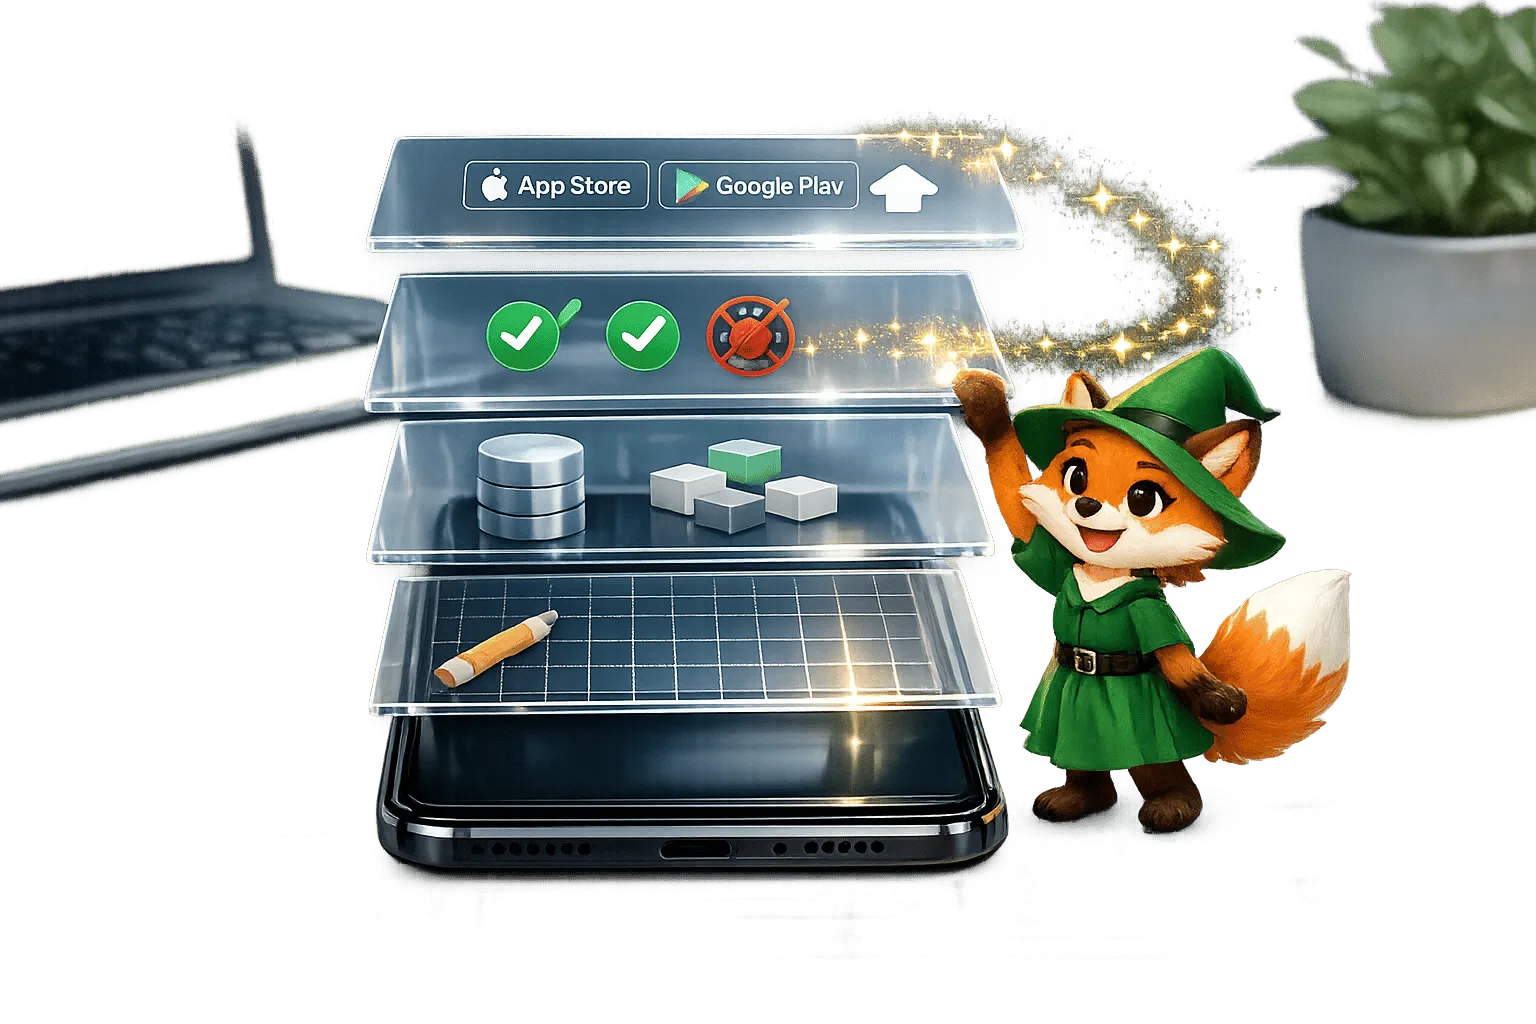
Publishing and Scaling Your App
Publishing to iOS, Android, and PWA
Adalo simplifies the process of bringing your app to market by enabling deployment to iOS, Android, and as a Progressive Web App (PWA) from a single build. This means you design your app once—like an appointment scheduler—and it automatically adjusts for all three platforms, eliminating the need for multiple codebases. Unlike competitors that charge extra for app store publishing or require higher-tier plans, Adalo's $36/month plan includes native iOS and Android publishing to both the Apple App Store and Google Play Store.
For the Apple App Store, you'll need a unique Bundle ID (no spaces), an App-Specific Password, and a Display Name (up to 30 characters). Once that's set, head to the Launch tab to start a TestFlight Build. After the build is complete, use App Store Connect to manage it. Apple typically takes 1–2 weeks to review your submission, while Google Play's process is usually quicker.
Before submitting, preview your app on actual devices to ensure everything works as intended. Add essential metadata—icons, descriptions, and screenshots—through Adalo's publish settings. The platform takes care of the technical submission process, so you can focus on refining your app's features. Double-check that key functionalities perform smoothly across all platforms.
Once your app is live, the next challenge is ensuring it can handle growth.
Scaling for High-Volume Usage
Adalo's modular infrastructure scales to serve apps with millions of monthly active users, with no upper ceiling. Unlike app wrappers that hit speed constraints under load, Adalo's purpose-built architecture maintains performance at scale. The platform processes 20 million+ daily data requests with 99%+ uptime, ensuring your booking app stays responsive even during peak times.
At $36/month, you get unlimited actions, users, records, and storage—no usage-based charges that spike unexpectedly. This contrasts sharply with competitors like Bubble ($69/month) that impose Workload Unit limits, creating unpredictable costs as your app grows. With Adalo, your app can handle increasing appointment volumes without surprise fees.
To maintain performance, use Adalo's X-Ray tool to scan for issues on high-traffic screens, like booking calendars. Optimize your app performance by sticking to native list types instead of custom ones and avoid many-to-many relationships by using numeric properties for record IDs. If you're using Google Sheets through SheetBridge, consider switching to Adalo's native database once you surpass 50,000 records for optimal speed.
The 3-4x faster infrastructure introduced in Adalo 3.0 (launched late 2025) ensures your app stays smooth even during peak booking times. Most external performance reviews predate this major infrastructure overhaul, so current performance significantly exceeds what older benchmarks suggest.
Conclusion
Building a mobile app for bookings and reservations involves five straightforward steps: setting up your database, designing screens, building booking logic, integrating payments, and publishing across multiple platforms. With AI-assisted tools like Magic Start and Magic Add, you can kickstart your app by simply describing your idea, cutting development time from months to just days.
Your app publishes as fully native iOS and Android applications on the Apple App Store and Google Play Store from a single codebase. Built-in push notifications make appointment reminders easy and effective, whether you're managing a salon scheduler, a restaurant reservation system, a fitness class app, or a medical appointment platform. The X-Ray tool helps you identify and fix any issues before they impact users, letting you focus on growing your business.
Start with Adalo's free plan to explore premium features and publish right away. Upgrade when you're ready to launch on mobile.
Related Blog Posts
- How To Create a Content Scheduling App
- How to Create a Caravan Park Management App
- How to Create a Barber Booking App
- How to Create any Appointment App
FAQ
Why choose Adalo over other app building solutions?
Adalo is an AI-powered app builder that creates true native iOS and Android apps. Unlike web wrappers, it compiles to native code and publishes directly to both the Apple App Store and Google Play Store from a single codebase—the hardest part of launching an app handled automatically. At $36/month with unlimited usage, it offers the lowest price for native app store publishing with predictable costs.
What's the fastest way to build and publish an app to the App Store?
Adalo's drag-and-drop interface combined with AI-assisted building through Magic Start and Magic Add lets you go from idea to published app in days rather than months. Describe your app concept, and the AI generates your database, screens, and logic automatically. Adalo handles the complex App Store submission process, so you can focus on features instead of certificates and provisioning profiles.
Can I easily build a booking app without coding experience?
Yes, Adalo's visual builder requires no coding experience. Using drag-and-drop tools and AI-powered features like Magic Start, you can set up your database, design screens, and configure booking logic in days rather than months. The platform handles all the technical complexity behind the scenes.
How does Adalo prevent double bookings in my app?
Adalo allows you to configure booking actions that check availability before creating appointments. By adding a "Booked" Boolean property to your database and filtering time slots to show only open ones, you can prevent double bookings automatically without writing any code.
Can I integrate payment processing into my Adalo booking app?
Yes, Adalo includes a native Stripe Payment component that processes card transactions securely. Sensitive card information never touches your servers, keeping you PCI compliant, and you can configure variable pricing using dynamic formulas from your collections.
How much does it cost to build and scale a booking app on Adalo?
Adalo's $36/month plan includes unlimited database records, users, actions, and storage with no usage-based charges. Your app can grow from 100 bookings to 100,000 without unexpected costs. This compares favorably to Bubble ($69/month with Workload Unit limits) and Thunkable ($189/month for app store publishing).
Does Adalo support push notifications for appointment reminders?
Yes, Adalo supports native push notifications for iOS and Android apps that appear on users' devices even when the app is closed. You can send booking confirmations instantly and integrate with automation tools like Make.com to schedule reminder notifications 24 hours before appointments, helping reduce no-shows.
How long does it take to build a booking app with Adalo?
With Magic Start generating your complete app foundation from a description, you can have a functional booking app prototype in hours. Full development including customization, payment integration, and testing typically takes days rather than the months required with traditional development.
Can I publish my booking app to both iOS and Android?
Yes, Adalo publishes native iOS and Android apps from a single codebase. Design your app once, and it automatically adjusts for both platforms plus PWA. The $36/month plan includes publishing to both the Apple App Store and Google Play Store.
What features should a booking app have?
Essential features include user authentication, service listings with pricing, a calendar for date selection, time slot availability, booking forms, payment processing, confirmation screens, and push notification reminders. Adalo supports all of these through its native components and integrations.
Build your app fast with one of our pre-made app templates
Begin Building with no codeRelated Content
Building Your Mobile App: Adalo's Complete Development and Deployment Guide
Step-by-step guide to design, build, test, and publish cross-platform mobile apps and PWAs with AI tools, databases, testing, and app store

How to Create a Holiday Rentals Management App
Step-by-step guide to build a holiday rentals management app: database setup, booking logic, Stripe payments, role-based permissions, and pu

Step-by-Step Guide: Building a Lyft Clone with Adalo
Build a Lyft-style rideshare app using Adalo’s no-code platform with trip booking, driver-rider matching, and payments — no coding required.
No-Code Job Board and Career Platform: Build It with Adalo
Step-by-step guide to create a native mobile job board with search, filters, employer dashboards, push notifications, and app store publishi