


Managing customer support without a dedicated system quickly becomes chaos—requests get lost in email threads, response times slip, and frustrated customers churn. Building a proper ticketing system traditionally requires hiring developers, investing months of development time, and spending a significant budget, putting it out of reach for startups and small teams who need it most.
That's where Adalo comes in. Adalo is a no-code app builder for database-driven web apps and native iOS and Android apps—one version across all three platforms. AI-assisted building and streamlined publishing enable launch to the Apple App Store and Google Play in days rather than months. With this powerful platform, you can create a fully functional ticketing system that centralizes support requests, assigns tickets to team members, and tracks resolution status—all without writing a single line of code.

Why Adalo Works for Building a Ticketing System
Adalo is a no-code app builder for database-driven web apps and native iOS and Android apps—one version across all three platforms, published to the Apple App Store and Google Play. This cross-platform capability is exactly what a modern ticketing system demands—your support team can manage tickets from desktop browsers while customers submit and track requests directly from their phones, all powered by the same backend database.
Having your ticketing app available on both app stores means customers can receive push notifications the moment their ticket is updated, dramatically improving response satisfaction. Your support agents get instant alerts for high-priority issues, and managers can monitor team performance from anywhere. This always-connected experience transforms customer support from a reactive inbox into a proactive communication channel.
Customer support requests piling up in scattered email threads and spreadsheets? Building a dedicated ticketing system used to mean hiring developers, waiting months, and spending thousands. Not anymore. In just three days, you can create a fully functional support ticketing system that rivals tools like Zendesk or Intercom—without writing a single line of code.
Adalo, an AI-powered app builder, lets you create database-driven web apps and native iOS and Android apps—published to the App Store and Google Play—from a single editor. That means your ticketing system can live on the web, in your customers' pockets, or both, all managed from one place.
This guide walks you through the complete process: setting up a database on Day 1, designing intuitive screens on Day 2, and adding automation with tools like Zapier before publishing on Day 3. With drag-and-drop tools and built-in integrations, you'll cut development time by up to 90% and save up to 48% compared to traditional development. By the end, you'll have a live, cross-platform system ready to centralize customer support and streamline your team's workflow.
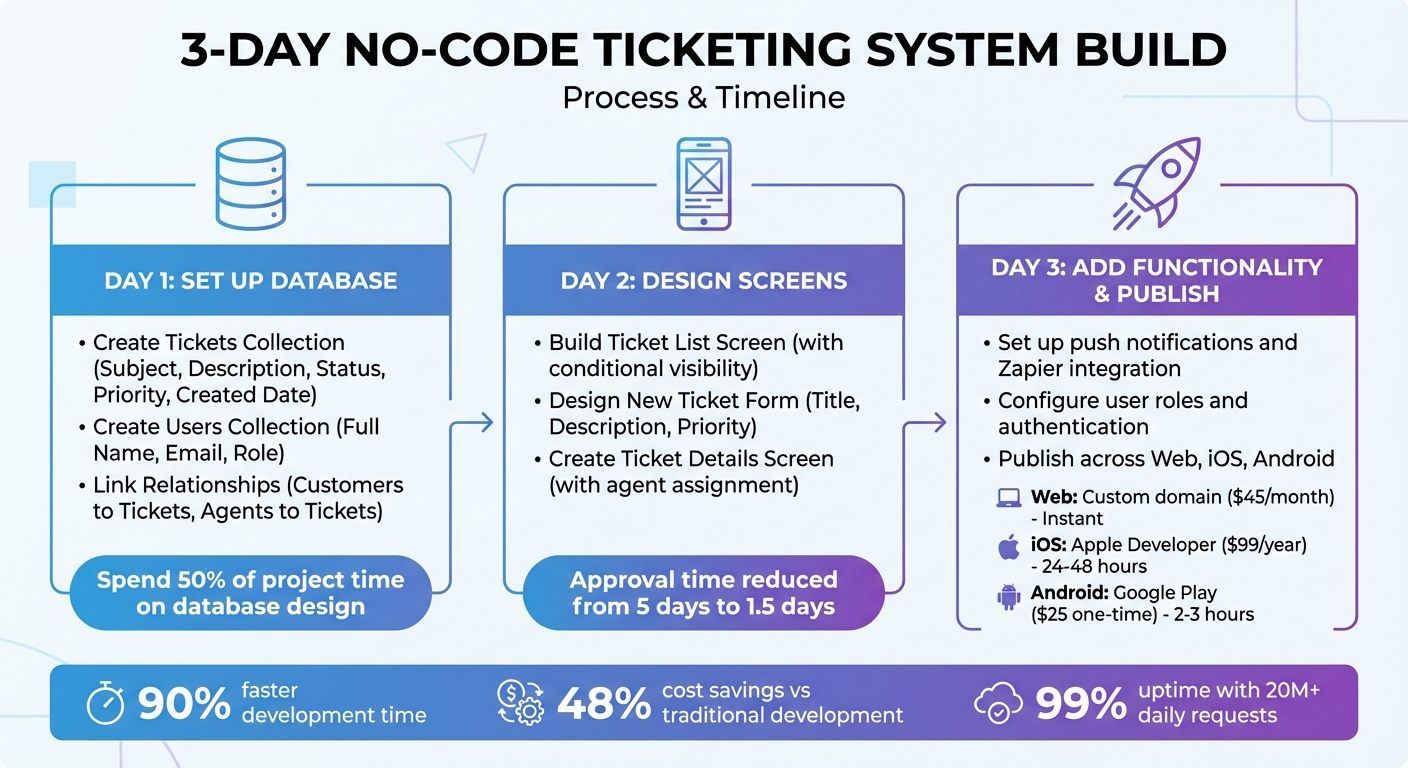
3-Day No-Code Ticketing System Build Process with Adalo
Why Adalo Is Perfect for Building a Support Ticketing System
Adalo is an AI-powered app builder for database-driven web apps and native iOS and Android apps—one version across all three platforms, published to the Apple App Store and Google Play. This makes it the ideal choice for creating a ticketing system that your support team can access from desktop browsers while your customers submit requests directly from their phones.
Having your ticketing app available on both app stores means customers can reach you instantly with push notifications alerting them to ticket updates, status changes, and resolutions. Your support agents stay connected too, receiving real-time alerts for new tickets and escalations whether they're at their desks or on the go.
With Magic Start, you can describe your ticketing system and generate a complete app foundation—database structure, screens, and user flows—in minutes rather than days. Magic Add lets you expand functionality by simply describing what you need: "Add a priority filter to the ticket list" or "Create an agent assignment dropdown." The platform's 3-4x faster performance since the 2026 infrastructure overhaul ensures your support team won't be waiting on slow load times during high-volume periods.
How to build a no-code ticketing support system like Intercom or Zendesk
Day 1: Set Up Your Database Collections
Your database serves as the backbone of your ticketing system. It holds all the essential information—support requests, customer details, and agent assignments. With Adalo's built-in database, setting up collections (similar to spreadsheet tabs) and defining properties (columns) is straightforward. A well-thought-out database structure saves you from tedious reconfigurations down the road.
Spend at least 50% of your project time designing the database before building screens, as reconfiguring tables later can take 15–30 minutes per table. With paid plans offering no record limit caps, you can scale your ticket volume without worrying about hitting storage ceilings—a critical advantage for growing support operations.
Create the Tickets Collection
The "Tickets" collection is the heart of your system, where every support request will be stored. Here's how to structure it:
| Property Name | Property Type | Description |
|---|---|---|
| Subject | Text | A brief summary of the customer's issue |
| Description | Text | A detailed explanation of the problem |
| Status | Text | Current state (e.g., New, In Progress, Resolved) |
| Priority | Text | Urgency level (e.g., Low, Medium, High) |
| Created Date | Date/Time | Automatically tracks when the ticket was submitted |
The Subject field acts as the record identifier. Ensure at least one sample ticket is fully populated; otherwise, Adalo may not recognize empty columns during later configurations.
Create the Users Collection
Adalo automatically includes a Users collection to handle authentication. You'll need to add custom properties to it:
- Full Name (Text): Stores the user's name.
- Email (Text): Stores the user's email address.
- Role (Text): Defines whether the user is a "Customer" or "Support Agent."
The Role field is critical for controlling user permissions—customers and agents will have different levels of access. User records are automatically linked to their submitted tickets and assigned roles, making it easier to manage the system.
Link Relationships Between Collections
To ensure your data stays consistent, you'll need to link your collections. Relationships in Adalo are reciprocal, meaning a link between two collections automatically creates corresponding properties in both.
- Link Customers to Tickets:
Add a Relationship property to the Tickets collection called "Customer" and link it to the Users collection. Select the option where "A user can have multiple tickets, but a ticket belongs to only one user". This creates a one-to-many relationship—customers can submit multiple tickets, but each ticket is tied to a specific customer. - Link Agents to Tickets:
Add another relationship property to the Tickets collection called "Assignee" and link it to the Users collection again. Use the same one-to-many setup. This ensures support agents can handle multiple tickets, while each ticket is assigned to only one agent for accountability.
Finally, rename the reciprocal properties that Adalo creates in the Users collection. Change them to something clear, like "Submitted Tickets" and "Assigned Tickets." This helps you filter and display data correctly—customers will only see tickets they've submitted, and agents will only see tickets assigned to them. These small adjustments simplify development and make the system more intuitive.
Day 2: Design Screens and User Flows
Now that your database is set up, it's time to focus on creating the no-code web app user interface. This is where users will interact with your app. Adalo's drag-and-drop builder simplifies this process, enabling you to design three essential screens: Ticket List, New Ticket Form, and Ticket Details.
The visual builder has been described as "easy as PowerPoint," and you can display up to 400 screens at once on the canvas—making it simple to see your entire app architecture while building.
Build the Ticket List Screen
Start by opening the Add Panel (click the plus button) and dragging a List component onto the canvas. Link this list to your "Tickets" collection to display live data. Configure each list item to show key details like Subject, Status, Priority, and Date Created. For better organization, sort the tickets by Date Created, showing the newest entries at the top.
To make the interface more user-friendly, use conditional visibility to color-code ticket statuses. For example, you could assign different colors to statuses such as Open, In Progress, and Resolved, making it easy for users to scan the list at a glance. Finally, add an action to each list item so that tapping it navigates users to the Ticket Details screen.
Design the New Ticket Form
On a new screen, drag a Form component and connect it to your "Tickets" collection. Add input fields for Title, Description, and Priority Level, mapping each field to the corresponding property in your database. To ensure tickets are linked to the correct user, configure the "Created By" field to automatically pull data from the Logged-in User.
Set up the Submit button to create a new ticket and redirect users to either the Ticket List screen or a confirmation page. Systems like this have been shown to significantly improve efficiency—one example saw client approval times drop from an average of 5 days to just 1.5 days after implementing a similar portal.
Alternatively, use Magic Add to speed up form creation: describe "a ticket submission form with title, description, and priority dropdown" and let the AI generate the component structure for you.
Create the Ticket Details Screen
This screen is designed to give support agents the tools they need to manage tickets effectively. Start by displaying individual ticket details using Text components for fields like Subject and Description. Add a Dropdown component for updating the ticket's status, with options like Open, In Progress, and Resolved.
To assign tickets to support agents, include another dropdown linked to your "Users" collection. Filter this dropdown to show only users with the Support Agent role. Use conditional visibility to ensure this dropdown is visible only to agents, keeping it hidden from customers.
Finally, configure the Submit button to save any changes and return users to the previous screen. Adalo's infrastructure, which handles over 20 million daily requests with 99%+ uptime, ensures your ticketing system will remain reliable even as your user base grows. The X-Ray feature can identify performance issues before they affect users, helping you maintain smooth operations as ticket volume increases.
Day 3: Add Functionality and Publish
On Day 3, you'll bring your prototype to life by adding key features like notifications, user roles, and building and publishing your web app. These steps turn your design into a fully functional system capable of managing real customer support requests.
Set Up Actions and Notifications
To keep users informed, start by enabling push notifications. Add a "Request Notification Permission" action that prompts users when they launch the app. Then, link a "Trigger Notification" action to the Submit button on the ticket form. Use Magic Text to personalize notifications with dynamic details, such as: "New Ticket: [Ticket Subject]". You can also include other details like Priority or Status to help agents prioritize tasks.
For email notifications, integrate your app with Zapier. Create a Zap that triggers when a new record is added to the Tickets collection in Adalo. This allows you to automate email alerts to both customers and agents whenever a ticket is created or updated. Make sure your database includes an "Email" field to specify the recipient.
Set Up User Authentication and Roles
To differentiate between customers and agents, add a "Role" property to your Users collection. Assign default roles, like "Customer", during the sign-up process.
Use conditional visibility to tailor the app experience based on user roles. For instance:
- Show the ticket assignment dropdown only to users with the "Agent" role.
- Filter the ticket list so customers see only their own tickets, while agents can view all or only their assigned tickets. Use a filter like:
Tickets > User > Email is equal to > Logged In User > Email.
For sensitive fields, such as "Internal Notes" or "Ticket Status", mark them as "Administrative" so they're hidden from customers but visible to agents. To simplify onboarding, consider enabling social login options like "Sign in with Google" or "Sign in with Apple" using Adalo's built-in tools.
Publish Your Ticketing System
With the functionality and access controls finalized, it's time to publish your app. Use Adalo's Preview mode to test your app with at least 50 sample tickets. Simulate workflows on different devices, such as an iPhone 13 Pro or Samsung Galaxy S20, to ensure smooth performance. Test everything—from ticket creation to status updates and notification triggers.
Adalo's single-build system makes publishing straightforward. A single deployment works across web, iOS, and Android. Here's what you'll need for each platform:
- Web: Free plans use an Adalo subdomain (e.g., subdomain.adalo.com). Paid plans, starting at $36/month, allow custom domains like app.yourcompany.com.
- iOS: Requires an Apple Developer Account, which costs $99/year. Apple's review process typically takes 24–48 hours.
- Android: Requires a Google Play Developer Account, available for a one-time fee of $25. Google reviews apps within 2–3 hours.
| Platform | Requirement | Review Timeline |
|---|---|---|
| Web | Custom Domain (Paid) | Instant |
| iOS | Apple Developer Account ($99/yr) | 24–48 Hours |
| Android | Google Play Developer Account ($25 one-time) | 2–3 Hours |
Once published, your ticketing system is live and ready to manage real customer requests. Unlike platforms that charge usage-based fees that can create bill shock, all Adalo plans now include unlimited usage—no surprise charges as your ticket volume grows. With 99%+ uptime, your app will be reliable from day one.
How Adalo Compares to Alternatives for Ticketing Systems
When building a support ticketing system, you have several platform options. Here's how Adalo stacks up against common alternatives:
Bubble offers more customization options, but that flexibility often results in slower applications that struggle under increased load. Bubble's mobile solution is a wrapper for web apps rather than true native compilation, which can introduce performance challenges at scale. Their pricing starts at $59/month with usage-based charges (Workload Units) and record limits that can be difficult to predict. Adalo's native iOS and Android compilation means one codebase automatically updates all deployed versions—web, App Store, and Play Store.
Glide excels at spreadsheet-based apps with fast setup, but creates generic, template-restricted apps with limited creative freedom. Glide doesn't support Apple App Store or Google Play Store publishing, and pricing starts at $60/month with data record limits that attract additional charges. For spreadsheet integration, Adalo's SheetBridge connects Google Sheets directly to your database without the template restrictions.
FlutterFlow is a low-code option for technical users, but requires setting up and managing a separate database—significant learning complexity that can create scale problems without optimal configuration. Their pricing starts at $70/month per user for app store publishing, and that still doesn't include database costs. Adalo's built-in database removes this complexity entirely.
| Platform | Starting Price | Native Mobile | Database Included | Usage Limits |
|---|---|---|---|---|
| Adalo | $36/month | Yes (iOS & Android) | Yes, unlimited records | Unlimited |
| Bubble | $59/month | Web wrapper only | Yes, with limits | Workload Units |
| Glide | $60/month | No | Yes, with limits | Row limits |
| FlutterFlow | $70/month/user | Yes | No (external required) | Varies by DB |
Note: Most third-party platform comparisons and ratings predate Adalo 3.0's infrastructure overhaul in late 2026, which delivered 3-4x faster performance and modular scaling architecture.
Next Steps
With your ticketing system now live, you've built a robust platform that covers everything from database configuration to user authentication and deployment. This foundation supports further improvements as your support needs evolve.
Consider expanding functionality by introducing real-time user chat to facilitate instant communication between customers and support agents. You can also integrate tools like Zapier to automate follow-ups in Slack or Microsoft Teams whenever high-priority tickets come in. These additions can streamline your workflow and enhance user satisfaction.
For teams experiencing growth, connecting to external database integration options can help handle higher ticket volumes and more complex queries efficiently. Adalo's modular infrastructure scales to serve apps with over 1 million monthly active users, with no upper ceiling—so your ticketing system can grow with your business. The Design Versions tool allows you to experiment with new features—such as dark mode or advanced filtering—without disrupting your current system.
To ensure your platform scales effectively, focus on monitoring performance and strengthening security. Use tools like Google Analytics to track metrics such as active users, screen visits, and ticket trends. This data can guide you in scaling and improving the user experience. On the security front, enable two-factor authentication (2FA) for all admin accounts and schedule regular security audits to safeguard sensitive customer information.
With Adalo's component marketplace, API integrations, no-code API builders, and automation options, you have the flexibility to add features as your support requirements grow—all without needing to write any code.
Related Blog Posts
- 5 Steps to Monetize Your No-Code Mobile Application
- Publishing Apps to App Stores: A Beginner's Guide
- How to Launch Your First Mobile App Without Coding
- Best Practices for NLP in No-Code Chatbots
FAQ
| Question | Answer |
|---|---|
| Why choose Adalo over other app building solutions? | Adalo is an AI-powered app builder that creates true native iOS and Android apps. Unlike web wrappers, it compiles to native code and publishes directly to both the Apple App Store and Google Play Store from a single codebase—the hardest part of launching an app handled automatically. Paid plans include unlimited database records and no usage-based charges. |
| What's the fastest way to build and publish an app to the App Store? | Adalo's drag-and-drop interface and AI-assisted building let you go from idea to published app in days rather than months. Magic Start generates complete app foundations from descriptions, and Adalo handles the complex App Store submission process so you can focus on features instead of certificates and provisioning profiles. |
| Can I easily build a support ticketing system without coding? | Yes, with Adalo's AI-powered app builder, you can create a fully functional support ticketing system without writing any code. Using drag-and-drop tools and built-in database features, you can build a professional ticketing platform with user authentication, ticket management, and automated notifications in just three days. |
| How do I set up user roles to separate customers from support agents? | Add a 'Role' property to your Users collection and assign default roles during sign-up. Then use conditional visibility to show different features based on roles—for example, displaying ticket assignment dropdowns only to agents while filtering ticket lists so customers see only their own submissions. |
| Can I add push notifications and email alerts to my ticketing system? | Yes, Adalo supports push notifications natively, and you can personalize them with dynamic ticket details using Magic Text. For email notifications, integrate with Zapier to automatically send alerts to customers and agents whenever tickets are created or updated. |
| How much does it cost to publish my ticketing app to mobile app stores? | Adalo's paid plans start at $36/month with unlimited usage and app store publishing. You'll also need an Apple Developer Account ($99/year) for iOS and a Google Play Developer Account ($25 one-time fee) for Android. Unlike some competitors, Adalo has no usage-based charges or record limits on paid plans. |
| How reliable is an Adalo-built ticketing system for production use? | Adalo's infrastructure handles over 20 million daily requests with 99%+ uptime. The 2026 infrastructure overhaul delivered 3-4x faster performance, and the modular architecture scales to support apps with over 1 million monthly active users with no upper ceiling. |
| Which is more affordable, Adalo or Bubble? | Adalo starts at $36/month with unlimited usage and no record limits on paid plans. Bubble starts at $59/month with usage-based Workload Unit charges and record limits that can create unpredictable costs. Adalo's pricing model eliminates bill shock as your app grows. |
| Is Adalo better than Glide for mobile ticketing apps? | For mobile ticketing apps, Adalo offers significant advantages: native iOS and Android compilation with App Store and Play Store publishing, which Glide doesn't support. Glide excels at quick spreadsheet-based apps but restricts you to templates and doesn't create native mobile apps. |
| How long does it take to build a support ticketing system? | Following this guide, you can build and publish a complete support ticketing system in three days: Day 1 for database setup, Day 2 for screen design, and Day 3 for functionality and publishing. Magic Start can accelerate the initial setup by generating your app foundation from a description. |


