Building a web app from scratch traditionally requires months of coding, a team of developers, and a significant budget—resources most entrepreneurs and small businesses simply don't have. Even with a brilliant idea and a clear vision, the technical barriers of web development can feel insurmountable when you lack programming expertise.
Fortunately, no-code platforms have transformed what's possible for non-technical creators. Adalo is a no-code app builder for database-driven web apps and native iOS and Android apps—one version across all three platforms. AI-assisted building and streamlined publishing enable launch to the Apple App Store and Google Play in days rather than months.

Why Adalo Is the Perfect Tool for Building Your First Web App
If you've been searching for a way to build a web app without learning to code, you're in the right place. Adalo is a no-code app builder for database-driven web apps and native iOS and Android apps—one version across all three platforms, published to the Apple App Store and Google Play. This means you can start with a web app today and easily expand to native mobile apps when you're ready—all from the same project.
What makes Adalo especially powerful for web app creators is the flexibility to grow. While standard web apps and PWAs can't reach users through app stores, Adalo lets you build once and deploy everywhere, including native apps with push notifications to keep your users engaged. Whether you're creating a simple tool or a full-featured platform, Adalo gives you the foundation to scale without technical barriers.
Getting Started: What is a Web App, and What Do You Need to Build One?
There are actually two different types of web apps. The first kind, known simply as web apps, are apps you can access on the internet using any browser, from a tablet, phone, or desktop.
Because web apps are essentially websites, they’re limited in functionality: You won’t be able to use your device’s features, like GPS, camera, and more, whilst using a web app.
The second kind of web apps are Progressive Web Apps (PWAs), which you download directly to your mobile device from a link or QR code. PWAs use your mobile device’s processor and memory, so you don’t need a constant internet connection to use them. Many are able to use some of your device’s features, like your camera and GPS.
You should remember that neither web apps nor PWAs are native mobile apps. This is because they can’t be published in the Apple App Store and Google Play Store.
Envision Your No-Code Web App
Before you start with the fun stuff, it’s recommended to have a plan in writing so you can get all your ideas on paper. Follow these pointers:
- List all the features and functions you wish to add. Do you want to receive payments, have a chatbot, collect weather data, or anything else?
- Sketch out how you’d like your app to look. You don’t have to be a professional designer; simple mock-ups will do.
- Get a membership with Adalo, one of the best platforms for building a no-code web app. Adalo is easy to learn and use — you won't need any coding or technical skills to get started.
We’ll walk you through using Adalo’s simple building interface to create your web app. After you read this guide, you’ll be armed with more than enough knowledge to turn your web app idea into a reality.
The Parts of A Web App
Now that you’ve got your plans and an Adalo account, we’ll introduce you to the 3 main parts of any web app:
- The Front End: Also known as the user interface (UI), the front end is the part of your app that users see, read, and interact with. Every screen, button, text, and picture on your web app is a part of its front end.
- The Backend: While the backend is hidden from the user, it’s constantly executing tasks. Your web app’s backend will pull up information, connect with third-party apps, and collect and store data.
- The Database: Think of the database as your web app’s memory bank. The information is stored in the database when a user purchases and fills out a form to book an appointment or order.
Adalo pre packages these three components, but you can customize them to your particular needs and tastes. For instance, you can add more features and functions, gather data that’s specific to your industry, and revamp your web app’s front end to match your brand.
How To Build a Web App: 8 Code-Free Steps
Step 1: Select Your Template
Adalo has various templates, including pre-made app “blanks” that come preloaded with several screens and a database. You’ll find templates that can make a wide assortment of web apps, such as:
- Templates for personal trainers and fitness centers
- A real estate template to manage listings and properties
- A social media template
- A template for ordering from a restaurant or food truck
- An e-commerce template
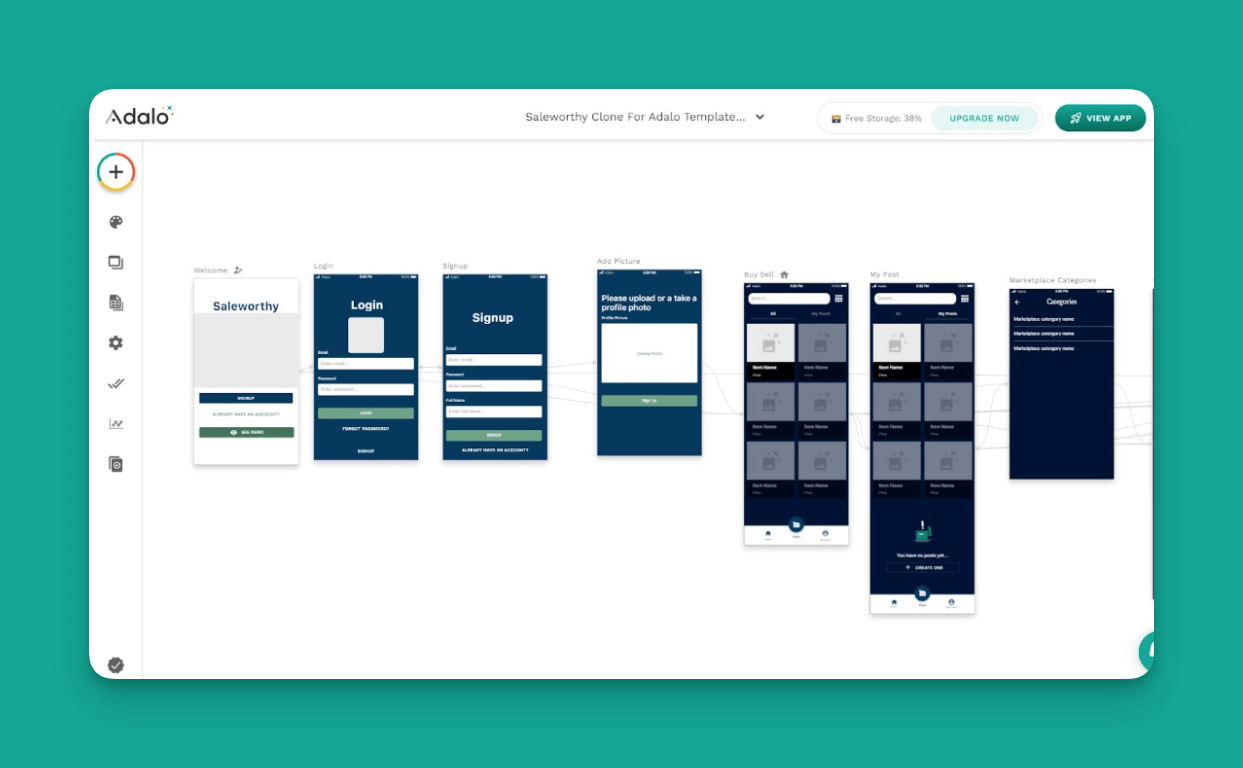
Check out Adalo’s entire template library and see for yourself! Adalo’s app-building interface will load on your screen after you pick the template you want. The app-building interface is the primary tool you’ll use to cobble your app together. It’s made up of these three components:
- The Editing Dashboard (left-hand side, vertical): This is the building tool in Adalo. You’ll use this to add pictures and text, create new screens, and more.
Made up of 7 icons, you’ll also use the editing dashboard to jump from screen to screen, edit your database, check your app’s analytics, and more. Just hover your cursor above each icon to see its function.
- The Building Canvas (center of the screen): You’ll cobble your app together on the building canvas.
The Menu (top of the screen, horizontal): With Adalo, you can work on up to 10 different web apps (but you can only publish one). Use this to toggle between projects, access your account settings, or see how your app appears live.
Step 2: Customize Your Data
Configuring your database information is a good idea before you start building your app’s user interface. Doing this first will ensure your app gathers all the data it needs.
Customizing your database from any Adalo template is a breeze. Simply navigate to the “Database” icon, which is the 4th one down. Click it, and consider the following:
- Adalo’s Database has two parts: Collections and Properties. Collections are the actual databases themselves, appearing as spreadsheets. Properties are the information inside the collection.
- Each template comes preloaded with records and collections: Consider these as a starting point. For instance, Adalo’s Salesworthy clone (the template for e-commerce) already has a collection filled with products, called “Marketplace Items.”
Click the vertical 3-dot button to add your own and select “View/Edit Records.” Then click on the pre-existing item and replace each record with your own.
You can add pictures and a description of your own items. Or, create completely new properties for each collection by selecting the “Add Properties” button. Adalo will show these on a screen, which your clients will see. It’s that simple.
- Want to add a completely new collection? You can create a new collection catered to your data needs. Do this by clicking the “Add Collection” button and giving your new collection a title. Then, add your collection’s properties by selecting “Add Properties.”
Step 3: Branding and Design
Adalo excels at customizing your app’s look to your exact tastes and needs. Customize your app by clicking the colorful button at the top of your editing dashboard. This button adds components and screens. Use this feature whenever you need a new button, picture, text box, form, or anything else.
You’ll also use this colorful button to install features into your app. For instance, if you want to add a calendar, Stripe integration, or more, you’ll find it here.
Changing your app’s colors is also a breeze. Start by clicking the “Branding” button, which is right below the colorful one used to add screens and components. Select the color you wish to feature — when you do so, you’ll see each screen’s color change on your building canvas.
The “Branding” button works similarly with fonts as it does screen color. Just select the font button for body text and headings to configure your app’s fonts to your preferences.
Step 4: Add New Screens
While Adalo’s templates come packed with all the features and functionality you need, you might want to add a few new screens that offer more features. Adalo gives you a couple of ways to add new screens.
If you want to add a screen with premade functions, forms, text boxes, and more, press that colorful button at the top of the building interface and select the screen you want to add.
You can also add new screens using the “Screens” button on the building interface. Pressing this will take you to the “Add Screens” function.

Step 5: Set Up Navigation
Ensuring each screen opens to the new intended screen is critical to providing a smooth and enjoyable user experience (UX). While all the screens on your premade come pre-connected to the screen they open, customizing new buttons for navigation is simple. Follow these steps:
- Find the screen you want to serve as a starting point. You can navigate to your screens using the building canvas by hitting the “Screens” button on the Editing Dashboard.
- Click on the element that will send users to another screen. This element can be a button, image, textbox, or item in a list.
- Scroll to “Advanced Options” and select “Add Another Option.”
- Hover your cursor over “Link”. A new box with all your app’s current screens will appear. Click on the screen you want to land on.
- You can also add a new screen or navigate to an external website.
We can’t emphasize enough how crucial smooth navigation is to your app’s overall functionality. So, it’s a good idea to periodically check each element’s links to ensure they work correctly.
Step 6: Preview and Test Your App
After you’ve spent some time constructing your web app, you’ll want to periodically check how it appears live. This will allow you to make small changes and nip problems in the bud as they arise.
With Adalo, previewing your app is super simple. Just press the “View App” button on the horizontal Top Menu in the right-hand corner of your screen, and select the “Staging Preview” option.
You’ll see how your app appears on iOS, Android, and desktop devices. Click through your app to ensure all buttons navigate to their intended screens or websites.
Invite Users to Test Your App
After you finish building your app, you’ll want to have a few people test it to ensure it functions properly. Allow people to test your app by pressing the “View App” button and clicking the “Share App” option.
Adalo will allow you to share a link to your app via SMS. You’ll also receive a link to your app, which you can send to users via email or DM from a social media account.
Be sure to collect as much feedback as possible about your app and use it to enhance its functions. This will help you create an optimal and pleasant user experience.
Step 7: Integrate Payments
Adalo has an integration with one of the most popular payment platforms out there: Stripe. This lets you take payments using your app.
Integrating with Stripe is insanely easy. Before you begin, create a Stripe account. After you’re all set, return to your Adalo account and press that colorful “Add Components” button. Scroll down to the Stripe element, fill in your needed information, and drag it to a screen.
Now, it’s time to make some dough!
Step 8: Publishing Your Web App and PWA
After you’ve collected feedback and used it to optimize your app fully, it's time to release your web app to the public. Adalo conveniently lets you release the same version of your app as a web app and a PWA — you won’t need to make any changes to your app at all. Here’s how to publish:
- How to Publish an Adalo Web App: Click your profile button in the top right corner of your app, select “Settings,” and then scroll down to “Domain.” If you have a custom domain name, enter it here.
Push the “Publish” button on your Editing Dashboard and follow the directions. Your app will then be on the web!
- How to Publish a PWA: Creating a PWA is very simple. Push the “Publishing” button on your Editing Dashboard and select “Progressive Web App.” Follow each step, and then get the link to your finished app, which you can embed in your website and social accounts. Doing so makes it easy for your users to download your PWA.
Promoting your app will take consistent effort. We wrote a helpful guide outlining a few useful app promotion strategies. Putting in time each day will help you grow your number of app users.
Maintaining Your Web App
While you’ve finished building and publishing your app, your job is not done. To ensure your app always provides a tip-top user experience, you’ll need to ensure it always works. You’ll also want to periodically update your app with new features and functions.
Adalo provides helpful resources that update you with the new functions they periodically release. To learn more, check these out:
- Adalo’s Forum: Post questions and get feedback from current Adalo users. Feel free to help out other users on this forum, too!
- Adalo’s Help Guide: Essentially Adalo’s user manual, you’ll find documentation about adding components and the newest features here.
- The Adalo Academy: If you want to master specific functions, you’ll find it here. The Adalo Academy offers over 70 courses that will transform you into an Adalo sage.
User Analytics
The “Analytics” button on your Editing Dashboard will give insights into your app’s users. You’ll learn which screens are the most popular, the amount of time users spend on your app, your users’ locations, and more.
Check your app’s analytics daily to discover what parts of your app users prefer to visit. Make sure these highly trafficked areas are always running like a well-oiled machine. Extract insights about what makes a popular screen so sought after, and try to apply these to all parts of your app.
Ultimately, creating your own unique web app with Adalo is totally achievable using these simple steps. Plus, if you decide you’d rather get someone else to build it for you, you can always hire an Adalo expert to do all the heavy lifting for you. Happy building!
FAQ
| Question | Answer |
|---|---|
| Can I easily build a web app without any coding experience? | Yes, with Adalo's No Code App Builder, you can easily build a web app without any coding experience. Adalo provides templates, a drag-and-drop interface, and pre-built components that let you create fully functional database-driven web apps by simply customizing elements to match your vision and brand. |
| Why choose Adalo over other App Builder solutions? | Adalo is a no-code app builder for database-driven web apps and native iOS and Android apps—one version across all three platforms. AI-assisted building and streamlined publishing enable launch to the Apple App Store and Google Play in days rather than months. This app store publishing capability is a major advantage because getting your app in front of users through the App Store and Google Play is often the hardest part of launching a new app or business—it's essential for marketing and distribution success. |
| What's the difference between a web app and a Progressive Web App (PWA)? | A web app is accessed through any browser and works like a website, but has limited access to device features like GPS and camera. A PWA is downloaded directly to your mobile device from a link or QR code, can work offline, and has access to some device features—though neither can be published in app stores like native apps. |
| What are the main components I need to build a web app? | Every web app consists of three main parts: the front end (user interface with screens, buttons, and visuals), the backend (which executes tasks, connects with third-party apps, and processes data), and the database (which stores all user information and records). Adalo pre-packages all three components and allows you to customize each to your specific needs. |
| How do I accept payments in my Adalo web app? | Adalo has a built-in integration with Stripe, one of the most popular payment platforms. Simply create a Stripe account, then use Adalo's colorful 'Add Components' button to find the Stripe element, fill in your information, and drag it onto your desired screen. |
| How can I test my web app before publishing it? | Adalo makes previewing simple—click the 'View App' button and select 'Staging Preview' to see how your app appears on iOS, Android, and desktop devices. You can also share a link to your app via SMS or email to invite users to test it and collect valuable feedback before launch. |

