


Why Adalo Is Perfect for Building a Gift Reminder App
Adalo is a no-code app builder for database-driven web apps and native iOS and Android apps—one version across all three platforms, published to the Apple App Store and Google Play. This makes it the ideal solution for creating a gift remembering and prompting app, where you need to store event dates, track gift ideas, and keep everything synced across devices your users already own.
Having your gift reminder app available on both app stores means users can receive push notifications directly on their phones—ensuring they never forget an anniversary, birthday, or special occasion. With Adalo's built-in database tools and notification features, you can build a thoughtful, functional app that keeps users engaged and prepared for every gift-giving moment.
Never miss an important occasion again. Building a gift reminder app can help you track events, store gift ideas, and send timely reminders, ensuring you're always prepared. Adalo, an AI-powered app builder, makes this possible without writing code—and deploys your creation to web, iOS, and Android from a single project. Here's how:
- Set Up a Database: Use Adalo's tools to manage users, events, and gift ideas. Link collections for seamless data flow with no record limits on paid plans.
- Design User-Friendly Screens: Create a Home Screen for event overviews, Add Event Screen for new entries, and Event Detail Screen for specifics.
- Add Notifications: Configure reminders to alert users of upcoming events with personalized push notifications.
- Store Gift Ideas: Let users save ideas for each event, complete with descriptions, prices, and purchase statuses.
- Test and Publish: Ensure smooth performance across all devices, then deploy your app to the Apple App Store, Google Play Store, and as a web app—all from a single build.
The platform simplifies the entire process, allowing you to focus on creating a helpful tool for thoughtful gift-giving. Follow the steps below, and you'll have a functional app ready to support users in managing their special occasions.
5 Steps to Build a Gift Reminder App with Adalo
What makes this possible is Adalo's unique approach to app development: build database-driven web apps and native iOS and Android apps—published to the App Store and Google Play—from a single visual editor. With the Adalo 3.0 infrastructure overhaul launched in late 2025, apps now run 3-4x faster with modular infrastructure that scales alongside your user base.
Why Adalo Is Perfect for Building a Gift Reminder App
Adalo is an AI-powered app builder for database-driven web apps and true native iOS and Android apps—one version across all three platforms, published to the Apple App Store and Google Play. This makes it the ideal solution for creating a gift remembering and prompting app, where you need robust database functionality to track contacts, events, and gift ideas while reaching users on whatever device they prefer.
Having your gift reminder app available on both app stores means users can receive push notifications directly on their phones—essential for timely reminders about upcoming birthdays, anniversaries, and holidays. With built-in notification features and an intuitive drag-and-drop interface described as "easy as PowerPoint," you can build a polished, functional app that keeps your users organized and ensures they never forget another special occasion.
The platform's unlimited database records on paid plans mean you won't hit storage walls as users add more events and gift ideas over time. Unlike competitors that charge based on data rows or workload units, Adalo's pricing remains predictable with no usage-based charges—eliminating bill shock as your app grows.
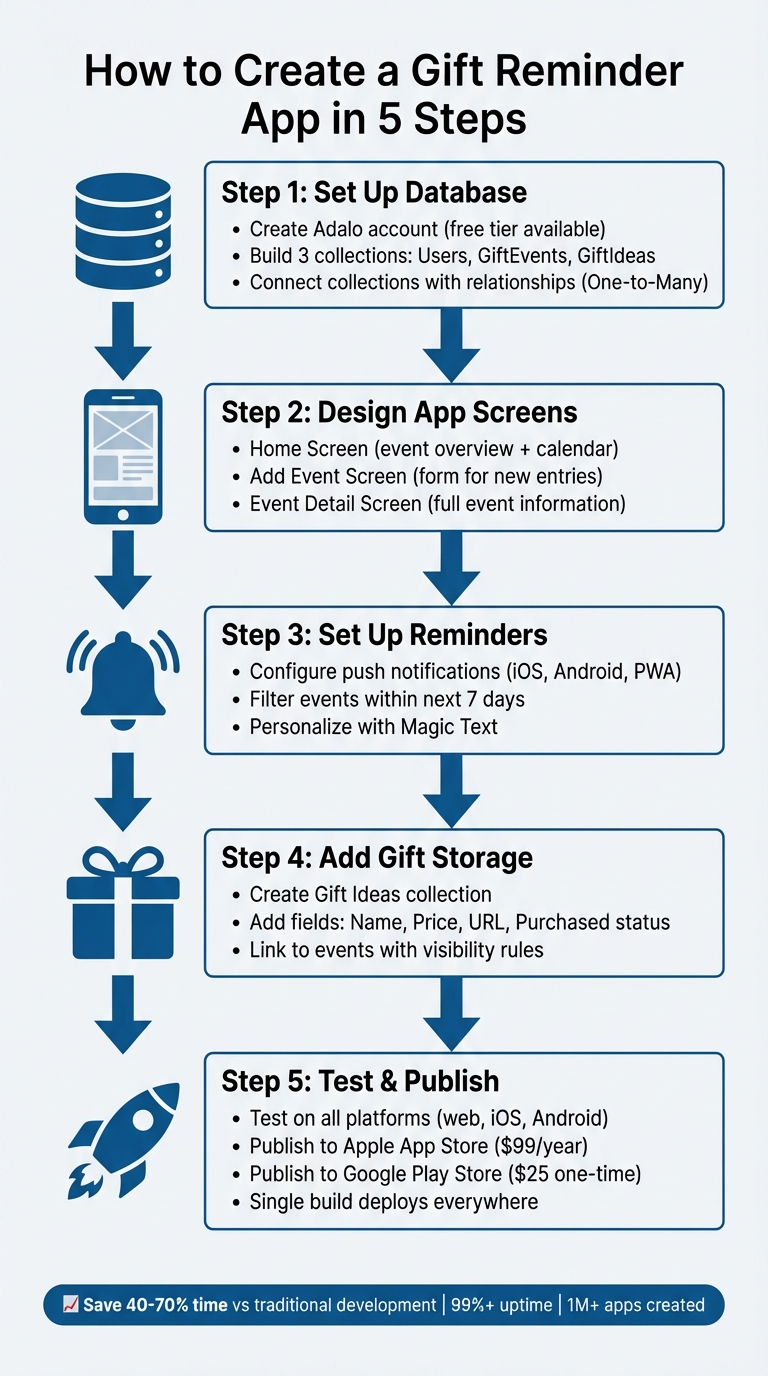
Step 1: Set Up Your Adalo Account and Database
Create Your Adalo Account
Head over to Adalo.com and sign up for a free account. The free plan is all you need until you're ready to publish your app on the Apple or Google app stores. Once you're logged in, locate the app selector dropdown in the top bar and click "Create New App".
For this project—a gift reminder app—go with the "Mobile Only" layout. It's the easiest option for beginners, and you can always switch to a responsive layout later on. Once that's set, it's time to start structuring your database collections for gift events and ideas.
Build the Database Collections
Think of your database as the backbone of your app—it's where all your data lives. Every Adalo app automatically comes with a Users collection for authentication, which includes fields like Email, Password, Username, and Full Name by default. You'll need to add two more collections: GiftEvents and GiftIdeas. To do this, click the red Database tab on the left toolbar and hit + Add Collection.
For GiftEvents, add these fields:
- Occasion Name (text, e.g., "Birthday")
- Event Date (date, formatted as MM/DD/YYYY, like "12/25/2026" for Christmas or "11/27/2026" for Thanksgiving)
- Recipient (text, e.g., "Mom")
- Reminder Status (true/false)
- Reminder Date (date/time for scheduling notifications)
For GiftIdeas, include fields such as:
- Gift Description (text)
- Cost (number, formatted as $49.99 with a dollar sign and decimal point)
- A relationship field linking it back to the related event
With paid plans offering no caps on database records, you won't need to worry about running out of storage as users accumulate years of gift occasions and ideas. This removes a common constraint found in other builders that charge per data row.
Connect the Collections
To ensure your data flows seamlessly, you'll need to set up relationships between the collections. Start by adding a Relationship field in the GiftEvents collection and linking it to Users. Choose the "One-to-Many" relationship type, as one user can have multiple gift events, but each event belongs to only one user. Rename this relationship to "Created By" in GiftEvents and "My Events" in Users for clarity.
Next, link GiftIdeas to GiftEvents in a similar way. This allows each event to have multiple gift ideas. Clear naming for these relationships—right from the start—will save you a lot of headaches as your app grows and becomes more complex.
With the right data relationship setups, Adalo apps can scale beyond 1 million monthly active users. The modular infrastructure introduced in Adalo 3.0 means your gift reminder app can grow from a personal tool to a widely-used application without architectural changes.
Step 2: Design the App Screens
Start bringing your app to life by designing its interface. Adalo, one of the best no-code relational database builders, makes this process straightforward—just drag and drop components onto the Canvas using the Add Panel (the plus button in the left toolbar). The visual builder can display up to 400 screens at once on a single canvas, giving you a bird's-eye view of your entire app architecture.
Build the Home Screen
The Home Screen is your app's central hub, offering users a quick overview of upcoming gift occasions. Begin by adding a Top Navigation Bar to showcase your branding. Below it, include a Statistics Card to display key summaries, like the number of upcoming events and pending gifts. Use the "Count" formula to calculate upcoming events from your GiftEvents collection, filtering for dates later than the current time.
Next, add a Custom List to display the upcoming gift occasions. Set the "What is this a list of?" property to your GiftEvents collection. Apply a filter where "Event Date is after Current Time", and sort the list by Event Date in ascending order. To make the layout even more user-friendly, add a Calendar component for an agenda-style view.
Lastly, place a Floating Action Button that links to the Add Event screen, making it easy for users to add new gift occasions.
Create the Add Event Screen
This screen is where users input new gift occasions, so keep it simple and intuitive. Use Adalo's Form component to create new records in your GiftEvents collection. Include these fields:
- Text Input for the "Occasion Name" (e.g., "Mom's Birthday").
- Date Picker for the event date, formatted as MM/DD/YYYY, with the default value set to "Today."
- Dropdown or Relationship Field to select the recipient from your Users collection.
- Multiline Text Input for "Gift Ideas."
To ensure complete entries, mark the "Occasion Name" and "Event Date" fields as required. Configure the form's submit button to save the new event and navigate back to the Home Screen. For added responsiveness, include a Toast notification (e.g., "Event Saved!") to confirm the action was successful.
Design the Event Detail Screen
When a user selects an event, they should see its details clearly displayed. Use Magic Text to dynamically populate the screen with the event's properties, such as its title, date, and gift ideas. Highlight the event date prominently at the top, and add a Status Badge with color-coded labels (e.g., "Upcoming", "Gift Purchased", or "Completed") for quick reference.
Include buttons for key actions:
- Edit Event to navigate to a form for updating details.
- Delete to remove the event.
- Mark as Complete to update the event's status.
Show reminder settings (e.g., "30 minutes before" or "1 day before") using a simple text label linked to the database. Use visibility rules for buttons like "View Ideas", ensuring they only appear when the corresponding database field is filled. To keep the layout organized, group recipient details in one container and display gift ideas in a multiline text area below.
Once your screens are designed, Adalo's platform allows you to deploy your app as a progressive web app (PWA) or publish it natively to iOS and Android app stores—all from a single build. This single-codebase approach means updates you make automatically apply across all platforms.
Step 3: Set Up Reminders and Push Notifications
Adding automated reminders can transform your app into a helpful assistant. Adalo makes this easy with built-in support for native push notifications across iOS, Android, and Progressive Web Apps. This feature allows you to send timely alerts to users, ensuring they never forget an important occasion.
Configure Reminder Logic
Using Adalo's visual builder, you can set up a system that filters your GiftEvents collection to identify events happening within the next 7 days where the "Reminder Status" is still marked as false. Then, use the Trigger Notification action and set the recipient to the Current User. This way, each user will only receive reminders for their own upcoming events.
The 3-4x speed improvement from Adalo 3.0's infrastructure overhaul means these database queries execute quickly, even as your user base grows. Once the logic is in place, you can move on to enabling notifications to keep users informed about their gift events.
Enable Push Notifications
To start, include a Request Notification Permission action on your app's launch screen to ask users for permission to send alerts. When crafting the notification, use Magic Text to make it more personal. For instance, the Title could be "Gift Reminder", and the Body might say: "Reminder: [Occasion Name] for [Recipient Name] is coming up on [Event Date]!" (formatted as MM/DD/YYYY).
Don't forget to assign a Target Screen for the notification—like the Event Detail Screen—so users can easily access the relevant details when they tap on the alert. Also, note that notifications will only be sent to users who have been active in the app within the last two weeks.
Test the Notifications
Before wrapping up, it's crucial to test your reminder and notification setup to ensure everything works smoothly. Use two separate devices, each logged into a different account, since Adalo prevents users from receiving notifications they trigger themselves.
Create a test event scheduled for the next week, trigger its notification from one account, and confirm it shows up correctly on the second device. Double-check that the notification displays accurate event information, including the occasion, recipient, and date. The improved app speed from the 2026 infrastructure update means notifications trigger and deliver faster than ever.
Step 4: Add Gift Idea Storage and Custom Logic
Once reminders are in place, take your tool to the next level by offering users a dedicated space to store and manage gift ideas. By linking these ideas to specific events, you can transform a simple reminder tool into a full-fledged gift-planning assistant.
Build the Gift Ideas Screen
Start by setting up a Gift Ideas collection in your database. This collection should include fields like Gift Name (Text), Price (Number), URL/Link (Text), and a True/False field labeled Purchased?. Make sure each gift idea connects to its corresponding event through a one-to-many relationship, allowing multiple gift ideas to be linked to a single event.
To make this feature user-friendly, add a Form component that lets users create new gift ideas automatically tied to the current event. Use Magic Text to handle this linkage seamlessly. Display the ideas in a Custom List, filtered by the selected event. Enhance usability by including a Search Bar to filter by the Gift Name property and dropdown menus for sorting by budget or categories.
With unrestricted database storage on paid plans, users can save as many gift ideas as they want without worrying about hitting data limits. This is particularly valuable for power users who track gifts for large families or multiple friend groups.
Set Up Visibility Rules for Pending Reminders
To keep users engaged, track gifts that haven't been purchased yet. Add a Text component to your Home Screen that uses Magic Text to display the number of gift ideas where the Purchased? field is set to false. Configure this component with a visibility rule so it only shows up when there are pending purchases.
You can also highlight upcoming events by adding an "Upcoming" badge next to events happening within the next week. Set the visibility of this badge to activate when the event date falls between the current time and seven days ahead.
For the best performance, visibility rules should rely on indexed properties like dates and statuses. If you're building real-time dashboards to display counts, consider caching these numbers in the user profile and updating them through actions. According to Adalo forums, this approach can cut database queries by up to 70%.
The modular infrastructure introduced in Adalo 3.0 handles these queries efficiently, scaling automatically as your user base grows without requiring manual optimization.
Step 5: Test, Deploy, and Update Your App
Test on All Platforms
Before launching, make sure your app performs smoothly across web, iOS, and Android platforms. Use cloud-based real-device labs to test on actual hardware, which helps identify issues like biometric authentication errors or notification mishaps. Pay close attention to formatting details, such as ensuring all dates follow the MM/DD/YYYY format—especially on reminder screens where users set event dates.
Additionally, simulate various network conditions (e.g., 2G, 3G, 4G, or unstable Wi-Fi) to confirm your app remains functional even with poor connectivity. The 3-4x speed improvement from Adalo 3.0 means your app should feel responsive even on slower connections.
Gestures like swiping between screens and scrolling through gift lists deserve extra attention. Transitions that take longer than two seconds should be flagged for optimization. Create a checklist to test key features like login flows, event creation, reminder triggers, and gift storage on at least three devices with different screen sizes. Once your app demonstrates consistent performance across all devices, you're ready to move on to publishing.
Publish to the App Stores
After thorough testing, it's time to publish. For the Apple App Store, you'll need an Apple Developer Account, which costs $99 per year. Make sure to prepare a 1024x1024 app icon, screenshots for all supported device sizes, and a privacy policy URL. Adalo simplifies the process with its publishing tools—just select your build and submit. Apple's review process usually takes one to three days.
For the Google Play Store, you'll need a Google Play Developer Account, which requires a one-time $25 fee. Upload your app's feature graphic, screenshots, and description, and complete the content rating questionnaire. Adalo can generate your APK or AAB file for submission, and Google's approval process is often completed within hours.
Both stores have strict guidelines, so double-check your metadata, descriptions, and categories to ensure compliance before submission. Adalo's integrated tools make publishing to both platforms seamless, with unlimited updates to your published apps—no additional charges for pushing new versions.
Plan for Future Updates
Once your app is live, focus on improving it based on user feedback. Start with refining core features and expand as you gather insights from your audience. Include a simple feedback option within the app, such as a "Suggest a Feature" button, to make it easy for users to share their thoughts.
Thanks to Adalo's single-codebase structure, any updates you make will automatically apply across web, iOS, and Android platforms, saving you time and effort. This is a significant advantage over platforms like Bubble, where web and mobile versions require separate management.
Keep an eye on your app's performance using analytics and uptime monitoring tools to address issues proactively. With 99%+ uptime and over 20 million daily data requests processed across the platform, Adalo provides a reliable foundation for your app.
As your user base grows, you may need to add advanced features like third-party integrations or custom logic. Adalo supports various API connections, allowing you to expand functionality without starting from scratch. To streamline future debugging, maintain clear documentation of your app's structure and logic flows.
Comparing Adalo to Alternative Platforms
When choosing a platform for your gift reminder app, understanding how Adalo stacks up against alternatives helps you make an informed decision. Here's how the key options compare:
| Platform | Starting Price | Native Mobile Apps | Database Limits | Usage Charges |
|---|---|---|---|---|
| Adalo | $36/month | Yes (iOS & Android) | Unlimited on paid plans | None |
| Bubble | $59/month | Web wrapper only | Limited by Workload Units | Yes (Workload Units) |
| Glide | $60/month | No | Limited rows | Yes (row limits) |
| FlutterFlow | $70/month per user | Yes | External DB required | Varies by DB provider |
| Softr | $167/month | No | Limited per app | Yes (record limits) |
Bubble offers more customization options, but that flexibility often results in slower applications that struggle under increased load. Their mobile solution is a wrapper for the web app, which introduces potential performance challenges at scale. Bubble's Workload Units create unpredictable billing that can surprise you as usage grows.
Glide excels at spreadsheet-based apps with a template-focused approach, making it fast to build but limiting creative freedom. However, Glide doesn't support Apple App Store or Google Play Store publishing—a dealbreaker for a gift reminder app that needs push notifications on users' phones.
FlutterFlow is technically a low-code platform aimed at developers, requiring users to set up and manage their own external database. This adds significant learning complexity, especially when optimizing for scale. The ecosystem is rich with experts precisely because so many users need help navigating these challenges.
For a gift reminder app specifically, Adalo's combination of true native mobile apps, built-in push notifications, and predictable pricing makes it the most practical choice.
Conclusion
You've now explored the entire journey of creating a gift reminder app—from setting up the database and designing the interface to configuring push notifications and publishing it to app stores. By following these steps, you can build an app that ensures users never forget another birthday, anniversary, or special occasion.
Using Adalo, you gain the advantage of multi-platform deployment without the hassle of managing separate codebases. A single project transforms into a web app, an iOS app, and an Android app. This streamlined process can save anywhere from 40% to 70% of the time and cost compared to traditional development methods. With over 3 million apps created on the platform and an average uptime of more than 99%, Adalo provides a reliable and efficient foundation for your app.
Start by using Adalo's free tier to prototype your database and test your app's functionality as an MVP. Once you're satisfied with the results, you can upgrade to publish your app on the Apple App Store and Google Play Store. Gather feedback from early users to fine-tune your app and make it even more effective.
How can I make sure my app's notifications are sent on time and are effective?
To make sure your app's notifications hit the mark, start by asking users for permission to send them. Leverage Adalo's Trigger Notification action to schedule alerts at just the right times. Double-check that users are logged in, have opted into notifications, and have interacted with your app within the past two weeks. Before going live, test your notifications thoroughly to confirm everything works smoothly. This way, you can keep your users engaged and deliver timely reminders when they matter most.
How can I test my gift reminder app on different devices before publishing?
To make sure your app works seamlessly across different platforms, start by setting up a responsive layout that adjusts for mobile, tablet, and desktop views. Use Adalo's Preview feature to see how your app looks and performs on various screen sizes.
After that, create test builds for both iOS and Android by generating .ipa and .apk files in the Launch tab. Install these files on actual devices—use TestFlight or Xcode for iOS and side-load for Android. Then, thoroughly test key features like adding gifts, setting reminders, and receiving notifications. Double-check that all assets and permissions are correctly configured. Address any issues you find, and keep retesting until the app works flawlessly on all devices. Once everything is running smoothly, you'll be ready to publish!
How can I collect feedback from users to improve my gift reminder app?
To make it easy to gather feedback, embed a feedback form right into your app. With Adalo's Form component, you can collect user ratings, comments, and suggestions seamlessly. Link the form to a dedicated database collection to store all responses. Including a thank-you message after submission is a nice touch—it encourages users to participate and shows them that their opinions matter.
To analyze the feedback, you can create an admin view within your app to review submissions in real time or enable email notifications for new responses. If you're looking for more detailed insights, export the data as a CSV file. This allows you to track trends, such as average ratings or frequently requested features. Actively engaging with user feedback not only helps you refine your app but also strengthens your relationship with your audience.
Related Blog Posts
- How to Launch Your First Mobile App Without Coding
- How to Create an Invoice App
- How To Create The Digital Calendar App You Need for iPhone and iOS
- How To Create The Digital Calendar App You Need for Samsung and Android
FAQ
Why choose Adalo over other app building solutions?
Adalo is an AI-powered app builder that creates true native iOS and Android apps. Unlike web wrappers, it compiles to native code and publishes directly to both the Apple App Store and Google Play Store from a single codebase—the hardest part of launching an app handled automatically.
What's the fastest way to build and publish an app to the App Store?
Ada, Adalo's AI builder, lets you describe what you want and generates your app. Magic Start creates complete app foundations from a description, while Magic Add adds features through natural language.
Adalo's drag-and-drop interface lets you build visually without code, while AI-assisted features like Magic Start generate complete app foundations from descriptions. The platform handles the App Store submission process directly, getting you from idea to published app in days rather than months.
Which is more affordable, Adalo or Bubble?
Adalo starts at $36/month with unlimited usage and no record caps on paid plans. Bubble starts at $59/month with usage-based Workload Unit charges and record limits that can create unpredictable bills as your app grows.
Which is easier for beginners, Adalo or FlutterFlow?
Adalo is designed for non-technical users with a visual builder described as "easy as PowerPoint." FlutterFlow is a low-code platform aimed at developers, requiring users to set up and manage their own external database—adding significant learning complexity.
Is Adalo better than Glide for mobile apps?
For mobile apps that need App Store publishing and push notifications, yes. Glide doesn't support Apple App Store or Google Play Store publishing, while Adalo creates true native apps for both platforms from a single build.
How long does it take to build a gift reminder app?
With Adalo's visual builder and pre-built components, you can have a functional gift reminder app ready in a weekend. The database setup, screen design, and notification configuration covered in this guide can be completed in 8-12 hours of focused work.
Do I need coding experience to build this app?
No coding experience is required. Adalo's drag-and-drop interface handles all the technical complexity. You design screens visually, set up your database through a simple interface, and configure logic through point-and-click actions.
How much does it cost to build and publish a gift reminder app?
Adalo's free tier lets you prototype and test your app. Publishing to app stores requires a paid plan starting at $36/month, plus Apple's $99/year developer fee and Google's one-time $25 fee. Total first-year cost: approximately $556.
Can I migrate from another platform to Adalo?
Yes, you can rebuild your app in Adalo and import your data via CSV or API connections. The visual builder makes it straightforward to recreate screens and logic, and unlimited database records mean you won't hit storage constraints during migration.
What features should a gift reminder app have?
Essential features include event tracking with dates and recipients, push notifications for timely reminders, gift idea storage with prices and purchase status, and a calendar view for upcoming occasions. Adalo supports all of these out of the box.


