


Why Adalo Works for Building AI Scanning Apps
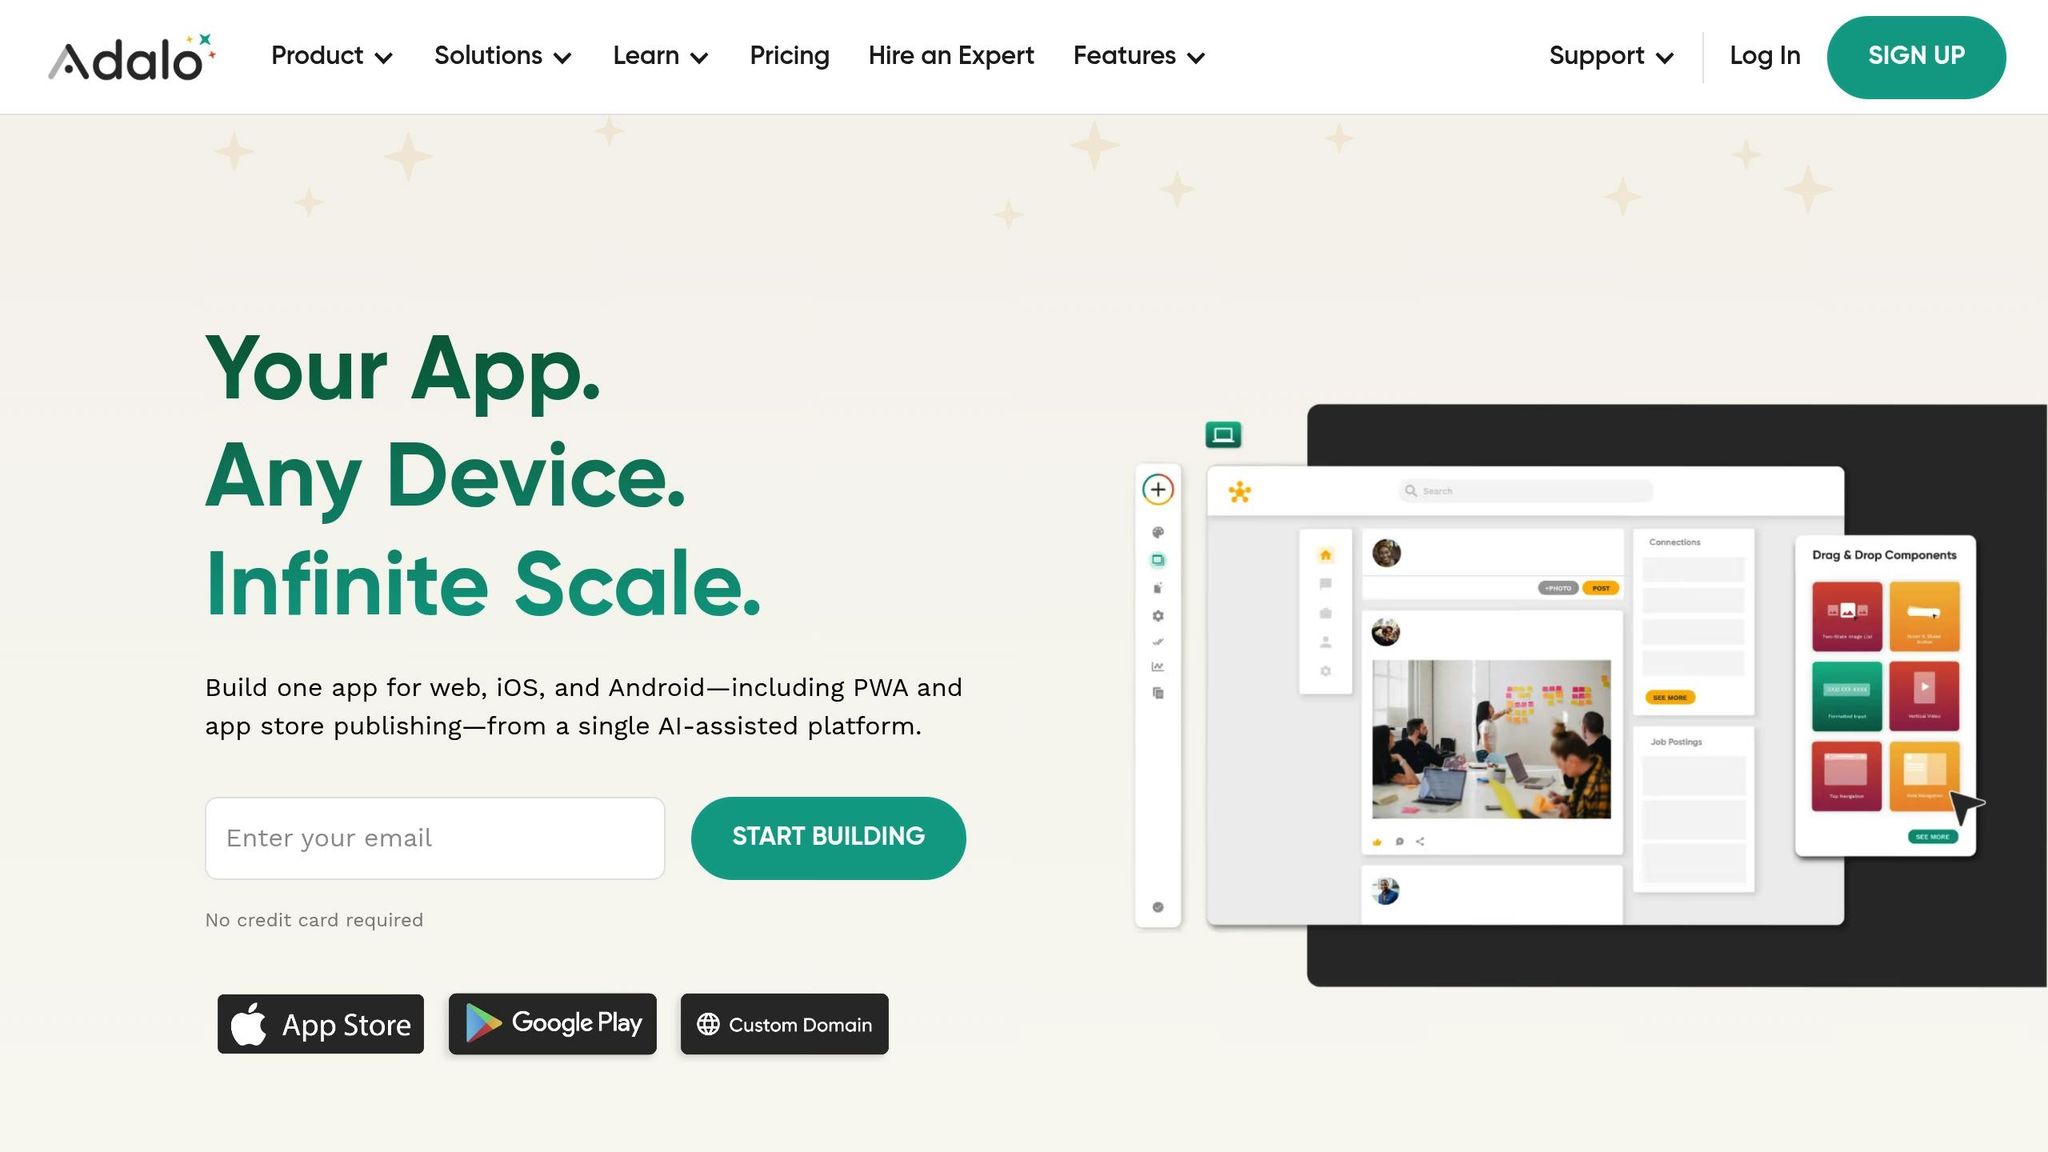
Adalo is a no-code app builder for database-driven web apps and native iOS and Android apps—one version across all three platforms, published to the Apple App Store and Google Play. This makes it uniquely suited for AI scanning apps, where you need to store scan results in a database, connect to external OCR services via APIs, and deliver a seamless experience across devices—all without managing separate codebases.
App store distribution is essential for scanning apps because users expect quick access to their device camera and instant push notifications when scans are processed or verified. With Adalo, you get true native functionality that performs reliably under real-world conditions, plus a streamlined publishing process that handles the complexity of app store submissions for you.
What if you could build a powerful AI-powered scanning app—one that extracts text from documents, verifies receipts, or validates data in real-time—without writing a single line of code? It's not only possible; it's more accessible than ever.
In this guide, you'll learn how to create a fully functional AI scanning and checking app from scratch. We'll walk through setting up your project, designing a database to store scan results, integrating OCR (Optical Character Recognition) services like Google Cloud Vision, and building intuitive interfaces for capturing, reviewing, and approving data.
To bring this app to life, we'll use Adalo—an AI-powered app builder that creates database-driven web apps and native iOS and Android apps from a single editor. With Adalo's drag-and-drop builder and seamless API integrations, you can go from concept to deployed app faster than traditional development allows, even if you're a complete beginner. One build publishes to web, the iOS App Store, and the Android Play Store—handling the complex submission process that often derails new app projects.
Let's get started by setting up your Adalo project and preparing the foundation for your scanning app.
Why Adalo Works for Building AI Scanning Apps
Creating an AI-powered scanning and checking app typically requires expertise in mobile development, backend infrastructure, and API integrations—a daunting combination for most creators. Adalo removes these barriers by providing a visual builder that generates true native code for iOS and Android, not web wrappers that struggle under load.
When you publish your scanning app to the app stores, you gain access to powerful native features like the device camera for capturing documents and push notifications to alert users when their scans have been processed or verified. The platform's modular infrastructure scales to serve apps with millions of monthly active users, with no upper ceiling—critical for scanning apps that may process thousands of documents daily.
Whether you're building a receipt checker for expense management or a document validator for compliance workflows, Adalo gives you the tools to create, deploy, and scale your AI scanning solution quickly. With unlimited database records on paid plans, you won't hit storage walls as your scan history grows.
Setting Up Your Adalo Project
Creating a New Adalo App
To get started, sign up at adalo.com. Once you're in, open the App Switcher by clicking your app name in the Top Bar, then select "Create a New App." Here, you'll have two options: choose a Feature Template or start from scratch with a blank screen.
Templates are a great starting point for beginners since they come with pre-built screens, databases, and functions. If you're looking for more flexibility and have the time, starting with a blank screen gives you full control over the app's design and functionality. The visual builder has been described as "as easy as PowerPoint," making either approach accessible regardless of your technical background.
After creating your app, the next step is setting up your database to efficiently handle scan data.
Designing the Database for Scans
Click on the Database icon (the spreadsheet symbol) in the left sidebar. Create a new collection and name it "Scans." Then, add the following properties using the "Add to Properties" button:
- Scan Image (Image): Stores the captured photo or document.
- Extracted Text (Text): Holds the OCR results. Leave this blank so it can be automatically filled by your AI service.
- Validation Status (Text or True/False): Tracks whether scans pass or fail checks, such as "Approved", "Rejected", or "Pending."
- Timestamp (Date): Logs when each scan occurs, using the MM/DD/YYYY format for US localization.
If needed, you can add a Relationship property to link the Scans collection to the Users collection. This is useful for tracking which user performed each scan. Taking the time to name these properties clearly will save you a lot of headaches as your app becomes more complex.
"A database is simply an organized collection of information that is accessed electronically." - Adalo
A key advantage here: paid Adalo plans have no record limit cap, so your Scans collection can grow indefinitely as users process more documents. With the right data relationship setups, Adalo apps can scale beyond 1 million monthly active users—essential for scanning apps that accumulate historical data over time.
With your app and database ready, you're all set to move on to integrating scanning and AI features.
Building a Barcode Scanning App on Adalo
Building Scanning and AI Integration Features
Once your Scans database is set up, it's time to integrate scanning and AI functionality into your app.
Adding a Camera or Barcode Scanner Component
To start, click the "+" icon on your app screen to add a new component. Look for the Barcode Scanner component in the component panel or search for it in the Adalo Marketplace. This component uses the camera on mobile devices to scan various code types, such as QR codes or EAN codes.
For capturing documents or images with Optical Character Recognition (OCR), use the Image Picker component. Pair it with a button that links the captured image to the Scan Image property in your Scans collection, creating a new record.
Because Adalo compiles to true native iOS and Android code rather than wrapping a web view, your camera integration will perform smoothly even when processing high-resolution document scans. This native approach means faster image capture and more reliable OCR results compared to web-based alternatives.
"Best no-code tools allow us to develop and deploy your new application 40-60% faster than regular app development methods." - Bootstrapped
Integrating OCR for Data Extraction
To enable OCR functionality, connect your app to an AI-powered text recognition service using an automation tool like Zapier or Make (formerly Integromat). These platforms can act as a bridge between Adalo and OCR services like Google Cloud Vision or Nanonets OCR. Both services offer free tiers for basic usage.
In Zapier, set up a New Record trigger for your Scans collection. This workflow activates whenever a user uploads an image. Add an action step to send the image to your chosen OCR service. For Zapier, prepend https://adalo-uploads.imgix.net/ to the image file property so that the service can access it externally. Once processed, map the extracted text back to the Extracted Text property using an Update Record action.
The integration process benefits from Adalo's 3-4x faster performance following the 2026 infrastructure overhaul. Your OCR workflows will process more quickly, and the database updates happen without the lag that plagued earlier versions of the platform.
After setting up OCR, you can move forward by adding validation rules to ensure the captured data meets your app's requirements.
Setting Up Data Validation Logic
Adalo includes built-in tools to validate data formatting. For example, dates are displayed in the MM/DD/YYYY format in your app, but external integrations may require dates in the YYYY-MM-DD format. Similarly, ensure numbers are stripped of symbols and Boolean values are formatted in lowercase.
Use Magic Text to display extracted results immediately after scanning, giving users a chance to confirm the information before proceeding. Add conditional actions to ensure records are only created or updated when all required fields are complete. Include buttons that allow users to update the Validation Status based on their review.
For more complex validation scenarios, you can leverage X-Ray, Adalo's built-in performance diagnostic tool that identifies issues before they affect users. This is particularly valuable for scanning apps where slow validation logic could frustrate users processing multiple documents in sequence.
Once these validation rules are in place, your app will be ready to handle scanned and extracted data efficiently.
Designing the User Interface
Crafting a user-friendly interface is key to helping users quickly scan, review, and take action on results. By building on your app's scanning and validation features, you can create an interface that feels intuitive and simplifies the user experience.
Creating Screens for Scanning and Results
Start by enhancing the scanning screen. Add tools like a Barcode Scanner or Image Picker to streamline the process. Configure the scanner so that a successful scan automatically creates a new record in the database and redirects the user to the results screen.
On the results screen, include a Simple List to display important data like product names, extracted text, and scan dates. Use Magic Text to pull this information directly from your database, eliminating the need for manual data entry and ensuring accuracy. To make navigation easier, add Search and Filter fields so users can quickly find records by date, status, or specific keywords.
Adalo's canvas can display up to 400 screens at once if needed, giving you a bird's-eye view of your entire app architecture. This is particularly helpful when designing scanning apps with multiple workflow paths—you can see how the capture screen connects to results, how results connect to detail views, and how approval flows branch based on validation status.
"You'll need a frontend that balances beauty and simplicity - if not, users might ditch your app." - The Adalo Team
To keep the interface clean and user-focused, implement Conditional Visibility. For instance, display a green "Approved" badge when the Validation Status is "Approved" and a red "Rejected" badge when it's "Rejected." This ensures users only see information relevant to each scanned item without unnecessary clutter.
Adding Action Buttons for Approve/Reject
On the results screen, include two action buttons: Approve (green) and Reject (red). Link these buttons to update the record's Validation Status to "Approved" or "Rejected" accordingly.
Consider adding a third option for "Needs Review" status, which routes uncertain scans to a supervisor queue. This three-tier system is common in document validation workflows where OCR confidence varies based on image quality.
Once you've set everything up, use Adalo's Preview tool to thoroughly test the workflow. This ensures that the buttons update records correctly and that the entire process runs smoothly.
Testing and Publishing Your App
Before launching your app, it's crucial to test it thoroughly. Adalo offers tools that make transitioning from development to production seamless, whether you're targeting web or mobile platforms.
Testing on Devices and Debugging
Begin by using the Preview button in Adalo's top bar to test your app in a web browser. This allows you to check if features like scanning workflows, validation logic, and action buttons are functioning correctly. However, browser testing has its limits, especially for AI scanning apps. It won't give you an accurate picture of how camera integration, image capture quality, or OCR processing will perform in real-world scenarios.
For a more accurate assessment, test on physical devices. Navigate to the Launch tab and create a TestFlight build for iOS. You'll need an Apple Developer account to proceed and must configure permissions for Camera and Photos. Apple requires clear explanations for these permissions; without them, your app submission could be rejected.
Testing on actual devices, like iPhones and Android phones, helps you evaluate how your app performs under various conditions—such as different lighting, angles, and scanning speeds—all of which affect the accuracy of your AI model. The 3-4x speed improvement in Adalo 3.0 means your test builds will feel noticeably snappier than apps built on the previous infrastructure.
Additionally, test your app's data validation thoroughly. Submit both valid and invalid documents to ensure your AI handles errors correctly. Use Adalo's Version History feature (indicated by a circled checkmark icon) to save up to 10 iterations of your app. This feature allows you to roll back to a previous version if any issues arise during testing.
Once you've confirmed your app works as intended on real devices, you're ready to move on to publishing.
Deploying to Web, iOS, and Android
After testing, deploying your app to various platforms is straightforward. On the Editing Dashboard, click Publish to get started. For web deployment, you can use a custom domain (which typically costs $10–$45 per year) or an Adalo subdomain for an instant launch.
For iOS, enter your Apple Developer credentials and Bundle ID in the Launch tab. Be careful to avoid any extra spaces in the Bundle ID, as this could cause issues. Apple's review process generally takes 24 to 48 hours. For Android, you'll need a Google Play Developer account, which has a one-time fee of $25. Follow the Android-specific instructions in the Publish panel. Google's automated review process is faster, often approving apps within a few hours.
A significant advantage of Adalo's approach: one codebase updates all three platforms simultaneously. When you improve your OCR integration or add a new validation rule, you publish once and the changes go live on web, iOS, and Android. This differs from platforms like Bubble, where the mobile offering wraps the web app, potentially requiring separate optimization for each deployment target.
Once your app is live, use Adalo's Analytics tool (represented by a chart icon in the dashboard) to monitor its performance. Track metrics like total users, scan success rates, and how often users approve or reject validation results. This data can reveal how well your AI model performs in production. If users frequently reject results, it may be time to refine your AI prompts or tweak your validation logic.
Whether you compare Progressive Web Apps vs. native apps for your deployment or launch on both, Adalo allows you to make updates without rebuilding. With unlimited app updates on all paid plans, you can iterate as often as needed without worrying about republishing limits or additional charges.
Comparing Adalo to Alternative Platforms
When building an AI scanning app, you have several platform options. Here's how Adalo compares to common alternatives:
| Platform | Starting Price | Native Mobile Apps | Database Limits | Best For |
|---|---|---|---|---|
| Adalo | $36/month | Yes (true native) | Unlimited on paid plans | Native mobile apps with AI integrations |
| Bubble | $59/month | Web wrapper only | Limited by Workload Units | Complex web apps with custom logic |
| Glide | $60/month | No App Store publishing | Limited rows, extra charges | Simple spreadsheet-based apps |
| FlutterFlow | $70/month per user | Yes (requires coding knowledge) | External database required | Technical users comfortable with code |
| Thunkable | $59/month | PWA only at base tier | Usage restrictions | Basic mobile prototypes |
For AI scanning apps specifically, the choice often comes down to whether you need true native performance. Camera integration, image processing, and real-time OCR all benefit from native code execution. Bubble's web wrapper approach can introduce latency that affects the scanning experience, particularly when processing high-resolution document images.
FlutterFlow offers native compilation but requires technical knowledge—it's "low-code" rather than "no-code." Users also need to source, set up, and pay for their own external database, which adds complexity and cost. Many FlutterFlow users end up hiring experts to optimize their database setup for scale, turning a DIY project into a significant investment.
Glide excels at spreadsheet-based apps but doesn't support App Store publishing. If your scanning app needs to be distributed through Apple or Google's stores, Glide isn't an option. Adalo's SheetBridge feature offers similar spreadsheet connectivity while still enabling full native app publishing.
Note that many third-party platform comparisons and ratings predate Adalo 3.0's infrastructure overhaul in late 2025. The performance improvements and removal of database record limits addressed many concerns raised in older reviews.
Conclusion
Creating an AI-powered scanning and checking app is both efficient and straightforward with the right tools. In this guide, you learned how to establish a well-structured database, integrate OCR functionality, design intuitive interfaces, and launch your app across various platforms. What used to require months of development and budgets ranging from $50,000 to $250,000 can now be achieved in just a few weeks—and at a fraction of the cost.
Adalo's drag-and-drop builder makes it easy to develop native mobile apps, incorporate AI features, and publish on web, iOS, and Android platforms. This simplified process caters to both beginners and seasoned app creators.
"No-code platforms can decrease app development time by 90%, reducing months to weeks." - The Adalo Team
If you're new to app development, start with one of the best free app templates and test your app on actual devices to ensure the AI features work seamlessly. Whether your goal is validating receipts, verifying IDs, or streamlining inventory management, the combination of visual building, native compilation, and unrestricted database storage provides everything you need to bring your ideas to life.
How do I ensure accurate text extraction when using OCR in my app?
To get precise text extraction using OCR in your app, start by designing a clear and efficient data capture process. Create a dedicated collection to store the uploaded images, the extracted text, and any related metadata for validation purposes. Include an image picker and a button to initiate the OCR process, ensuring the image is uploaded before running text extraction.
Incorporate an AI-driven OCR tool, such as Google Vision, to analyze the image and extract the text. For optimal accuracy, make sure images are sharp, well-lit, and free from blurriness. Pre-processing steps like cropping or enhancing the image can make a big difference in the results. Additionally, implement validation rules in your app—like format checks or length limits—to catch potential errors and maintain high data quality.
Finally, save the original image alongside the extracted text to allow for manual review if necessary. By combining clear image capture, robust OCR integration, and in-app validation, your app can consistently deliver accurate and dependable results.
How can I add AI-powered features to my Adalo app?
To bring AI-powered features into your Adalo app, begin by creating a data collection to store the results—this could include scanned text or validation flags. Next, integrate user-friendly tools like an image picker or barcode scanner, allowing users to easily upload or capture documents. Use Adalo's custom actions to connect your app with AI services like OpenAI. Simply input your API key and set up the data flow between the app and the AI model. Once everything is in place, thoroughly test the app to confirm that the AI responses are accurate and the data is being stored correctly. After testing, you're ready to publish the app for your users. The best part? This entire process doesn't require any coding skills, making it accessible even for beginners.
How can I test my AI scanning app to ensure it works well on different devices?
To make sure your AI scanning app works smoothly across devices, it's crucial to test it extensively on both iOS and Android hardware. Begin by using the Adalo Preview app to observe how your app performs in practical scenarios. Activate developer tools to track logs and monitor network activity while testing key features like scanning, data validation, and error handling.
Experiment with scanning different file types—such as PDFs, JPGs, and PNGs—under various conditions, including low-light settings or blurred images, to see how reliably the AI processes the data. Check the app's responsiveness on devices with varying screen sizes and orientations to ensure the layout adapts seamlessly. Additionally, simulate different network conditions, like offline mode or slow connections, to verify the app can handle these situations effectively.
To gather user feedback, include a simple in-app option for reporting issues. This feature should capture details like the device used and relevant scan data. After every update, re-test the app to identify and resolve any new problems, ensuring a consistently smooth experience for users.
Related Blog Posts
- How to Launch Your First Mobile App Without Coding
- How To Enable Employees To Build The Apps They Need
- How To Build An App That Incorporates QR Scanning
- How to Create an Invoice App
FAQ
Why choose Adalo over other app building solutions?
Adalo is an AI-powered app builder that creates true native iOS and Android apps from a single codebase. Unlike web wrappers, it compiles to native code and publishes directly to both the Apple App Store and Google Play Store—handling the complex submission process that often derails new app projects. With unlimited database records on paid plans and no usage-based charges, you won't face surprise bills as your app scales.
What's the fastest way to build and publish an app to the App Store?
Adalo's drag-and-drop interface and AI-assisted building let you go from idea to published app in days rather than months. The platform handles the complex App Store submission process, so you can focus on your app's features and user experience instead of wrestling with certificates, provisioning profiles, and store guidelines.
How do I integrate OCR services into my Adalo scanning app?
Connect your Adalo app to AI-powered text recognition tools like Google Cloud Vision or Nanonets OCR through automation platforms like Zapier or Make. Set up a trigger for new scan records, send the image to your OCR service, and map the extracted text back to your database automatically. Both OCR services offer free tiers for basic usage.
What database properties do I need for a scanning app?
Your Scans collection should include four essential properties: Scan Image (to store captured photos), Extracted Text (to hold OCR results), Validation Status (to track approval states like Approved, Rejected, or Pending), and Timestamp (to log when each scan occurs). You can also add a relationship to the Users collection to track which user performed each scan.
How much does it cost to build an AI scanning app with Adalo?
Adalo's paid plans start at $36/month with unlimited database records and no usage-based charges. This compares favorably to alternatives like Bubble ($59/month with Workload Unit limits) or FlutterFlow ($70/month per user, plus external database costs). You'll also need an Apple Developer account ($99/year) and Google Play Developer account ($25 one-time) for app store publishing.
Can I add approve and reject functionality to my scanning app?
Yes, you can easily add action buttons for approve and reject workflows. Simply add two buttons to your results screen, link them to update the record's Validation Status property, and use conditional visibility to display appropriate status badges based on the current validation state. Consider adding a third "Needs Review" option for uncertain scans.
How do I test my AI scanning app before publishing?
Start by using Adalo's Preview button for browser testing of basic workflows, then test on physical devices using TestFlight for iOS or direct APK builds for Android. Testing on real devices is crucial for AI scanning apps because it reveals how camera integration, image quality, and OCR processing perform under various lighting conditions and angles.
Which is better for mobile apps, Adalo or Bubble?
For native mobile apps, Adalo has a clear advantage. Adalo compiles to true native iOS and Android code, while Bubble's mobile offering wraps the web app—which can introduce latency and performance issues, especially for camera-intensive scanning apps. Adalo also offers simpler pricing at $36/month versus Bubble's $59/month with usage-based Workload Unit charges.
Do I need coding experience to build an AI scanning app?
No coding experience is required with Adalo. The visual builder has been described as "as easy as PowerPoint," and you can integrate AI services through automation platforms like Zapier without writing code. This differs from platforms like FlutterFlow, which is "low-code" and requires technical knowledge to use effectively.
Can I migrate from another platform to Adalo?
Yes, you can migrate to Adalo from other platforms. Your database structure can be recreated in Adalo's built-in database, and external integrations can be reconnected through Zapier or Make. The main consideration is rebuilding your screens using Adalo's drag-and-drop components, which is straightforward given the visual builder's intuitive interface.


