Creating a restaurant app is no longer an expensive, complicated process. With Adalo, a no-code app builder for database-driven web apps and native iOS and Android apps—one version across all three platforms, published to the Apple App Store and Google Play—you can design, build, and publish a fully functional app for your restaurant without writing any code. Here's what you get:
- Direct Ordering: Save up to 30% per order by bypassing third-party platforms.
- Loyalty Programs: Increase customer spending by 20% with rewards and personalized push notifications.
- Affordable Pricing: Build an app for just $36/month, compared to $70,000+ for custom development.
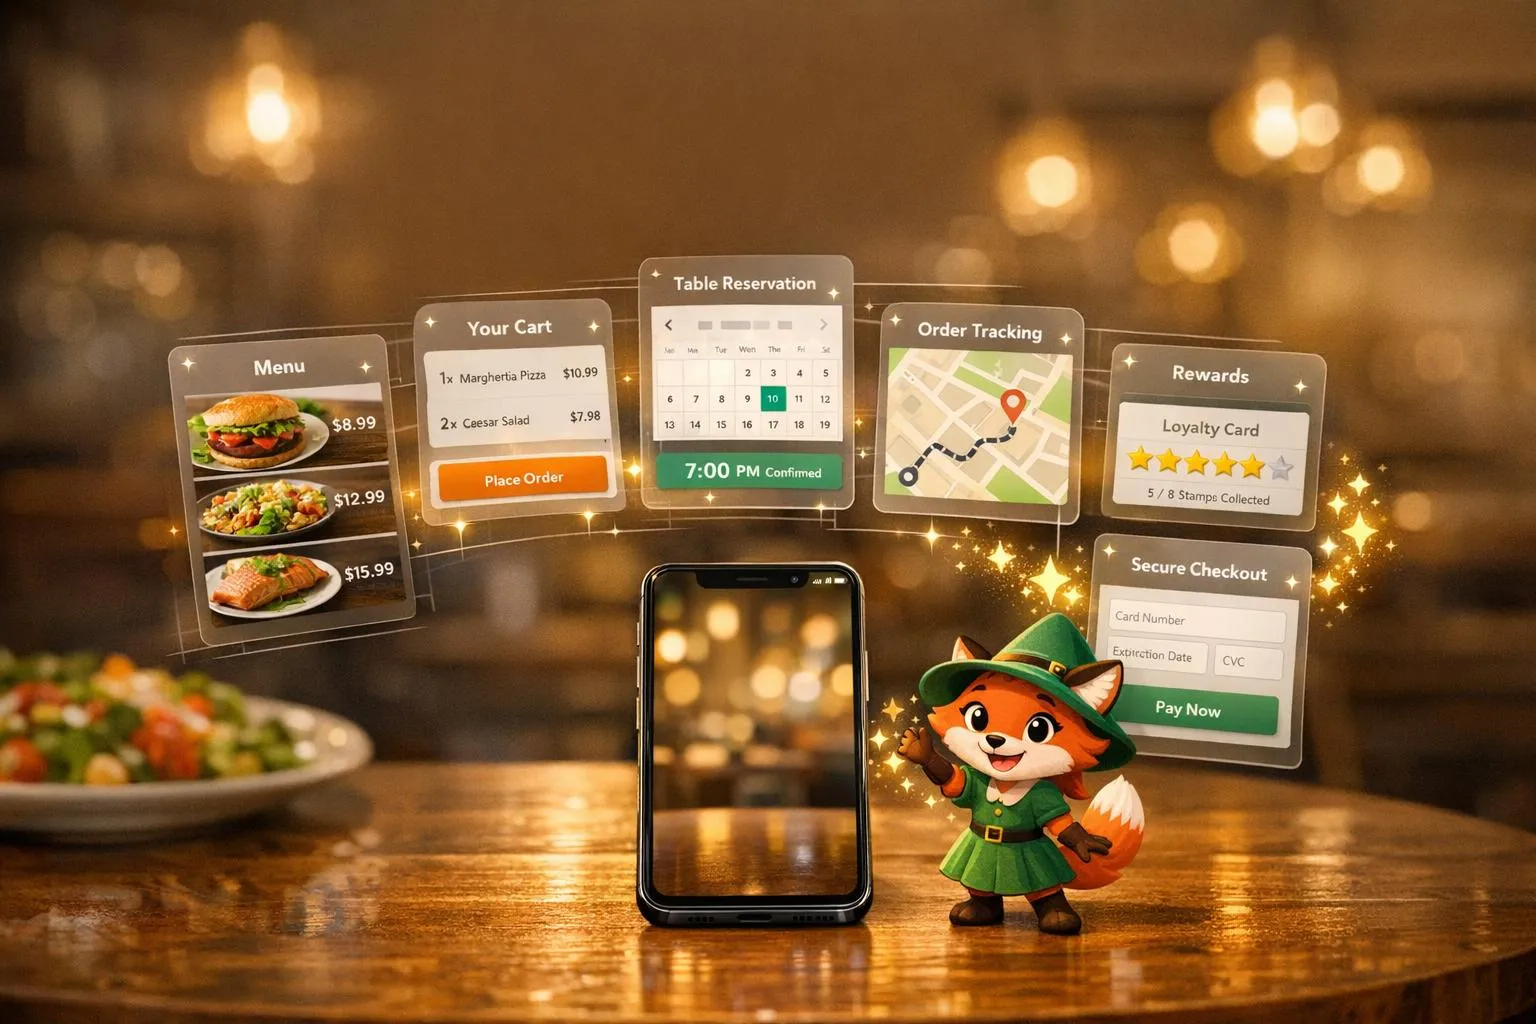
- Core Features: Digital menus, online ordering, delivery tracking, table reservations, and promotions - all in one place.
- Quick Start: Use templates or Adalo's AI-powered tools to launch faster.
Adalo simplifies app creation with drag-and-drop tools, pre-built templates, and integrations like Stripe for payments. You can test your app for free, customize it to fit your branding, and publish it on iOS, Android, or as a Progressive Web App (PWA). Ready to take control of your restaurant's digital experience? Let’s get started!
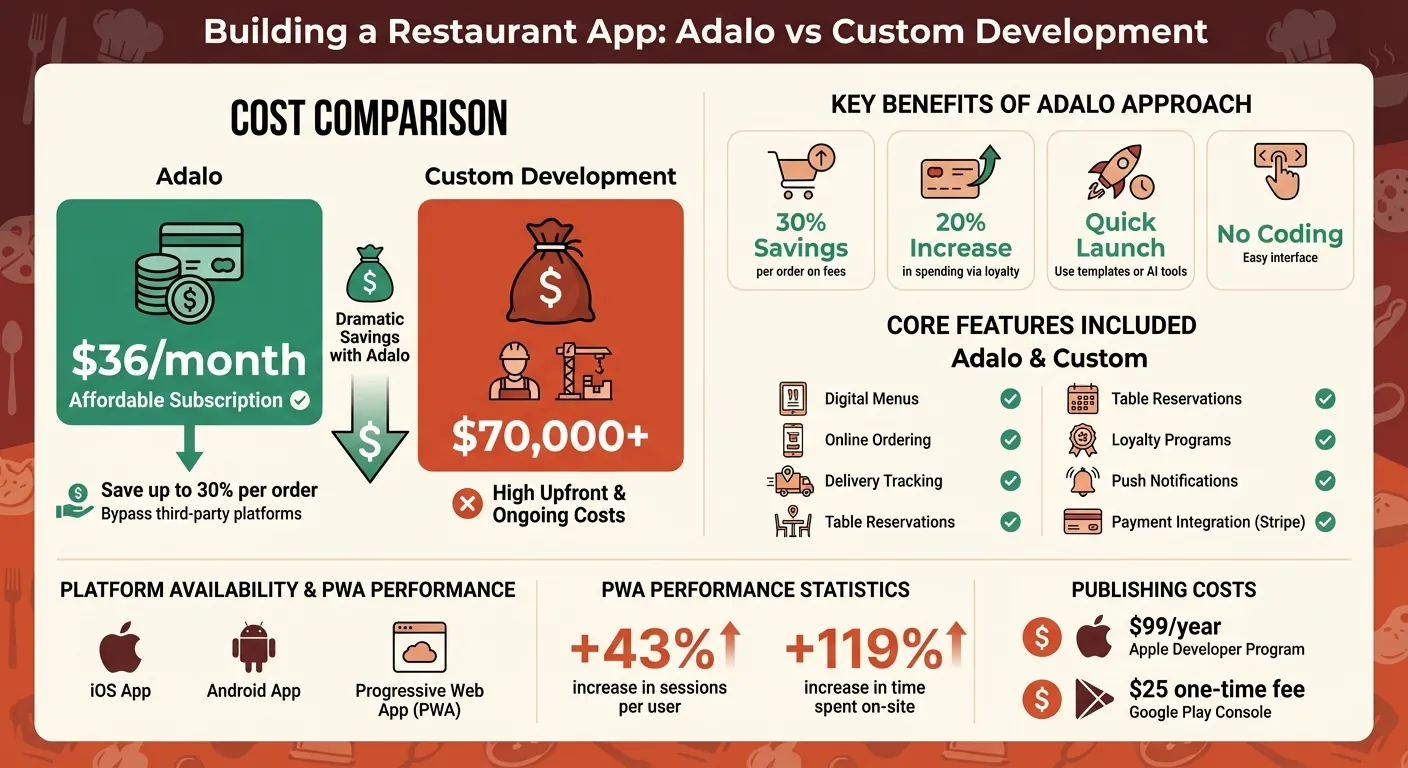
Adalo Restaurant App vs Custom Development: Cost and Features Comparison
Adalo Restaurant Ordering App
Getting Started with Adalo
Head over to Adalo.com and sign up for a free account. All you need is your full name, email address, and a password. The free plan allows you to build unlimited test apps, giving you the chance to prototype your entire restaurant concept without spending a dime. This way, you can test your menu layout, ordering process, and overall user experience without any financial risk.
Once you're logged in, you'll land on the dashboard. Click "Create New App" to kick off your restaurant project. Select "Mobile App" as your platform to take advantage of features like camera access for food photos and reviews, as well as location services for delivery tracking. You can either start from scratch or use the Restaurant Ordering Template, which comes pre-loaded with essential screens like All Products, Category, Product Detail, Bag, and Checkout. It also includes databases for Users, Orders, and Products, with Stripe payment integration already set up—saving you hours of manual work.
Ada, Adalo's AI builder, lets you describe what you want and generates your app. Magic Start creates complete app foundations from a description, while Magic Add adds features through natural language.
For an even quicker start, try Magic Start, Adalo's AI-powered feature that generates complete app foundations from text descriptions. Simply describe your app idea—for instance, "pizza restaurant app with online ordering and delivery tracking"—similar to how you would build an Instacart clone—and it will generate screens, databases, and user flows for you to customize. What used to take days of planning happens in minutes. After that, adjust your workspace settings to align with U.S. standards and your restaurant's branding.
Setting Up Your Adalo Workspace
Once your app is created, it's time to fine-tune the settings. In App Settings, configure the currency to USD ($), set the date format to MM/DD/YYYY, and adjust units to imperial (miles and Fahrenheit, if applicable). Personalize your app by adding your restaurant's logo and primary colors—colors like red and orange often work well for food-related apps.
If your app will showcase restaurant locations, you'll need to set up a Google Maps API key in the settings. Enable location services and push notifications to send your customers updates on orders or promotions. These small tweaks ensure your app looks polished and runs smoothly right from the start.
The Restaurant Ordering Template takes care of database relationships for you, linking Users to Orders and Orders to Products. With Adalo's unlimited database records on paid plans, you won't hit storage caps as your menu grows or order history accumulates. Prefer working with spreadsheets? Use SheetBridge to convert a Google Sheet into your app's database, making menu management a breeze.
Understanding Adalo's Visual Builder
Adalo's builder features a left-hand dashboard for navigation and a central canvas for designing your app. The drag-and-drop interface is intuitive and easy to use.
"Adalo's building interface is so intuitive that you can start building your app immediately after signing up." - The Adalo Team
The platform provides components like buttons, text fields, images, and lists. For a restaurant app, you might use List components to showcase menu items, Form components for order submissions, and Modals for sign-ins or customer reviews. Each component connects directly to your database, so any updates—like adding a new dish—automatically appear in your app.
You can toggle between AI-assisted editing with Magic Add and manual design using the drag-and-drop tools. Magic Add lets you describe what you want—"add a customer reviews section with star ratings"—and the AI generates the components and logic automatically. While Adalo supports up to 400 screens, most restaurant apps only need 10–15 core screens. Start with the template's ready-made screens and tweak them to match your restaurant's vibe. Adjust colors, swap out images, and update text—all changes appear instantly, giving you a clear view of how your app will look on a phone screen. With your workspace and builder set up, you're ready to dive into creating your restaurant app's key features.
Building the Core Features of Your Restaurant App
Creating a Digital Menu
Your digital menu relies on two main database collections: Categories (like Appetizers, Mains, Desserts, and Drinks) and Products (each linked to a category). The Restaurant Ordering template comes preloaded with these collections, including fields for Name, Price, Image, and Description. To display your menu, use a List component connected to the Products collection, and add Image and Text components to showcase food photos, names, descriptions, and prices in USD ($).
To enhance the experience, create a Product Detail screen where customers can view more details about a dish. Include an Image Carousel to highlight multiple photos of the item. Add visual cues like "Popular" badges for best-sellers, chili icons for spiciness, or dietary tags like "V" for Vegetarian or "GF" for Gluten-Free. Use a True/False availability flag to gray out items that are out of stock, updating in real time.
For larger menus, enable the "Load items as the user scrolls" option in the List component to keep performance smooth. Add a Text Input at the top of the menu screen so customers can search for dishes by name or filter by dietary preferences. To speed up load times, compress images before uploading. Since Adalo places no caps on database storage, you can add as many menu items, photos, and descriptions as your restaurant needs without worrying about hitting limits.
Once your dynamic menu is ready, you can move on to setting up the online ordering system.
Building an Online Ordering System
With your menu in place, the next step is creating a smooth ordering system. The template's "Bag" acts as a shopping cart, showing items added by the customer. Use a List component that filters for the logged-in user's active order. Display each item's name, image, quantity (with controls for adjustments), and subtotal. The "Add to Bag" button creates a new Order Item record tied to the user's current order.
On the Checkout screen, calculate the total by summing up the Order Item prices and adding delivery fees, taxes, and tips. Offer tipping options, such as 15%, 18%, or 20%, using a slider or preset buttons—these are standard in the U.S. Set up the Stripe Card Input component so the "Pay" button processes the payment in USD and creates an Order record. After payment, redirect users to a confirmation screen. Make sure to test the setup in Stripe's test mode before launching.
Since cart functionality requires users to be logged in, display a Sign In modal if a guest tries to shop without an account. Unlike platforms that charge usage-based fees for each transaction or database action, Adalo's $36/month plan includes unlimited usage—no surprise charges as your order volume grows.
Adding Table Reservation Functionality
Take your app a step further by adding a table reservation feature alongside online ordering. Create a Reservations collection with fields for User, Date (MM/DD/YYYY), Time (12-hour format), Party Size, and Status ("Pending" or "Confirmed"). Build a reservation form that includes a Date Picker (set to allow dates from "Today" up to 60 days out), a Time Picker (with intervals of 15 or 30 minutes), and a Number Input for party size.
Add a "Check Availability" button to verify open slots by counting existing reservations for the selected date and time. If all slots are booked, use conditional visibility to show a message like "Fully Booked - Please Choose Another Time." When a new reservation is created, set its default status to "Pending." Once the customer completes any required deposit using the Stripe component, update the status to "Confirmed."
To reduce no-shows, use Adalo's push notifications to send automated reminders 24 hours before the reservation. For confirmation emails, connect to Zapier via Custom Actions to send reservation details directly to the customer.
Adding Features to Increase User Engagement
Implementing Loyalty Rewards and Promotions
Once your core features are in place, you can boost user engagement by introducing rewards and promotions. A points-based loyalty system is a great way to start. Create a Loyalty Points collection in your database with fields like User (relationship), Points (number), and Transactions (to track earning history). Link this collection to your Users collection so each customer has their own points balance. Since Adalo integrates these collections seamlessly, managing this setup is straightforward.
To reward users, set up a custom action on the Congrats screen after each purchase. For instance, you could award 10 points for every $1 spent and update the user's balance accordingly. Display this running total on a profile screen using a text component, such as "Logged-in User > Loyalty Points > Points."
For redemptions, create a Rewards Redemption screen. Use a "Rewards" collection with fields like Name, Required Points, and Discount Value. Add logic to check if a user has enough points to redeem a reward. If not, display a modal with a friendly message.
Push notifications can further enhance engagement. Use Adalo's "Send Push Notification" action to notify users about their point balances or special offers. For example, target users who haven't ordered in 30 days with a personalized message: "Hi {Logged-in User > Full Name}, you have {Loyalty Points > Points} points! Order this week for double points on all entrees." Adalo's data suggests push notifications can increase user retention rates by 3 to 10 times.
For promotional campaigns, set up a "Promotions" collection. Include fields like Promo Code, Discount Type (Percentage, Fixed Amount, or Free Delivery), Discount Value, Minimum Spend, and Expiry Date. Highlight special discounts by showing "Loyalty Reward" badges on eligible menu items. This encourages users to explore deals while browsing.
Setting Up Delivery and Order Tracking
To keep customers informed and engaged, add real-time order tracking. Start by adding a Status property to your Orders collection with values like "Placed", "Accepted", "Preparing", "Out for Delivery", and "Delivered." Update the status as the order progresses, and reflect these changes on an Order Tracking screen.
Design the Order Tracking screen with a visual progress bar tied to the current status. Use conditional visibility to show completed steps as filled circles and pending ones as outlines. You can also include timestamps for each status update to provide more clarity.
Automate push notifications to alert users when their order status changes. For example, when an order moves from "Preparing" to "Out for Delivery", send a message like "Your order is on the way! Expected arrival in 25 minutes." Add a personal touch by including the driver's name or estimated delivery time using magic text.
For additional transparency, integrate a Google Maps component to display the delivery address. While Adalo doesn't support continuous background GPS tracking natively, you can still show the destination location for visual confirmation. For advanced live driver tracking, consider integrating external tools like Firebase through Custom Actions.
Combining status updates, visual progress indicators, and timely notifications creates a seamless delivery experience. This transparency not only keeps customers informed but also builds trust, ensuring they remain engaged throughout the entire order process.
Publishing Your Restaurant App
After rigorous testing and fine-tuning, it's time to bring your restaurant app to life and make it available to your customers.
Preparing for App Store Submission
Before launching, ensure you have developer accounts set up and all necessary materials prepared. An Apple Developer Program account costs $99 annually, while a Google Play Console account requires a one-time $25 fee. These accounts are essential for publishing native apps on their respective platforms.
Start by creating a Privacy Policy for your app, as both Apple and Google require one. Since your app may collect data like payment details, addresses, or order history, this policy must be hosted on a publicly accessible URL—ideally on your restaurant's website. Additionally, Apple requires a Support URL and a Marketing URL, so have these ready.
Next, focus on your app's visual assets. Apple requires a 1024×1024 pixel icon with no transparency, while Google Play needs a 512×512 pixel icon. Keep your app's name under Apple's 30-character limit—choose something short, catchy, and aligned with your restaurant's branding. Gather high-quality screenshots that showcase your app's key features, like the digital menu, ordering process, or loyalty rewards. These visuals not only help reviewers but also attract potential users.
For technical setup, use the Bundle ID format com.appname.ios for Apple submissions. Double-check that there are no extra spaces in Adalo's settings to avoid build errors. Even if you're not using them right away, enable "Push Notifications" in Apple's developer portal to prevent approval delays.
If your app requires a login, create a demo account with working credentials for the review team. Remove any placeholder content before submission. Apple notes that around 40% of app rejections stem from avoidable mistakes, like incomplete information or placeholder text. Use the "Notes for Review" section in App Store Connect to explain any unique features or quirks your app may have.
"A successful App Store review goes beyond having a bug-free app, it means meeting the technical, design and policy rules set by Apple and Google."
- Gaurav Parvadiya, Founder and CEO, Twinr
Once everything is in place, you're ready to publish your app across all platforms.
Publishing to iOS, Android, and Web
With all your materials prepped, the publishing process becomes straightforward. In Adalo's Publish section, select your target platform. Adalo generates the necessary native files—.IPA for Apple and .AAB (Android App Bundle) for Google Play. This is where Adalo's value becomes clear: at $36/month, it's the most affordable option for publishing native iOS and Android apps to both app stores from a single codebase.
Each platform has a different review process. Apple's is primarily manual, with human reviewers assessing your app's design, functionality, and compliance. While 90% of apps are reviewed within 24 hours, it's safer to plan for a 48-hour timeline. Google Play combines automated and manual reviews, with approval times ranging from a few hours to several days. Apple's team handles over 100,000 submissions weekly, and in 2022 alone, the App Store rejected 1.7 million apps. Attention to detail is critical to avoid delays.
Adalo apps are also built as Progressive Web Apps (PWAs) by default. PWAs allow users to access your app through a web link without requiring a download. By visiting the link, users can "install" the app on their home screen. PWAs are highly effective—restaurants adopting PWAs have seen a 43% increase in sessions per user, and time spent on-site jumps by 119%.
"PWAs are a game-changer for restaurants especially and represent the next phase of mobile marketing."
- Mano Behera, The Digital Restaurant
For payment processing in PWAs, Stripe is a better choice than native In-App Purchase systems, which are only available in native apps. PWAs also benefit from search engine indexing, making your restaurant easier to find online—something native apps can't offer.
| Feature | Native App (iOS/Android) | Progressive Web App (PWA) |
|---|---|---|
| Distribution | App Store / Google Play | Direct via Web Link |
| Installation | Requires download | "Add to Home Screen" |
| Updates | Store approval needed | Instant/Automatic |
| Push Notifications | Built-in | Supported via Service Workers |
| Discoverability | App store search only | Indexed by search engines |
For context on pricing, competitors like Bubble charge $69/month plus unpredictable Workload Units for CPU and database usage. Glide starts at $25/month but only creates web apps—no native mobile apps. Thunkable requires $189/month for app store publishing. Adalo's $36/month plan includes native iOS and Android publishing with no usage-based charges, making costs predictable as your restaurant grows.
Testing and Optimizing Your App Before Launch
Getting your app ready for the public involves more than just building it—it requires thorough testing to ensure a smooth experience for users. Before submitting your restaurant app to the Apple App Store or Google Play, you need to test it across all platforms and address any performance issues. Skipping this step can lead to app store rejections, frustrated users, or apps that crash under pressure.
Testing Across Platforms
Apps don't behave the same on iOS, Android, and web browsers. Each platform processes your app's data and logic differently, so testing is crucial. Start with Adalo's Preview button for a quick look, but make sure to test on actual devices for the most accurate results. Use tools like TestFlight for iOS and Google Play Internal Testing for Android to distribute builds and gather feedback. TestFlight lets you share builds with up to 100 internal testers without Apple's review, while external testing supports up to 10,000 people but requires approval. Keep in mind, TestFlight builds expire after 90 days, so plan accordingly.
Focus on testing your app's key features—menu browsing, order placement, table reservations, and loyalty rewards—on each platform. Check how touch interactions on mobile compare to mouse clicks on web browsers. Push notifications are another area to test, as they behave differently on iOS, Android, and web. For features like delivery tracking, ensure maps load properly across devices. Also, test edge cases to confirm your app runs reliably under less-than-ideal conditions.
For example, in Adalo's 2026 OpenTable clone tutorial, developers tested the entire owner setup flow—sign-up, adding tables and menu items, and verifying the dashboard—on iOS and Android. During testing, they noticed slow table list filters. By switching to direct Restaurant ID matching instead of complex filters, they reduced load times by 40% on restaurant detail screens. This optimization smoothed out daily operations like viewing reservations and assigning tables.
Using Adalo's Performance Analysis Tools
After confirming your app works across platforms, it's time to fine-tune its performance. Adalo's X-Ray tool helps diagnose performance issues before launch. Think of app performance as a score between 0 and 100—every design decision affects that score. X-Ray scans your app and flags problems like slow-loading lists, inefficient database queries, or heavy actions that delay navigation.
To use X-Ray, activate it from the preview menu and run a scan. The tool generates a heatmap of load times and highlights issues. For instance, it might flag unfiltered menu item lists that take over two seconds to load. Restaurant apps often struggle with displaying too many menu items at once, or sorting customer reviews by "Newest first" without limiting the initial load. X-Ray offers specific fixes, like indexing Restaurant IDs on menu items or reducing list visibility conditions.
Prioritize optimizing high-traffic screens, such as your home page with search and menu categories, or your menu management dashboard. Use features like "Load Items as User Scrolls" to cut initial load times on large lists by up to 86%. Limit the number of items displayed initially to 20-50 and use infinite scrolling for the rest. Compressing images to under 500KB can also significantly speed up load times.
Aim for an X-Ray score of 90 or higher, and keep page load times under two seconds. If database query times exceed 200 milliseconds, look into optimizing your data relationships. For example, add indexes on User-Rewards relationships in loyalty programs or use pagination for review displays instead of loading everything at once.
"Testing your app across platforms and making necessary adjustments is key to ensuring the best possible user experience, even with these inherent variations."
- Adalo Help
Adalo's modular infrastructure is designed to scale with your restaurant's growth. The platform supports apps with 1 million+ monthly active users, processing 20 million+ daily requests with 99%+ uptime. Unlike WebView wrappers that can slow down under heavy load, Adalo's purpose-built architecture maintains performance as your customer base expands.
Finally, test your app with real users before submitting it to app stores. Share TestFlight or Google Play Internal Testing links with a small group of customers and gather feedback on usability. This final round of testing helps catch any last-minute issues and ensures your restaurant app is ready to impress from day one.
Conclusion
You've successfully created your restaurant app with Adalo, incorporating features like digital menus, online ordering, table reservations, loyalty rewards, push notifications, and delivery tracking. After testing across iOS, Android, and web platforms, and fine-tuning performance with tools like X-Ray, every aspect of your app—from browsing menus to placing orders—runs seamlessly.
Adalo's $36/month plan allows you to launch your app across all platforms with predictable pricing and no usage-based charges. With your branded app, you're in control—building stronger connections with customers and capturing more value from each order. The steps you've taken, from designing the interface to ensuring smooth functionality, have set the stage for a modern, efficient restaurant experience featuring dynamic menus, real-time tracking, and customer engagement.
Now that every detail has been polished, it's time to take the next step. Start your free trial, follow the process you've mastered, and publish your app today. Whether you're running one location or envisioning growth across multiple restaurants, Adalo's infrastructure scales to support your ambitions. Build the app that matches your vision and take control of how you serve your customers.
Related Blog Posts
- How to Launch Your First Mobile App Without Coding
- Building an E-commerce App: No-Code Platform Guide
- How to Create an Invoice App
- How to Build a Money-Making App with Adalo: 12 Revenue Models
FAQ
Why choose Adalo over other app building solutions?
Adalo is an AI-powered app builder that creates true native iOS and Android apps. Unlike web wrappers, it compiles to native code and publishes directly to both the Apple App Store and Google Play Store from a single codebase—the hardest part of launching an app handled automatically. At $36/month with unlimited usage, it's the most affordable option for native app store publishing.
What's the fastest way to build and publish an app to the App Store?
Adalo's drag-and-drop interface and AI-assisted building let you go from idea to published app in days rather than months. Magic Start generates complete app foundations from text descriptions, and Magic Add lets you add features by simply describing what you want. Adalo handles the complex App Store submission process, so you can focus on your app's features instead of wrestling with certificates and store guidelines.
How much does it cost to build a restaurant app with Adalo compared to custom development?
Building a restaurant app with Adalo costs $36/month, compared to $70,000+ for custom development. This includes all core features like digital menus, online ordering, delivery tracking, table reservations, and promotions—with no caps on actions, users, records, or storage. Unlike competitors that charge usage-based fees, Adalo's pricing is predictable.
Can I add a loyalty rewards program to my restaurant app?
Yes, Adalo makes it easy to implement a points-based loyalty system in your restaurant app. You can create loyalty collections in your database, award points automatically after purchases, and set up reward redemptions—all connected to push notifications that can increase customer retention by 3 to 10 times.
Do I need to build separate apps for iOS, Android, and web?
No, with Adalo you build one version that works across all three platforms. Your restaurant app can be published as a native iOS app, native Android app, and Progressive Web App (PWA) from a single project. PWAs are particularly effective for restaurants, with studies showing a 43% increase in user sessions and 119% more time spent on-site.
How do I accept payments in my Adalo restaurant app?
Adalo integrates with Stripe for secure payment processing in USD. The Restaurant Ordering Template comes with Stripe payment integration already set up, allowing you to accept credit card payments for orders, handle tips (15%, 18%, or 20% options), and process reservation deposits—all tested safely in Stripe's test mode before going live.
How long does it take to build a restaurant app with Adalo?
Using Adalo's Restaurant Ordering Template and AI-powered tools like Magic Start, you can have a functional prototype within hours. A fully polished app ready for app store submission typically takes a few days to a couple of weeks, depending on customization needs—compared to months for traditional development.
Do I need coding experience to build a restaurant app?
No coding experience is required. Adalo's visual builder uses drag-and-drop components, and the AI Builder lets you describe features in plain language. The platform is designed so anyone can start building immediately after signing up, with pre-built templates handling the technical complexity.
Can my restaurant app handle growth as my business expands?
Yes, Adalo's modular infrastructure scales to support apps with 1 million+ monthly active users, processing 20 million+ daily requests with 99%+ uptime. Unlike platforms with record limits or usage-based charges, Adalo's paid plans include unlimited database records and no action caps, so your costs stay predictable as you grow.
How does Adalo compare to Bubble or Glide for restaurant apps?
Adalo offers native iOS and Android apps at $36/month with unlimited usage. Bubble costs $69/month plus unpredictable Workload Units and doesn't create native mobile apps. Glide starts at $25/month but only creates web apps—no native mobile apps or app store publishing. For restaurants wanting a presence in the App Store and Play Store, Adalo provides the best value.
Build your app fast with one of our pre-made app templates
Begin Building with no codeRelated Content
Building Your Mobile App: Adalo's Complete Development and Deployment Guide
Step-by-step guide to design, build, test, and publish cross-platform mobile apps and PWAs with AI tools, databases, testing, and app store
Adalo's 2026 Guide to AI-Powered No-Code Mobile App Builders
Adalo's 2026 Guide to AI-Powered No-Code Mobile App Builders
Adalo offers AI-powered no-code tools to help founders and startups build and publish responsive apps using APIs and custom integrations.

Step-by-Step Guide: Building a Grubhub Clone with Adalo
Build a Grubhub-style food delivery app in Adalo with ordering, payments, and delivery—plus real-time features via external integrations.
Step-by-Step Guide: Building a Postmates Clone with Adalo
Build a no-code food delivery app with Adalo, supporting restaurants, customers, and drivers, plus payments and order tracking.