


Managing a clothing store requires tracking inventory across locations, processing orders instantly, and delivering a seamless shopping experience to customers—whether they're browsing on a phone or desktop. Building an app that handles all of this typically demands separate development teams for web, iOS, and Android, plus months of coding and a budget that's simply out of reach for most retail businesses.
That's where Adalo comes in. Adalo is a no-code app builder for database-driven web apps and native iOS and Android apps—one version across all three platforms. AI-assisted building and streamlined publishing enable launch to the Apple App Store and Google Play in days rather than months. For clothing retailers ready to modernize their operations, this means finally having the power to create professional-grade management tools without writing a single line of code.
Why Adalo Works for Building a Clothing Store Management App
Adalo is a no-code app builder for database-driven web apps and native iOS and Android apps—one version across all three platforms, published to the Apple App Store and Google Play. This makes it an excellent choice for clothing retailers who need to manage inventory, process orders, and engage customers across multiple channels without hiring a development team or maintaining separate codebases for each platform.
Having your clothing store app available in both app stores gives your business credibility and makes it easy for customers to find and download. You can leverage push notifications to alert shoppers about new arrivals, flash sales, or order updates—keeping them engaged and driving repeat purchases. Paid plans include unlimited database records, meaning your product catalog, customer data, and order history can grow without hitting storage caps. Let's walk through how to build your own clothing store management app from start to finish.
Running a clothing store means juggling inventory across multiple locations, processing orders in real time, and keeping customers happy with a seamless shopping experience. Building an app that handles all of this—while working flawlessly on web browsers, iPhones, and Android devices—typically requires separate development teams, months of coding, and a substantial budget that puts custom software out of reach for most retail businesses.
Adalo, an AI-powered app builder, changes this equation entirely. Store owners can now build powerful management tools themselves—one version that publishes to web, iOS App Store, and Android Play Store simultaneously. With AI-assisted building and streamlined publishing, you can launch to both app stores in days rather than months, handling what's often the hardest part of bringing a new retail app to market.
Why Adalo Works for Building a Clothing Store Management App
Adalo creates true native iOS and Android apps alongside web apps from a single codebase. This makes it an excellent choice for clothing retailers who need to manage inventory, process orders, and engage customers across multiple channels without hiring a development team or maintaining separate codebases for each platform.
Having your clothing store app available in both app stores gives your business credibility and makes it easy for customers to find and download. You can leverage push notifications to alert shoppers about new arrivals, flash sales, or order updates—keeping them engaged and driving repeat purchases. Paid plans include unlimited database records, meaning your product catalog, customer data, and order history can grow without hitting storage caps. Let's walk through how to build your own clothing store management app from start to finish.
Creating a clothing store management app can simplify inventory tracking, order processing, and customer interactions. With Adalo, you can develop a single app for web, iOS, and Android platforms without rebuilding for each. Here's what you need to know:
- Key Features: Real-time inventory tracking, user authentication, product catalogs, search and filtering, shopping cart with Stripe integration, and order management.
- Database Setup: Organize data into collections (e.g., products, categories, sizes, users) for seamless updates and relationships—with no record limits on paid plans.
- Customer Experience: Build intuitive browsing, detailed product pages, and a secure, simple checkout process.
- Deployment: Publish across platforms or use Progressive Web Apps (PWAs) or native apps for quick access without app store approvals.
- Maintenance: Monitor analytics, fix issues fast, and update features based on user feedback.
This guide walks you through planning, building, and launching your app, ensuring smooth operations and improved customer experiences. Tools like Adalo make it possible to create a professional app without coding expertise.
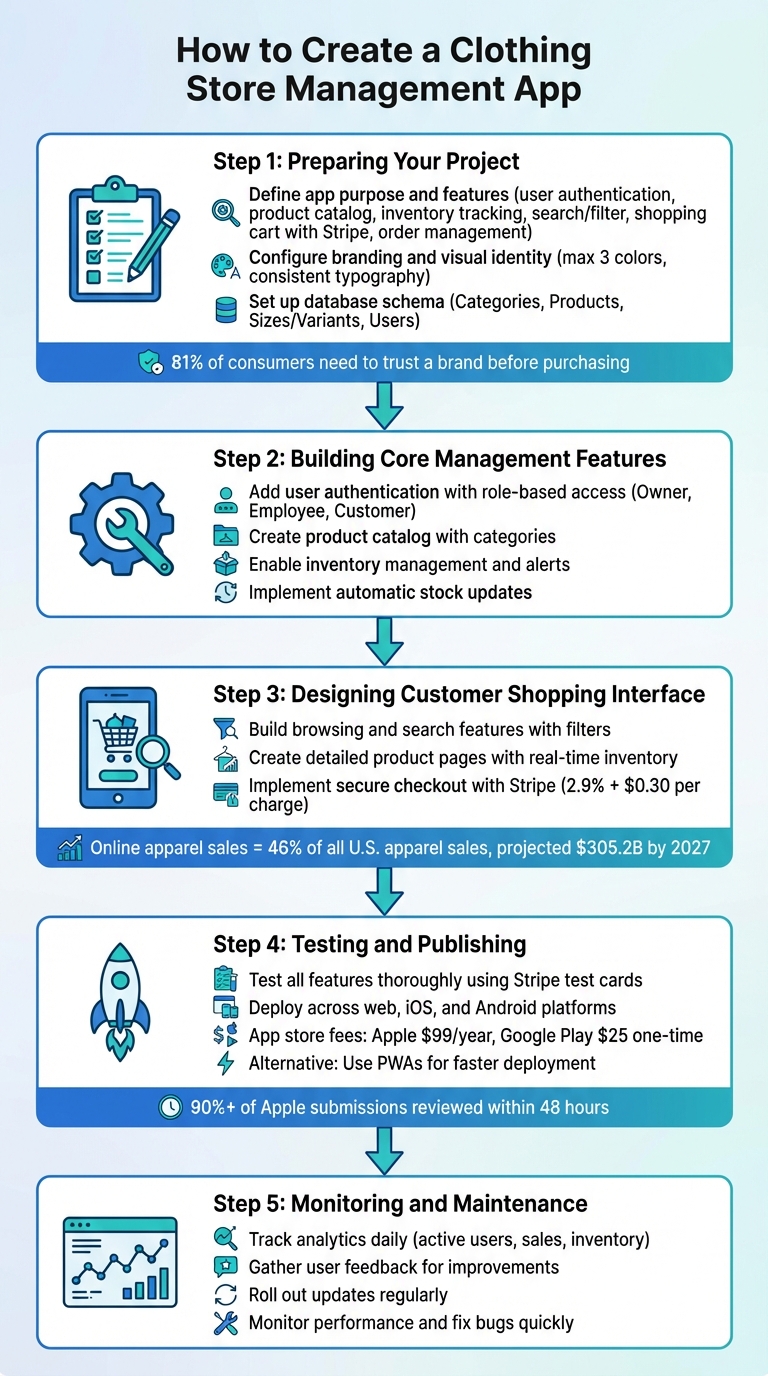
5-Step Process to Build a Clothing Store Management App
How To Set Up Your Adalo Database
Preparing Your Project
Plan your app's features and design carefully to address potential challenges like stock shortages, manual tracking, or disconnected sales channels. Start by clearly outlining your app's purpose, features, and overall structure, as well as how it ties into your brand identity.
Define Your App's Purpose and Features
List the key features your app needs to include, such as:
- User authentication
- A detailed product catalog
- Real-time inventory tracking
- Search and filtering options
- A shopping cart with checkout (using Stripe integration)
- Order management tools
Ada, Adalo's AI builder, lets you describe what you want and generates your app. Magic Start creates complete app foundations from a description, while Magic Add adds features through natural language.
To refine your ideas, collect user feedback through surveys and create simple wireframes to map out the flow of your app's screens. Magic Start can accelerate this process—describe your clothing store app concept, and it generates complete app foundations including database structure, screens, and user flows automatically. What used to take days of planning happens in minutes.
Configure Branding and Visual Identity
Your app should seamlessly reflect your store's brand. Start by establishing a cohesive visual identity. Stick to a clean color palette with no more than three colors, and define their Hex codes to maintain consistency across your app, website, and marketing materials. Typography should align with your brand's personality—for instance, luxury boutiques might prefer sophisticated serif or minimalist sans-serif fonts, while bold, graphic fonts might suit a streetwear label.
Make sure your logo is easily recognizable at any size by testing its visibility with the "3-second test." Keep in mind that 81% of consumers need to trust a brand before making a purchase.
Set Up the Database Schema
Design a database structure that organizes your data into collections based on specific categories. For a clothing store, you might need collections for:
- Categories: For example, "Apparel" or "Footwear."
- Products: Including details like descriptions, prices, and images.
- Sizes/Variants: To track stock levels for different product sizes.
- Users: Covering customer accounts and admin access.
Each collection should include relevant fields. For instance, the Products collection might have:
- Name: Text
- Description: Text
- Price: Number
- Brand: Text
- Main Image: Image file
- In Stock: Number (to set up inventory alerts)
Link these collections through relationships—for example, one category can include multiple products, and each product can have several size variants. This setup enables real-time updates for essential operations like creating, reading, updating, and deleting records. With no data caps on paid plans, your product catalog can scale to thousands of SKUs without hitting storage limits.
If you're already using tools like Google Sheets or Airtable to manage inventory, Adalo's SheetBridge feature lets you turn a Google Sheet into an actual database—the easiest path to mobile-friendly features without database-related learning curves. You can also explore other external database options to build on your existing data.
Building Core Store Management Features
Once your project framework is in place, it's time to focus on the essential features that will streamline store management. These features are designed to save time, minimize errors, and tackle the day-to-day challenges of running a clothing store.
Add User Authentication and Role-Based Access
Start by using the pre-configured Users collection to manage key details like email, password, username, full name, and profile photo.
To introduce different levels of access, add a custom Role property (Text type) to the Users collection. Assign roles such as "Owner", "Employee", or "Customer" to define what each user can access. For instance, you can set visibility rules to restrict management features—like "Add Product" or "Edit Inventory"—to users with specific roles.
Keep the role system simple at first to avoid unnecessary complexity. Use "Logged In User" filters to ensure sensitive actions are secure. A good example of this is Adalo's Poshmark clone tutorial from 2026, where developers implemented role-based access so only sellers could view a "Sales Dashboard" featuring earnings summaries and order lists.
This setup ensures that only authorized users can make critical changes, protecting your inventory and pricing from unauthorized access.
Create a Product Catalog with Categories
Using your database schema as a foundation, create a product catalog with Categories and Products collections. Display categories in a filterable list, which updates a product grid below to show key details like product images, titles, and prices (formatted in USD, e.g., $49.99).
For inventory tracking, build a Product Variants collection linked to the Products collection. Include properties for Size (e.g., S/M/L/XL based on US sizing), Color (e.g., Blue, Red, Black), and Stock Per Variant (number). On the Product Detail screen, display these variants in a custom list filtered by the selected product. Update the price and stock count dynamically based on the user's selection. When a customer completes a purchase, the stock for the chosen variant should automatically decrease.
Magic Add can speed up this process—describe the feature you want, like "add a color filter to the product grid," and it generates the necessary components and logic. This structure not only makes it easier for customers to browse products but also gives you precise control over inventory, down to the size and color of each item.
Enable Inventory Management and Alerts
Use a numerical field in your Products collection (or the "Stock Per Variant" field if variants are in use) to manage stock levels. Configure actions to automatically reduce stock when a purchase is completed or allow manual updates for new inventory arrivals.
Implement low-stock alerts with conditional visibility rules. For example, display a "Low Stock" badge on the management dashboard when inventory for a product drops below a set threshold—like fewer than 10 units.
Take it a step further by integrating tools like Zapier to trigger external notifications. For instance, you could send a Slack message to a manager or an automated email to a supplier when stock levels fall too low.
Finally, create an "Edit Product" screen with a restricted-access form for users with "Admin" or "Employee" roles. This prevents unauthorized edits and helps avoid costly issues like stockouts or overselling, which can hurt revenue and customer trust. X-Ray can help identify any performance bottlenecks in your inventory management screens before they affect users during high-traffic periods like sales events.
Designing the Customer Shopping Interface
Once you've nailed down the backend management features, it's time to shift gears and focus on the customer-facing side of your app. This is where shoppers interact directly, so the interface needs to be intuitive, visually appealing, and fast. With online apparel sales making up 46% of all U.S. apparel sales and projected to hit $305.2 billion by 2027, getting this part right could make a huge difference in your revenue. Let's break down the key elements of the customer journey: browsing, product details, and checkout.
Build Browsing and Search Features
Start by organizing your products using the Categories collection you set up earlier. Offer a filterable list so customers can narrow their search by size, color, price range, or style. A prominent search bar is a must-have for quick access to specific products.
Ashraf Farid, Founder of Upstack Studio, puts it perfectly:
"A directory... must also organize them in a user-friendly way that allows them to intuitively filter and search for what they want".
High-quality product photos are essential—they help build trust and confidence in your shoppers. For mobile users, use responsive layouts like card grids or swipe lists to make navigation smooth, even on smaller screens. Adalo's 3.0 infrastructure delivers 3-4x faster performance than previous versions, ensuring your product grids load quickly even with hundreds of items.
Want to take it a step further? Add product recommendations or a wishlist feature. These don't need to be overly complex—simple logic like suggesting items from the same category or style can do the trick.
Once customers find what they're looking for, it's time to guide them to detailed product pages.
Create Product Detail Pages
Every product should have its own dedicated page packed with all the key details. Pull in the product name, description, price (in USD), and images from your Products collection. Include real-time inventory updates—like "In Stock: 12 units"—to create urgency and set clear expectations.
If your products come in different variants, let customers select options like size and color directly on the page before adding items to their cart. The "Add to Cart" button should be smart: it checks for an active order tied to the logged-in user and creates one automatically if none exists. This ensures a seamless transition to the checkout process.
Visual hierarchy matters here. Place the product image and price front and center, with the description and variant options following. A cluttered or unprofessional layout can hurt sales and even discourage mobile app downloads. Invest time in making these pages look polished and user-friendly.
Implement a Checkout Process
The checkout process should be as simple, secure, and fast as possible. Make sure users are authenticated before they proceed. Show a clear order summary that includes item details, quantities, and the total price (in USD) before moving to payment.
For secure payment processing, use Stripe Elements. This keeps sensitive card data off your servers, simplifying PCI DSS compliance. Stripe's U.S. processing rate is 2.9% + $0.30 per successful charge. If you need to offer additional payment methods like PayPal or ACH, tools like Zapier or Make.com can help with integration.
After payment, mark the order as complete and show a confirmation screen with transaction details, including the transaction ID, total amount, and date. Give customers the option to view a receipt or return to the home screen. If you're selling physical products, use a Google Maps API key to capture accurate shipping addresses and integrate location functionality. Finally, ensure the system automatically updates inventory levels for purchased items to avoid overselling—a feature often found in a custom order management app.
Publishing and Maintaining Your App
You've built the features, designed the interface, and tested the checkout flow. Now it's time to launch your clothing store app and ensure it stays functional and user-friendly over time.
Test and Refine Your App
Before hitting publish, take the time to thoroughly test every screen and feature. Pay special attention to critical functions like adding items to the cart and processing payments. Use Stripe test cards to ensure payment workflows are smooth, and double-check that your database updates correctly—whether it's adjusting inventory after a sale or logging new orders in the system. Adalo's built-in preview tool is a handy way to see how your app performs across devices, including iPhones, Android tablets, and desktop browsers.
For even more feedback, share beta versions of your app using platforms like TestFlight or Google's testing programs. Focus on getting the core features—like inventory management, payment processing, and order tracking—working perfectly before adding extra features. Fix bugs quickly. As the Adalo team warns:
"An underperforming app will shed users at an appalling clip".
X-Ray helps identify performance issues before they affect users, highlighting potential bottlenecks in your app's logic or data queries so you can optimize proactively.
Deploy Across Multiple Platforms
Once your app is polished, it's time to deploy. Adalo simplifies this process, allowing you to build once and publish across web, iOS, and Android platforms. For web versions, you can publish to a custom domain (e.g., www.yourstore.com) or use an Adalo-provided subdomain. Deploying native apps requires developer accounts, which come with fees—$99 per year for Apple and a one-time $25 fee for Google Play.
Make sure your app store listings stand out by including a professional icon, clear screenshots showcasing key features like your product catalog, and descriptions packed with relevant keywords. Unlike platforms like Glide or Softr that don't support app store publishing, Adalo handles the complex submission process—certificates, provisioning profiles, and store guidelines—so you can focus on your business.
If you're looking for a quicker launch option, consider Progressive Web Apps (PWAs). These apps can be accessed via a link or QR code and saved directly to a user's home screen, skipping the app store approval process altogether. For native apps, approvals are typically fast: over 90% of Apple App Store submissions are reviewed within 48 hours, and Google Play approvals usually take just a few hours to a few days.
Monitor and Update Your App
Launching your app is just the beginning. To keep it running smoothly, you'll need to monitor its performance regularly. Adalo's analytics tools can help you track active users, identify the most visited screens, and pinpoint where customers drop off during checkout. Create dashboards to view real-time data, such as total sales in USD, current inventory levels, and order statuses.
Before rolling out major updates, gather feedback from employees and loyal customers to ensure changes will improve the user experience. Plan for both small updates—like refreshing product photos or tweaking the color scheme—and larger enhancements, such as adding new payment methods or expanding your product categories. All Adalo plans now include unlimited usage, meaning you can push updates as often as needed without worrying about usage-based charges or bill shock.
The Adalo team sums it up well:
"After launching your app, watch over it as if it were your firstborn child".
Staying on top of performance and making timely updates will help your app stay reliable and keep your customers coming back.
How Adalo Compares to Alternatives
When choosing a platform for your clothing store app, understanding the trade-offs between different builders helps you make the right decision for your specific needs.
| Platform | Starting Price | Native App Store Publishing | Database Limits | Best For |
|---|---|---|---|---|
| Adalo | $36/month | Yes (iOS & Android) | Unlimited on paid plans | Native mobile apps with integrated database |
| Bubble | $59/month | Wrapper only | Limited by Workload Units | Complex web apps with heavy customization |
| FlutterFlow | $70/month per user | Yes | External DB required | Technical users comfortable with code |
| Glide | $60/month | No | Limited rows | Simple spreadsheet-based apps |
| Softr | $167/month | No | Limited per app | Airtable-connected web apps |
Bubble offers more customization options but comes with trade-offs. Its mobile solution wraps the web app rather than compiling to native code, which can introduce performance challenges at scale. Bubble's Workload Units create unpredictable billing that makes cost planning difficult. Claims of millions of monthly active users on Bubble often require hiring experts to optimize performance—an additional expense that erodes the platform's cost advantage.
FlutterFlow is technically "low-code" rather than "no-code" and targets users comfortable with development concepts. You'll need to source, set up, and pay for your own database separately, which adds complexity and potential scale problems if not configured optimally. The builder also limits your view to two screens at once, whereas Adalo can display up to 400 screens on one canvas for easier navigation of complex apps.
Glide excels at spreadsheet-based apps but restricts you to set templates, creating generic apps with limited creative freedom. It doesn't support app store publishing, which limits your distribution options for a retail business.
Adalo's modular infrastructure scales to serve apps with over 1 million monthly active users, with no upper ceiling. With the right data relationship setups, clothing stores can grow from startup to enterprise scale on the same platform. Over 3 million apps have been created on Adalo, with the visual builder described as "easy as PowerPoint."
Conclusion
This guide walked through the process of creating a clothing store management app—from planning out essential features to launching it across web, iOS, and Android platforms. Each step lays the groundwork for building a reliable system to manage your store effectively. Using Adalo's platform, you can design a fully operational app without needing to write a single line of code, which can save you a significant amount compared to the cost to hire an app developer.
Once your app is live, it's crucial to stay proactive. Keep an eye on analytics daily to track performance and address bugs quickly to ensure smooth operations. Listen to feedback from both your employees and loyal customers, and use their insights to roll out updates that improve the user experience and keep your brand competitive.
A well-designed app opens up new opportunities for your business. It allows you to generate revenue 24/7, reach a wider audience, and simplify operations. Features like automated order processing, inventory management, and seamless payment integration through Stripe make running your store more efficient. Start with an Adalo template, customize it to reflect your brand's identity, and launch your app to take your store beyond its physical limits.
Related Blog Posts
- How to Launch Your First Mobile App Without Coding
- Building an E-commerce App: No-Code Platform Guide
- How to Create an Invoice App
- How to Create a Self-Storage Management App
FAQ
Why choose Adalo over other app building solutions?
Adalo is an AI-powered app builder that creates true native iOS and Android apps. Unlike web wrappers, it compiles to native code and publishes directly to both the Apple App Store and Google Play Store from a single codebase—the hardest part of launching an app handled automatically. Paid plans include unlimited database records and no usage-based charges.
What's the fastest way to build and publish an app to the App Store?
Adalo's drag-and-drop interface and AI-assisted building let you go from idea to published app in days rather than months. Magic Start generates complete app foundations from descriptions, and Adalo handles the complex App Store submission process—certificates, provisioning profiles, and store guidelines—so you can focus on your clothing store's features.
Which is more affordable, Adalo or Bubble?
Adalo starts at $36/month with unlimited usage and app store publishing. Bubble starts at $59/month with usage-based Workload Unit charges that can create unpredictable billing. Bubble's mobile solution is also a web wrapper rather than true native, which may require additional optimization costs at scale.
Which is easier for beginners, Adalo or FlutterFlow?
Adalo is designed for non-technical users with a visual builder described as "easy as PowerPoint." FlutterFlow is "low-code" rather than "no-code" and targets users comfortable with development concepts. FlutterFlow also requires you to source and configure your own external database separately.
Is Adalo better than Glide for mobile apps?
For native mobile apps, yes. Adalo publishes true native iOS and Android apps to both app stores. Glide doesn't support Apple App Store or Google Play Store publishing at all, limiting your distribution to web-only access. Glide also restricts you to set templates with limited creative freedom.
How long does it take to build a clothing store management app?
With Adalo's AI-assisted building and pre-built components, you can have a functional clothing store app ready in days rather than months. Magic Start generates your database structure, screens, and user flows from a simple description, accelerating the planning phase significantly.
Do I need coding experience to build a clothing store app?
No coding experience is required. Adalo's visual drag-and-drop interface lets you build database-driven apps by connecting components visually. Magic Add lets you describe features in natural language, and the platform generates the necessary logic automatically.
How much does it cost to build a clothing store app?
Adalo plans start at $36/month with unlimited database records and no usage-based charges. You'll also need Apple ($99/year) and Google Play ($25 one-time) developer accounts for app store publishing. This is significantly less than hiring developers, which can cost tens of thousands of dollars.
Can I integrate payment processing into my clothing store app?
Yes, Adalo supports Stripe integration for secure payment processing. Stripe Elements keeps sensitive card data off your servers for PCI DSS compliance, with U.S. processing rates at 2.9% + $0.30 per successful charge. Additional payment methods like PayPal can be integrated via Zapier.
Can I migrate from another platform to Adalo?
Yes, you can migrate to Adalo from other platforms. If you're using Google Sheets or Airtable for inventory, SheetBridge lets you turn your existing spreadsheet into an Adalo database. For apps built on other platforms, you'll rebuild in Adalo's visual builder—but the process is fast enough that many users complete migrations in a weekend.


