


Why Adalo Works for Building a Self-Storage Management App
Adalo is a no-code app builder for database-driven web apps and native iOS and Android apps—one version across all three platforms, published to the Apple App Store and Google Play. This makes it particularly well-suited for self-storage management, where you need to track unit inventory, manage tenant databases, and process bookings across multiple devices without hiring a development team.
Having your self-storage app available in both app stores means tenants can easily find and download it, access their account information, and receive push notifications about payment reminders or facility updates. This direct line of communication improves tenant retention while reducing the administrative burden of manual outreach—letting you focus on growing your storage business.
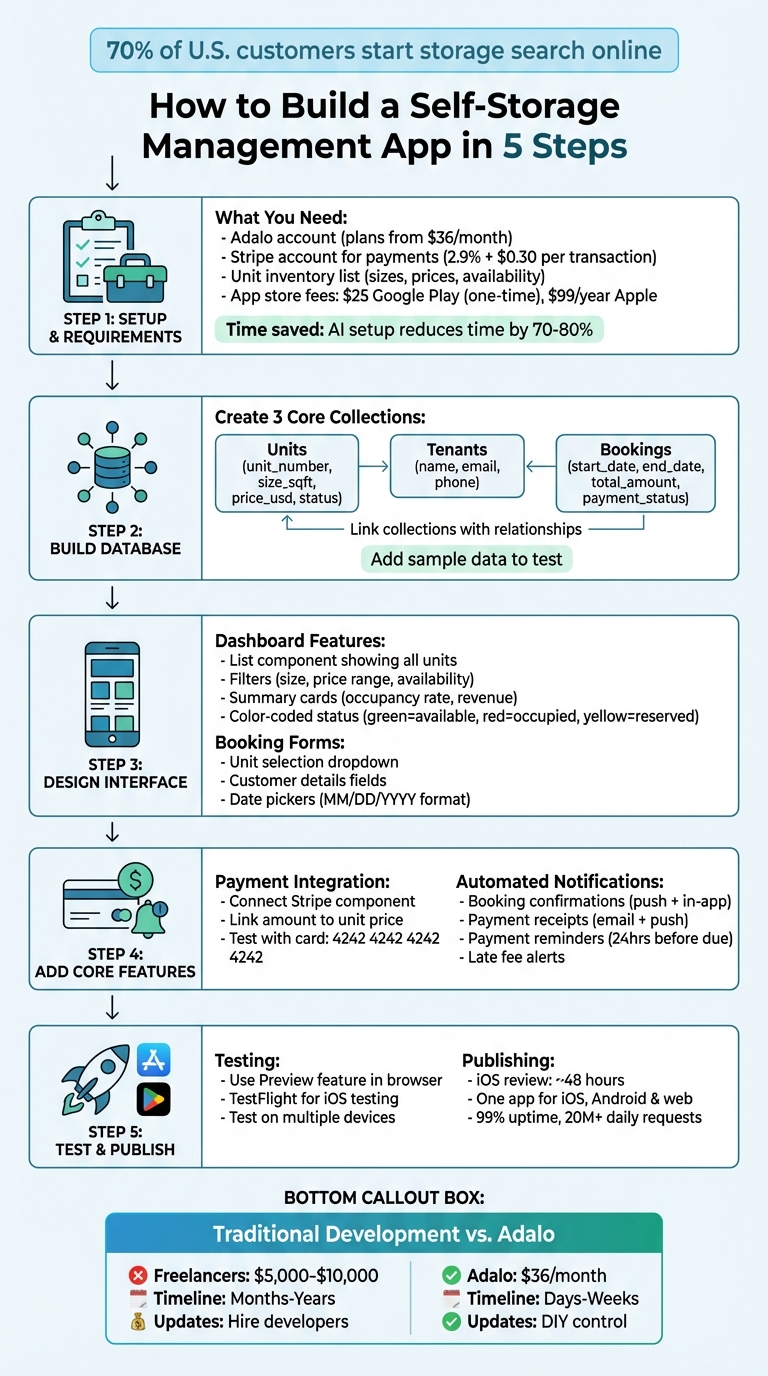
Creating a self-storage management app can simplify operations for facility owners by integrating unit tracking, bookings, payments, and tenant communication into one platform. With over 70% of U.S. customers starting their storage search online, having a mobile-friendly app is key to meeting modern expectations. Adalo, an AI-powered app builder, lets you create such an app for iOS, Android, and the web without any coding knowledge—saving time and costs compared to traditional development.
Key Highlights:
- Why It Matters: Automating tasks like bookings and payments reduces errors, improves efficiency, and provides a better customer experience.
- What You Need: An inventory list (unit sizes, prices, availability), Adalo account, Stripe for payments, and app store fees ($25 for Google Play, $99/year for Apple).
- Scalability: Paid plans include unlimited database records and no usage-based charges—your app can grow to millions of users without hitting data caps or surprise bills.
The platform stands out by letting you create a single app deployable across iOS, Android, and web platforms without rebuilding for each. This approach ensures your app is accessible to all users while keeping costs low. Start building today to streamline your self-storage operations and offer a modern digital experience.
Step-by-Step Guide to Building a Self-Storage Management App with Adalo
Why Adalo Works for Building a Self-Storage Management App
Adalo is an AI-powered app builder for database-driven web apps and native iOS and Android apps—one version across all three platforms, published to the Apple App Store and Google Play. This makes it ideal for self-storage facility owners who need to manage unit inventory, tenant information, and booking records across multiple devices without hiring a development team.
Having your self-storage app available in the app stores gives your business instant credibility and accessibility. Tenants can easily download your app to check availability, make payments, and receive push notifications about promotions or account updates—all features that keep customers engaged and reduce administrative overhead. The platform's modular infrastructure scales to serve apps with millions of monthly active users, with no upper ceiling on growth. Let's walk through how to build your own self-storage management app step by step.
Setting Up Your App and Database in Adalo
Creating Your App in Adalo
Start by heading over to adalo.com and signing up. Once you're in, click on "Create New App". This step sets the stage for building a mobile app capable of managing unit tracking, tenant bookings, and payment processing.
Ada, Adalo's AI builder, lets you describe what you want and generates your app. Magic Start creates complete app foundations from a description, while Magic Add adds features through natural language.
Adalo's Magic Start feature can significantly speed things up. Describe what you want to build—for example: "Build a self-storage management app with unit tracking, tenant bookings, and payments in USD using square feet sizes and MM/DD/YYYY dates." Magic Start then generates a complete app foundation including initial screens and a database structure tailored to these specifications, following US formatting standards. What used to take days of planning happens in minutes.
Users have reported that this AI-assisted setup can cut down setup time by as much as 70-80%. The platform pre-builds essential screens and relationships specifically for self-storage operations. Afterward, you can fine-tune the setup by ensuring currency symbols are in $, date formats follow MM/DD/YYYY, and measurements are displayed in square feet instead of metric units.
Once your app's framework and screens are ready, you can move on to creating your database collections to support its functionality.
Building Your Database Collections
With your app created, the next step is to organize your data by setting up core collections. Adalo structures its database into three main components: Collections (categories of data), Properties (fields within collections), and Records (individual data entries). For a self-storage app, you'll need three primary collections: Units, Tenants, and Bookings. Additionally, every Adalo app includes a default Users collection, which can handle tenant authentication and account management.
Here's how to set up each collection:
- Units: Include properties like unit_number (text), size_sqft (number, e.g., 1,250), price_usd (number formatted as USD, e.g., $125.00), and status (a choice field with options such as available, occupied, or reserved).
- Tenants: Add fields like name (text), email, and phone (formatted as (XXX) XXX-XXXX).
- Bookings: Include start_date and end_date (formatted as MM/DD/YYYY), along with total_amount (in dollars) and payment_status.
To make your app dynamic and functional, link these collections using relationships. For example, connect each booking to a specific unit (one-to-many: a unit can have multiple bookings over time) and to a specific tenant (many-to-one: a tenant can have multiple bookings).
Test your setup by adding sample data. For instance, create a unit—Unit 101—with 100 square feet priced at $125 per month. Then, link it to a booking spanning from 01/16/2026 to 12/31/2026. These linked collections form the backbone of features like filtering available units and showing rental histories, ensuring your app runs smoothly. With no record limits on paid plans, you can scale your database as your facility grows without worrying about hitting data caps.
Designing the App Interface
Creating a Dashboard for Unit Availability
When designing your dashboard, clarity and ease of use should be top priorities. Start by adding a List component in Adalo and linking it to your Units collection. This will automatically display all your unit data, including unit numbers, sizes (in square feet), prices (formatted in USD), and availability status.
To make searching more efficient, incorporate filters. Add dropdown menus or sliders that let users refine their search by size (e.g., 5x10 ft, 10x20 ft), price range (e.g., $50–$250/mo), and availability status (Available, Occupied, Reserved). These filters should update dynamically, providing instant results as users tweak their preferences. Be sure to format prices with dollar signs and commas, like $150.00/month, and display sizes using imperial units to align with U.S. standards.
Enhance the dashboard with summary cards at the top to highlight key metrics such as total occupancy rate and monthly revenue. These cards offer managers a quick overview of performance without sifting through detailed reports. Use color-coding to make statuses easily recognizable—green for available units, red for occupied, and yellow for reserved. This visual approach simplifies navigation and supports industry practices that prioritize intuitive user interfaces.
Once the dashboard is set, focus on creating screens for booking and payment to complete the app's functionality.
Building Booking and Payment Screens
For the booking process, use a Form component linked to your Bookings collection. Include essential elements like a dropdown menu to select the unit, input fields for customer details (name, email, and phone formatted as (XXX) XXX-XXXX), and Date Picker components for move-in and move-out dates. Set the date format to MM/DD/YYYY to ensure consistency.
Add a Stripe component to your payment screen to enable secure transactions directly within the app. Display payment amounts in USD and include a progress indicator to guide users through each step of the checkout process. After payment is completed, show a confirmation screen with booking details and a message like, "Booking confirmed for Unit A-12 starting 01/20/2026." This screen can also preview automated notifications that will be sent via email or SMS, reinforcing customer confidence that their reservation is finalized.
To ensure a seamless experience, test the booking flow regularly using Adalo's Preview feature. Check the design and functionality across various devices—iPhones, Android tablets, Samsung phones—to confirm that buttons are easy to tap, forms are straightforward, and the payment process feels secure. A responsive and user-friendly interface not only improves customer satisfaction but can also boost conversion rates.
Magic Add can accelerate this process further. Simply describe the feature you want—"add a booking confirmation screen with payment summary and email notification trigger"—and the AI generates the components and logic for you.
Adding Core Features
Connecting Payment Gateways
To activate the Stripe component, ensure users are logged in first. Add the Stripe component to your app and link the "Amount" field to the current unit's price using Magic Text. In the component settings, specify a Receipt Email field—typically set to the logged-in user's email—so customers receive confirmation emails and transactions are accurately reflected in your Stripe Dashboard.
For clarity, set the "Charge Description" to something like "Monthly Rent - Unit A-12" so customers can easily identify the charge on their bank statements. Keep in mind that Stripe's standard U.S. processing fees start at 2.9% + $0.30 per successful transaction.
Before going live, toggle Test Mode and use Stripe's test API keys along with the test card number 4242 4242 4242 4242 to verify the payment flow. Once the payment is successful, configure the submit button to update the unit's status to "Occupied" and redirect users to a Booking Confirmed screen.
With payment processing securely in place, the next step is to set up automated notifications to keep users informed and engaged.
Setting Up Automated Notifications
Once secure payments are functioning, keeping users informed through timely notifications builds trust and enhances their experience. Start by creating a Notifications collection in your database. Include fields like Title, Message, Type (e.g., "Payment Received" or "Booking Confirmed"), Is Read (True/False), and Created Date. Link these notifications to the respective user in the Users collection.
Use Click Actions on buttons such as "Confirm Booking" or "Pay Now" to automatically create notification records and send push notifications. Enable push notifications in your app settings and request user permission when they log in for the first time.
For booking confirmations, set the notification to trigger immediately after a booking record is created. For payment receipts, configure the notification to fire as soon as a Stripe transaction is successfully processed. For more advanced scenarios—like overdue payment alerts or scheduled reminders—integrate tools like Zapier to monitor your database and send notifications automatically.
| Notification Type | Trigger Event | Recommended Channel |
|---|---|---|
| Booking Confirmation | Successful creation of a booking record | Push Notification + In-App Alert |
| Payment Receipt | Successful Stripe transaction completion | Email (via Zapier) + Push Notification |
| Payment Reminder | 24 hours before payment due date | Push Notification |
| Late Fee Alert | Unpaid status past due date | Push Notification + Email |
To enhance usability, include an Action URL property in your notification records. This allows users to tap a notification and be directed to specific screens, such as a booking details page. Additionally, add an "Is Read" boolean field so users can clear notifications from their in-app notification center, keeping things organized and user-friendly.
Publishing and Scaling Your App
Testing Your App
Before publishing, take advantage of Adalo's Preview feature to test your app directly in a web browser. Walk through the entire booking process to confirm that every action works as intended and that database updates occur correctly. For mobile testing, generate a shareable link to identify any usability issues early on.
If you're planning to release your app on iOS, you can create a TestFlight build right within Adalo. Once the build is ready, testers will receive an email invitation via Apple's TestFlight platform. This step is crucial for catching mobile-specific bugs before submitting your app to the App Store.
Additionally, make sure to test notifications—such as booking confirmations and payment alerts—on multiple devices to ensure they're delivered promptly. Adalo's X-Ray feature can help identify performance issues before they affect users, highlighting potential bottlenecks in your database queries or screen loading times.
After thorough testing, you're ready to move on to publishing your app on major platforms.
Publishing to App Stores
To publish your app, you'll need developer accounts for both platforms. The Google Play Store charges a one-time fee of $25, while the Apple App Store requires an annual $99 membership for its developer program. You'll also need to prepare high-quality app assets, including an app icon, 4–5 device-specific screenshots, a title (limited to 30 characters for iOS), and a concise description (up to 4,000 characters).
For iOS, you'll need to set up an App-specific Password and a unique Bundle ID for your app submission. Apple also requires detailed explanations for any permissions your app requests—for example, access to the camera for uploading photos or location services for finding nearby facilities. Most iOS app submissions are reviewed within 48 hours.
Once approved, you can choose how to release your app: manually, automatically, or with a phased rollout over seven days to monitor for critical issues. Adalo simplifies the technical aspects of the publishing process, allowing you to focus on perfecting your app store listing and metadata. Unlike some competitors that limit app re-publishing or charge for updates, Adalo's paid plans include unlimited updates to your published apps.
Once your app is live, it's time to shift focus toward scaling your operations to meet increasing demand.
Preparing for Growth
As your business expands, your app needs to grow with it. Start by integrating reporting dashboards to track key metrics like occupancy trends, revenue performance, and payment statuses. These insights will empower you to make informed decisions about pricing, marketing strategies, and operational improvements.
For businesses managing multiple locations, Adalo's DreamFactory connector is a game-changer. It allows you to link your app with external databases or enterprise systems, centralizing data management across all your sites. This ensures real-time updates—for example, syncing payment records simultaneously across your app and accounting tools like QuickBooks or Xero.
Automation tools like Zapier can also connect your app with over 5,000 services, streamlining administrative tasks as your transaction volume grows. With Adalo's modular infrastructure that scales to 1M+ monthly active users and no upper ceiling, you can confidently grow your self-storage business knowing your app's performance won't degrade under increased load.
How Adalo Compares to Alternative Platforms
When evaluating app builders for your self-storage management app, understanding the differences between platforms helps you make an informed decision.
Bubble offers extensive customization but comes with trade-offs. Their web and mobile wrapper offering starts at $59/month with usage-based charges called Workload Units, which can lead to unpredictable bills as your app scales. Bubble's mobile solution wraps the web app rather than compiling to native code, which can introduce performance challenges under heavy load. Additionally, one app version doesn't automatically update web, Android, and iOS apps deployed to their respective stores—you're managing multiple builds.
FlutterFlow targets technical users with a low-code approach. Users need to set up and manage their own external database, which requires significant learning complexity—especially when optimizing for scale. Pricing starts at $70/month per user for app store publishing, but that still doesn't include database costs, which you'll need to source, configure, and pay for separately. The builder also limits your view to 2 screens at once, whereas Adalo can display up to 400 screens on one canvas for faster navigation.
Glide excels at spreadsheet-based apps with a template-focused approach. This makes it fast to build but creates generic apps with limited creative freedom. Pricing starts at $60/month for custom domain support, but you're still limited by app updates and data record rows that attract additional charges. Critically, Glide doesn't support Apple App Store or Google Play Store publishing—a dealbreaker for self-storage businesses wanting native mobile presence.
| Platform | Starting Price | Native App Store Publishing | Database Included | Usage Limits |
|---|---|---|---|---|
| Adalo | $36/month | Yes (iOS + Android) | Yes, unlimited records | None |
| Bubble | $59/month | Wrapper only | Yes, with Workload limits | Usage-based charges |
| FlutterFlow | $70/month/user | Yes | No (external required) | Varies by database |
| Glide | $60/month | No | Yes, with row limits | Row-based charges |
Adalo's combination of $36/month pricing, true native iOS and Android compilation, included database with no record caps, and unlimited usage makes it the most cost-effective choice for self-storage apps that need to scale.
Conclusion
Creating a self-storage management app no longer requires lengthy development timelines or hefty agency fees. With Adalo's AI-powered app builder, you can craft a fully functional, production-ready app in just days or weeks instead of months or years.
The platform simplifies the process by managing the technical backend—integrating the frontend, backend, and database—so you can focus on tailoring features like unit availability tracking, payment processing, and automated notifications to suit your business needs. Magic Start generates your app foundation from a description, while Magic Add lets you add features by simply describing what you want.
Adalo is built for reliability, boasting 99%+ uptime and handling over 20 million daily data requests. This ensures smooth operations for unit bookings, payment processing, and notifications. Plus, you only need to build your app once to publish it across the Apple App Store, Google Play Store, and web, reaching users on any device from a single codebase.
From a financial perspective, the savings are substantial. While hiring freelancers can cost between $5,000 and $10,000—and agencies charge even more—Adalo's paid plans start at just $36 per month with no usage-based charges. You also retain full control over updates and customization, eliminating the need to rely on developers for every tweak or pricing adjustment.
Getting started is straightforward. Use Magic Start with a description of your self-storage app, customize the design, connect Stripe for payments, and set up automated notifications for booking confirmations and payment reminders. Before publishing, use the Preview feature and TestFlight for iOS to thoroughly test your app. Once live, leverage Adalo's built-in analytics to monitor occupancy trends and revenue performance as you scale.
Related Blog Posts
- Building an E-commerce App: No-Code Platform Guide
- How to Create an Invoice App
- How to Create a Property Leasing App
- How to Create a Laundromat Management App
FAQ
Why choose Adalo over other app building solutions?
Adalo is an AI-powered app builder that creates true native iOS and Android apps. Unlike web wrappers, it compiles to native code and publishes directly to both the Apple App Store and Google Play Store from a single codebase—the hardest part of launching an app handled automatically. Paid plans include unlimited database records and no usage-based charges, so your costs stay predictable as you scale.
What's the fastest way to build and publish an app to the App Store?
Adalo's drag-and-drop interface combined with AI-assisted building through Magic Start and Magic Add lets you go from idea to published app in days rather than months. Describe what you want, and the AI generates your database, screens, and logic. Adalo handles the complex App Store submission process, so you can focus on your app's features instead of wrestling with certificates and provisioning profiles.
Can I easily build a self-storage management app without coding?
Yes. Adalo's visual builder has been described as "easy as PowerPoint." Magic Start can generate initial screens and database structures tailored to self-storage operations from a simple description, cutting setup time by 70-80%. You can create features like unit tracking, tenant bookings, and payment processing using drag-and-drop components without writing any code.
How do I integrate payment processing into my self-storage app?
Add the Stripe component to your app and link the amount field to your unit's price. Configure receipt emails for customers, and test using Stripe's test mode before going live. Standard U.S. processing fees start at 2.9% + $0.30 per successful transaction. The entire setup can be done without any coding knowledge.
How much does it cost to build a self-storage app?
Adalo's paid plans start at $36/month with unlimited database records and no usage-based charges. Add the Google Play Store one-time fee of $25 and Apple's annual $99 developer program membership. This is significantly more affordable than hiring freelancers ($5,000-$10,000) or agencies for custom development, and you retain full control over updates.
Which is more affordable, Adalo or Bubble?
Adalo starts at $36/month with unlimited usage and database records. Bubble starts at $59/month but includes usage-based Workload Unit charges that can lead to unpredictable bills as your app scales. Bubble's mobile solution is also a web wrapper rather than true native compilation, which may affect performance under load.
Is Adalo better than Glide for mobile apps?
For self-storage apps requiring App Store presence, yes. Glide doesn't support Apple App Store or Google Play Store publishing—it's limited to web apps. Glide also restricts creative freedom with template-focused designs and charges based on data row limits. Adalo publishes true native iOS and Android apps with unlimited database records on paid plans.
Can I scale my self-storage app as my business grows?
Adalo's modular infrastructure scales to serve apps with over 1 million monthly active users, with no upper ceiling. Unlike platforms with record limits or usage-based charges, Adalo's paid plans include unlimited database storage. You can integrate with tools like Zapier, connect to accounting software like QuickBooks, and add reporting dashboards as your business expands across multiple locations.
What features should a self-storage management app have?
Essential features include unit inventory tracking with availability status, tenant management with contact information, booking flows with date selection, payment processing via Stripe, automated notifications for confirmations and reminders, and reporting dashboards for occupancy and revenue metrics. Adalo supports all of these through its visual builder and component library.
How long does it take to build a self-storage management app?
With Adalo's Magic Start generating your app foundation and Magic Add helping you build features, you can have a functional self-storage app ready for testing within days. Traditional development would take months and cost thousands of dollars. The AI-assisted approach cuts setup time by 70-80% compared to building from scratch.


