


You've poured hours into building your app, only to receive a rejection notice from the Apple App Store or Google Play—often with vague guideline references that leave you scrambling to understand what went wrong. With nearly 40% of first-time submissions getting rejected, navigating the complex web of store requirements while simultaneously fixing technical issues and metadata problems can feel like an impossible puzzle, especially when each failed resubmission means more days of waiting.
The right development platform can help you avoid common rejection triggers from the start and speed up your path to approval. Adalo is a no-code app builder for database-driven web apps and native iOS and Android apps—one version across all three platforms. AI-assisted building and streamlined publishing enable launch to the Apple App Store and Google Play in days rather than months.
Why Adalo Helps You Avoid App Store Rejections
Adalo is a no-code app builder for database-driven web apps and native iOS and Android apps—one version across all three platforms, published to the Apple App Store and Google Play. Because Adalo generates truly native applications rather than web wrappers, your submissions start with a solid technical foundation that meets the core functionality requirements Apple and Google demand.
Getting your app accepted on both major app stores matters—it's where your users expect to find you, and it unlocks critical features like push notifications that keep people engaged. With Adalo's streamlined publishing workflow, you can address rejection feedback quickly and resubmit with confidence, turning what could be weeks of frustrating back-and-forth into a manageable process.
You've spent weeks building your app, carefully designing screens and testing features, only to receive that dreaded rejection notice from Apple or Google. With 40% of first-time submissions getting rejected, you're far from alone—but understanding why stores reject apps and how to systematically fix those issues can feel overwhelming, especially when vague guideline references leave you guessing at the actual problem.
The right tools can help you avoid common rejection pitfalls from the start and streamline the resubmission process when issues do arise. Adalo is an AI-powered app builder for database-driven web apps and native iOS and Android apps—one version across all three platforms. AI-assisted building and streamlined publishing enable launch to the Apple App Store and Google Play in days rather than months.
How Adalo Helps You Build Apps That Pass App Store Review
Adalo creates truly native applications—not web wrappers that often trigger rejection notices like "Guideline 4.2: Minimum Functionality." When you build with the platform, you're generating real native code that compiles for iOS and Android from a single codebase, giving you a stronger foundation when submitting to app stores.
Ada, Adalo's AI builder, lets you describe what you want and generates your app. Magic Start creates complete app foundations from a description, while Magic Add adds features through natural language.
The platform's Magic Start feature generates complete app foundations from simple descriptions. Tell it you need a booking app for a dog grooming business, and it creates your database structure, screens, and user flows automatically—what used to take days of planning happens in minutes. Magic Add then lets you describe additional features in natural language, building them directly into your app.
Because Adalo generates real native apps with proper functionality and structure, you're already starting from a stronger foundation when submitting to app stores. However, rejections can still happen for reasons like incomplete features, missing privacy policies, or metadata issues. The steps in this guide will help you quickly identify what went wrong and get your Adalo-built app approved and into users' hands.
Getting your app rejected by the App Store or Google Play can feel like a major setback, but the truth is, most rejections are solvable. Here's what you need to know:
- 40% of first-time submissions get rejected, with "Guideline 2.1: App Completeness" being the most common issue.
- Rejections often stem from problems like crashes, broken links, missing privacy policies, unclear subscription pricing, or apps that resemble basic web wrappers.
- The good news? Apple typically responds to feedback within 24-48 hours, meaning you can resolve issues quickly if you act fast.
This guide will show you how to understand rejection notices, identify the root cause, fix the issues, and resubmit your app with confidence. Let's break it down.
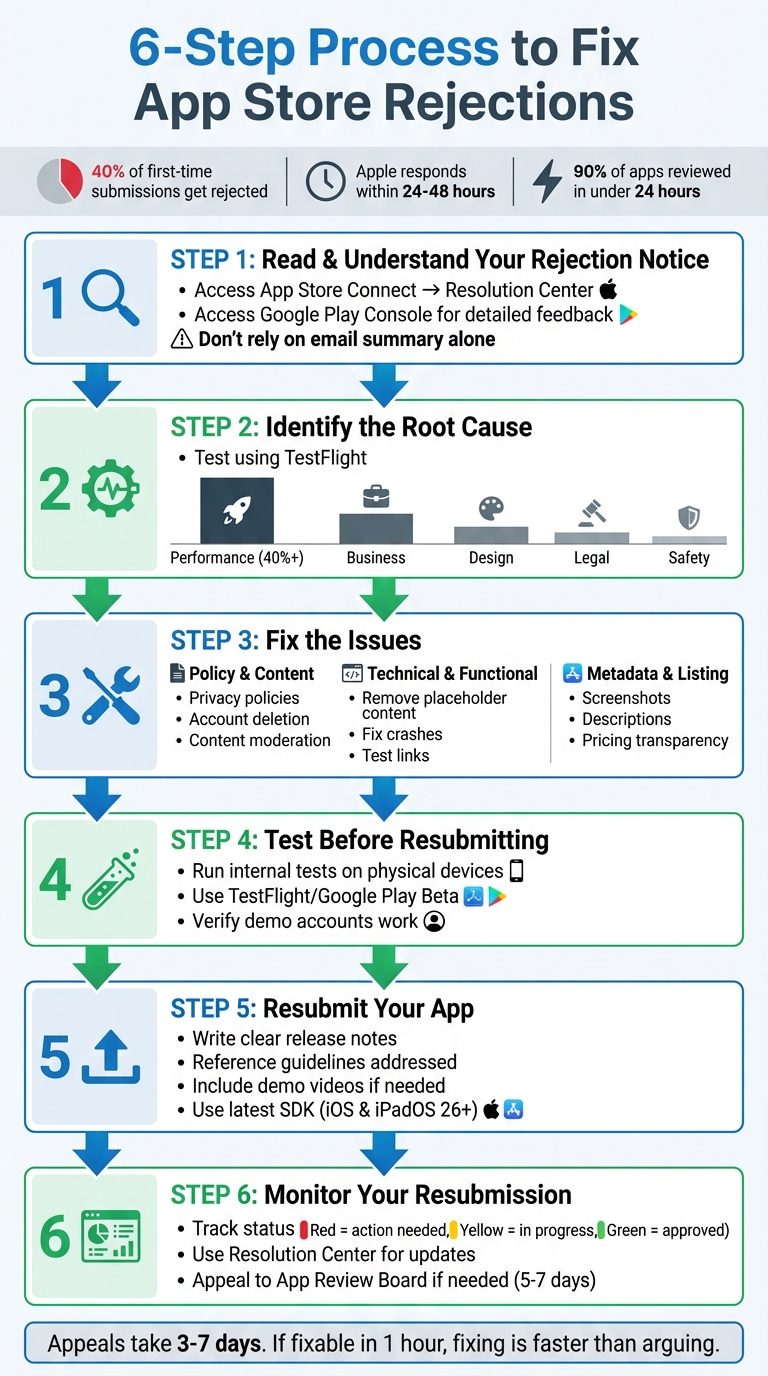
6-Step Process to Fix App Store Rejections
I finally submitted my app to the App Store… and it got rejected.
Step 1: Read and Understand Your Rejection Notice
The moment you receive a rejection, the first thing to do is read the complete notice thoroughly. Don't rely solely on the email summary—it often lacks crucial details. Instead, head to the platform's communication hub to access the full rejection notice.
For Apple App Store rejections, log into App Store Connect and navigate to the Resolution Center or App Review section. Look for the "View App Review Issues & Messages" link at the top of your app's page or click "Resolve" next to any submission marked with an "Unresolved Issues" status. The full notice may include screenshots, specific steps to reproduce the issue, or additional context that isn't mentioned in the email.
"Make sure you understand exactly what they're objecting to. Sometimes the email summary misses details that are in the full message." – iOS Submission Guide
For Google Play Store rejections, open the Play Console. Google provides detailed feedback explaining which policy or technical requirement your app violated. This feedback often goes beyond what's included in the email notification.
Before making any changes, it's critical to fully understand the rejection. Some issues might be resolved by simply updating your app's description or screenshots in the store console—no code changes required. In other cases, providing a demo video or clarifying how a feature works may be enough to address the problem. Jumping into code fixes without understanding the issue can waste time and even lead to more rejections.
"Step one is to understand the issue App Review is citing. The guidelines are often vague, and interpretations between app reviewers are sometimes inconsistent. Read the guideline they've specified fully before introducing changes to your app or protesting the rejection." – Charlie Chapman, RevenueCat
Once you've analyzed the rejection notice and grasped the details, the next step is to pinpoint the root cause of the issue.
Step 2: Identify the Root Cause of the Rejection
Once you've reviewed the rejection notice, the next step is to pinpoint the exact issue. This means reproducing the error rather than making assumptions. By replicating the problem, you can better understand its nature and determine the necessary steps to fix it.
Test Your App to Reproduce the Issue
Begin by testing your app in the same environment the reviewer used. A great tool for this is TestFlight, which closely mirrors the App Store's testing conditions.
"If it doesn't crash on TestFlight, it most likely won't crash for your reviewer" – Josh Holtz, RevenueCat
Use any screenshots or attachments from the Resolution Center to identify the specific screen or device context where the issue occurred. It's also important to test your app across a range of devices—such as an iPhone SE, an iPhone 14 Pro Max, and an iPad—since layout and functionality problems can vary depending on the screen size.
If your app requires login credentials, test it using the demo account provided to reviewers. Make sure all backend services and APIs are functioning properly. For instance, in 2020, the developer of ConnectKit faced repeated rejections because reviewers struggled with the app's public/private key authentication process. The issue was finally resolved by including demo videos that clearly explained how to generate and use the keys.
Once you've successfully reproduced the error, you'll be in a better position to classify the problem and address it.
Categorize the Problem Type
After reproducing the issue, the next step is to determine which category it falls under. Apple organizes app rejection reasons into five main categories: Safety, Performance, Business, Design, and Legal. The rejection notice will usually reference a specific guideline, such as "Guideline 2.1 - Performance" or "Guideline 4.2 - Design".
Here's a quick breakdown of these categories:
- Performance Issues: These are the most common, making up over 40% of all rejections. They include app crashes, placeholder text like "Lorem ipsum", broken links, or missing demo accounts.
- Business Problems: Often tied to payment issues, such as using third-party payment systems for digital goods.
- Design Concerns: These arise when an app lacks native functionality or feels like a simple web wrapper.
- Legal Issues: These typically involve missing privacy policies or terms of use.
- Safety Concerns: Often related to content moderation or mobile app security problems.
To fully understand the rejection, read the complete guideline cited in your notice on Apple's developer portal. The snippet provided in the rejection notice may not give the full picture, and Apple's guidelines can sometimes be open to interpretation. If you're still unclear about the category or issue, use the Resolution Center to ask follow-up questions. Apple typically responds within 24 to 48 hours.
Step 3: Fix the Issues
Now that you've identified the problems, it's time to fix the policy, technical, and metadata issues flagged in your app submission. Tackling these issues head-on is often quicker and more effective than filing an appeal.
"If your rejection is for something fixable in an hour, fixing is almost always faster than arguing." - iossubmissionguide.com
Fix Policy and Content Violations
Policy rejections often fall under Safety (Guideline 1), Business (Guideline 3), or Legal (Guideline 5). Common fixes typically involve privacy policies, content moderation, and account management features.
Privacy Policy Issues: Ensure your app includes a functional privacy policy link in both the App Store Connect metadata and within the app itself (usually under Settings). Double-check that the link works. If your app collects user data, complete the "Privacy Nutrition Label" in App Store Connect, including any data collected by third-party integrations.
For apps that allow users to create accounts, you must also provide an option to delete accounts directly within the app. If your app includes user-generated content or social features, it's essential to include:
- Filters for objectionable material
- Tools for reporting offensive content
- Options to block abusive users
- Published contact information for support
Kids Category Apps: These require extra safeguards. All external links and purchase options must be protected by a "parental gate" to prevent accidental access by children. For content flagged under Guideline 1.1, remove anything defamatory, discriminatory, overtly sexual, or promoting illegal activities.
If you need to clarify any misunderstandings or provide additional context, use the Resolution Center to communicate directly with the reviewer. Apple usually responds within 24 to 48 hours. If you believe the rejection was a mistake and have supporting evidence (e.g., similar approved apps), you can appeal through the Resolution Center or escalate to the App Review Board. Appeals to the Board typically take 5-7 business days, and their decisions are final.
Once policy and content issues are resolved, shift your focus to technical fixes.
Fix Technical and Functional Problems
Technical rejections are the most common, with Guideline 2.1 (App Completeness) accounting for over 40% of unresolved issues. These rejections often stem from crashes, broken links, or missing demo accounts.
Start by removing placeholder content like "Lorem ipsum" text, temporary images, or "coming soon" notices. Test all links to ensure they work properly.
"Over 40% of unresolved issues are related to guideline 2.1: App Completeness, which covers crashes, placeholder content, incomplete information, and more." - Charlie Chapman, Published Author, RevenueCat
Ensure your backend services are operational and whitelist Apple's IP range to avoid issues fetching data during the review process. For apps that might appear empty before user input, include sample data during onboarding to demonstrate "Minimum Functionality" as required by Guideline 4.2.
"If the reviewer has to ask 'Why isn't this working?' - you've already lost. Handhold them through the journey like it's a live demo." - Ilya Kataev, Team Lead, AppFollow
For apps connecting to hardware or third-party software, record a video demo and attach it to your submission. Avoid using private APIs, as Apple's automated tests will flag undocumented functions.
Test your app on physical devices (e.g., iPhone SE, iPhone 14 Pro Max) through TestFlight to replicate the reviewer's environment. Keep in mind that reviewers spend only a few minutes assessing an app. If they can't quickly understand its functionality, your app might be rejected.
Adalo's X-Ray feature helps identify performance issues before they affect users or reviewers. The tool highlights potential problems in your app's architecture, allowing you to address crashes and slowdowns before submission rather than discovering them through rejection notices.
Once functional issues are addressed, refine your app's metadata to ensure full compliance.
Fix Metadata and Listing Errors
Metadata rejections occur when your app's description, screenshots, or other listing elements don't align with the submitted build or fail to meet transparency requirements.
Verify that your app name (maximum 30 characters) and subtitle provide clear, concise context. Avoid unverifiable claims or references to other apps. Ensure all external links, including privacy policy and support links, are functional and up-to-date.
Screenshots must showcase the app in actual use—not just splash screens or title art—and match the correct device type in App Store Connect. For example, in August 2026, a developer experienced a four-day launch delay because their metadata listed a subscription price of $4.99, while the in-app pricing was $5.99. This $1 discrepancy violated transparency rules and required a full resubmission.
"Don't upload screenshots or previews that don't match the actual UI... if you leave outdated UI in your submission, Apple will flag it under app store requirements for misleading visuals." - Ilia Kukharev, Product Lead, AppFollow
If your app includes in-app purchases, clearly indicate in the description and screenshots which features or tools require additional payments. Use the "Review Notes" field to explain any non-obvious functionality and include links to demo videos if your app relies on specific hardware or environments.
Choose keywords that accurately describe your app, but steer clear of trademarked terms, popular app names, or pricing details. Finally, ensure that all metadata—icons, screenshots, previews—meets the requirements for a 4+ age rating, even if your app itself is rated higher.
Step 4: Test Before Resubmitting
Once you've implemented your fixes, resist the urge to resubmit your app right away. Thorough testing is essential to confirm that you've addressed the initial issues without introducing new ones. Rushing this step can lead to another rejection, delaying your launch even further. Take the time to verify your updates under real-world conditions through detailed internal testing.
Run Internal Tests
Begin by testing your app on actual devices, not just emulators. Simulators can miss issues that only surface in real-world scenarios. Test your app across a variety of hardware configurations, from older devices to the latest models, to ensure it performs reliably in the same environment the reviewer might use.
"The best way to avoid these issues is to test your app using TestFlight on as many devices as possible. This is the closest way to replicate the environment a reviewer will be using when testing your app."
– Charlie Chapman, RevenueCat
Make sure your app is built with the most up-to-date SDK (iOS & iPadOS 26 or later as of April 2026). Check your project thoroughly for placeholder text like "Lorem ipsum", as these are red flags that can lead to automatic rejection. Test every external link—this includes links to your Privacy Policy and Terms of Use, both in your metadata and within the app itself. If your app requires login credentials, double-check that the demo account details you provided in App Store Connect work seamlessly and include realistic sample data.
Use Beta Testing Platforms
Leverage platforms like TestFlight for iOS and Google Play Beta for Android to gather feedback from real users before resubmitting. TestFlight allows you to invite both internal team members and external testers via email or public links. Testers can provide invaluable feedback, including screenshots with notes and crash reports, directly through the TestFlight app.
"Testers download, test, and provide feedback on your beta app, using the TestFlight app. You can then use their provided feedback - including screenshots with contextual feedback, or crash details - to improve your app or game."
– Apple Developer Documentation
If your app includes subscriptions or paywalls, use the sandbox environment to ensure that products are fetched correctly from your server and that pricing is displayed as intended. For apps that rely on specific hardware or intricate third-party software, consider recording a video demo to include with your submission. This can help clarify functionality and prevent misunderstandings during the review process. Once you're confident in your testing results, move on to preparing your app for resubmission in the next step.
Step 5: Resubmit Your App
After testing your app thoroughly, it's time to resubmit it. Make sure to address any unresolved issues flagged in App Store Connect by editing or removing problematic items. Choose the correct build and update all necessary metadata. Double-check that your build complies with the latest requirements, such as Xcode 26 and the iOS & iPadOS 26 SDK or later. Don't forget to clearly outline the changes you've made in the release notes.
Write Clear Release Notes
In the Review Notes section, provide a detailed explanation of the changes you've made. Reference any relevant guidelines and, if necessary, confirm active demo account credentials. If your app has unique features or requires specific hardware, consider including a demo video to help reviewers better understand its functionality.
Before submitting, ensure all external links in your app and metadata are functional, including links to your Privacy Policy and Terms of Use. If your app was rejected due to metadata issues—like incorrect descriptions or screenshots—you can often fix these directly in App Store Connect and resubmit the same build without needing to upload a new binary.
Follow Platform-Specific Submission Requirements
Once your release notes are complete, follow the specific submission steps for your platform.
For iOS submissions, use the Resolution Center to communicate directly with the reviewer who rejected your app. Apple now allows up to two submissions under review at the same time for each platform: one app version and one for separate items like In-App Events or custom product pages. Apple also notes that 90% of app submissions are reviewed in under 24 hours.
For the Google Play Store, address the specific policy or technical issues outlined in the rejection notice. Submit your app at least a week before your planned launch date to allow sufficient time for review and any potential resubmissions. Once the app is resubmitted, you can move on to tracking its status in the next step.
Adalo streamlines this entire resubmission process. Because the platform handles App Store submission directly, you can make fixes in the visual builder and republish without wrestling with certificates, provisioning profiles, or complex build configurations. Paid plans include unlimited app updates, so you can iterate as many times as needed without additional charges.
Step 6: Monitor Your Resubmission
Once you've resubmitted your app, it's important to keep a close eye on its status in App Store Connect or the Google Play Console. Apple makes it easy to track progress with their color-coded system: Red means action is required, Yellow indicates that the process is ongoing, and Green means your app is approved and ready for distribution. If you're just starting out, using an AI app builder can help streamline the initial development and submission process. Any updates or messages from the App Review team can be found in the "App Review" section of App Store Connect.
Track Your Submission Status
Your app will move through various statuses like "Waiting for Review," "In Review," or "Metadata Rejected," each signaling a specific stage or issue. If your app remains stuck in "In Review" longer than expected, you can use the "Contact Us - Status" form to request an update. Typically, the Resolution Center responds within 24–48 hours. However, if you need to escalate the matter, the full appeals process may take 1–2 weeks.
Understanding where your app stands in the review process is crucial for tackling any new issues promptly.
Appeal or Escalate Rejections
If additional problems arise during monitoring, you may need to escalate the situation. Use the Resolution Center to provide detailed responses, including clarifying attachments like screenshots or demo videos. In some cases, requesting a brief call can also help clarify issues.
"Appeals take time. A typical back-and-forth can add 3–7 days to your timeline. If your rejection is for something fixable in an hour, fixing is almost always faster than arguing." - iOS Submission Guide
Only escalate to the App Review Board if you're confident the rejection is unjustified. This internal review process generally takes 5–7 business days for a decision. Before appealing, weigh your options: if the issue can be resolved quickly, fixing it may save you more time than pursuing an appeal. For example, a one-hour fix is often a better choice than waiting an additional week for a decision.
How to Avoid Future Rejections
Preventing app rejections isn't just about fixing past issues—it's about taking steps to ensure they don't happen again, which is key to maintaining high App Store rankings. Addressing common problems like crashes, placeholder content, and incomplete details (as outlined in Guideline 2.1) through thorough testing and clear documentation can save you time and frustration down the line.
Stay Updated with App Store Guidelines
Apple and Google frequently revise their app review guidelines, often focusing on areas like privacy and monetization. For instance, starting April 2026, all apps submitted to the App Store must be built using the iOS & iPadOS 26 SDK or later. To stay ahead, make it a habit to regularly review the App Store Review Guidelines, which cover key areas like Safety, Performance, Business, Design, and Legal. Staying informed about these updates can help you anticipate changes and avoid recurring issues.
Follow Testing and Documentation Best Practices
Testing and documentation are critical to ensuring your app meets review standards. Here's what you should focus on:
- Test your app on a variety of physical devices, such as the iPhone SE, iPhone 14 Pro Max, and iPads, to ensure consistent UI performance.
- Eliminate placeholder text, temporary images, and broken links.
- Clearly document your app's functionality. Use the "Review Notes" section in App Store Connect to explain features that might not be immediately obvious. Include demo credentials and video walkthroughs for complex functionality.
- Double-check that your privacy policy and terms of use links work properly—both in the app metadata and within the app itself.
- If your app requires a login, provide a demo account preloaded with data. This allows reviewers to quickly and easily evaluate your app.
It's worth noting that about 90% of app submissions are reviewed within 24 hours. By catching potential problems early, you can help ensure a smoother and faster approval process, minimizing delays and keeping your timeline on track.
Choose Tools That Reduce Rejection Risk
Your choice of development platform significantly impacts your rejection risk. Web wrappers—apps that essentially package a website as a mobile app—frequently trigger "Guideline 4.2: Minimum Functionality" rejections because they lack native app characteristics.
Adalo generates true native iOS and Android apps from a single codebase, which means your app compiles to native code rather than wrapping a web view. This native architecture helps avoid the "web wrapper" rejection category entirely. The platform's modular infrastructure scales to serve apps with over 1 million monthly active users, with no upper ceiling on growth.
Following the Adalo 3.0 infrastructure overhaul in late 2025, the platform is now 3-4x faster than previous versions. Paid plans include unlimited database records with no data caps, and all plans now feature unlimited usage with no usage-based charges—eliminating the bill shock that can come with platforms that charge per action or workload unit.
Over 3 million apps have been created on Adalo, with the visual builder described as "easy as PowerPoint." This combination of native app output, scalable infrastructure, and intuitive building tools helps ensure your app meets store requirements from the start.
Related Blog Posts
- How To Get a Vibe-Coded App To The App Store
- How To Get a Vibe-Coded App To The Google Play Store
- How to Get a Vibe-Coded App to the Apple App Store
- How Hard Is It To Publish To the App Stores? And Maintain The Apps?
FAQ
Why choose Adalo over other app building solutions?
Adalo is an AI-powered app builder that creates true native iOS and Android apps from a single codebase. Unlike web wrappers, it compiles to native code and publishes directly to both the Apple App Store and Google Play Store—the hardest part of launching an app handled automatically. Following the Adalo 3.0 infrastructure overhaul in late 2025, the platform is 3-4x faster with unlimited database records on paid plans and no usage-based charges.
What's the fastest way to build and publish an app to the App Store?
Adalo's drag-and-drop interface and AI-assisted building let you go from idea to published app in days rather than months. Magic Start generates complete app foundations from simple descriptions, while Magic Add builds features from natural language requests. The platform handles the complex App Store submission process, so you can focus on your app's features instead of wrestling with certificates and provisioning profiles.
What are the most common reasons apps get rejected from the App Store?
The most common rejection reason is "Guideline 2.1: App Completeness," accounting for over 40% of unresolved issues. This includes crashes, placeholder text like "Lorem ipsum," broken links, and missing demo accounts. Other frequent issues involve missing privacy policies, unclear subscription pricing, and apps that lack native functionality or resemble basic web wrappers.
How long does it take to get a response after my app is rejected?
Apple typically responds to feedback within 24-48 hours through the Resolution Center, allowing you to resolve issues quickly. About 90% of app submissions are reviewed within 24 hours. If you need to escalate to the App Review Board, expect the process to take 5-7 business days for a decision.
What should I include in my app submission to avoid rejection?
Include a functional privacy policy link in both your metadata and within the app, working demo account credentials with realistic sample data, screenshots showing actual app usage rather than splash screens, and clear documentation in the Review Notes section. If your app has complex features or requires specific hardware, attach a demo video to help reviewers understand the functionality.
How can I test my app before resubmitting to the App Store?
Test your app using TestFlight on physical devices like iPhone SE, iPhone 14 Pro Max, and iPads to replicate the reviewer's environment. Verify that all external links work, remove any placeholder content, ensure demo accounts function properly, and test across different screen sizes. TestFlight closely mirrors App Store testing conditions, so if your app works there, it will likely work for the reviewer.
Can I easily fix app store rejections and get my app approved?
Yes, most rejections are solvable with the right approach. Because Adalo generates real native apps with proper functionality and structure, you start from a stronger foundation. Most rejection issues like missing privacy policies, metadata errors, or incomplete features can be resolved quickly through the platform's intuitive interface, and paid plans include unlimited app updates for resubmissions.
How does Adalo help avoid "minimum functionality" rejections?
Adalo creates true native iOS and Android apps rather than web wrappers, which frequently trigger "Guideline 4.2: Minimum Functionality" rejections. The platform compiles to native code, ensuring your app has the native characteristics reviewers expect. X-Ray also identifies performance issues before submission, helping you catch problems that could lead to rejection.
What does it cost to build and publish an app with Adalo?
Adalo's web and true-native mobile builder starts at $36/month with unlimited usage and app store publishing. All paid plans include unlimited database records and unlimited app updates once published—no usage-based charges or bill shock. This compares favorably to alternatives like Bubble ($59/month with usage limits) or FlutterFlow ($70/month per user without a database included).
How long does the entire app rejection and resubmission process take?
The timeline depends on the complexity of the issues. Simple metadata fixes can be resolved in hours, while technical problems may take a few days. Apple reviews 90% of submissions within 24 hours, and the Resolution Center typically responds within 24-48 hours. If you need to appeal to the App Review Board, add 5-7 business days. Most developers can complete the fix-test-resubmit cycle within a week.


