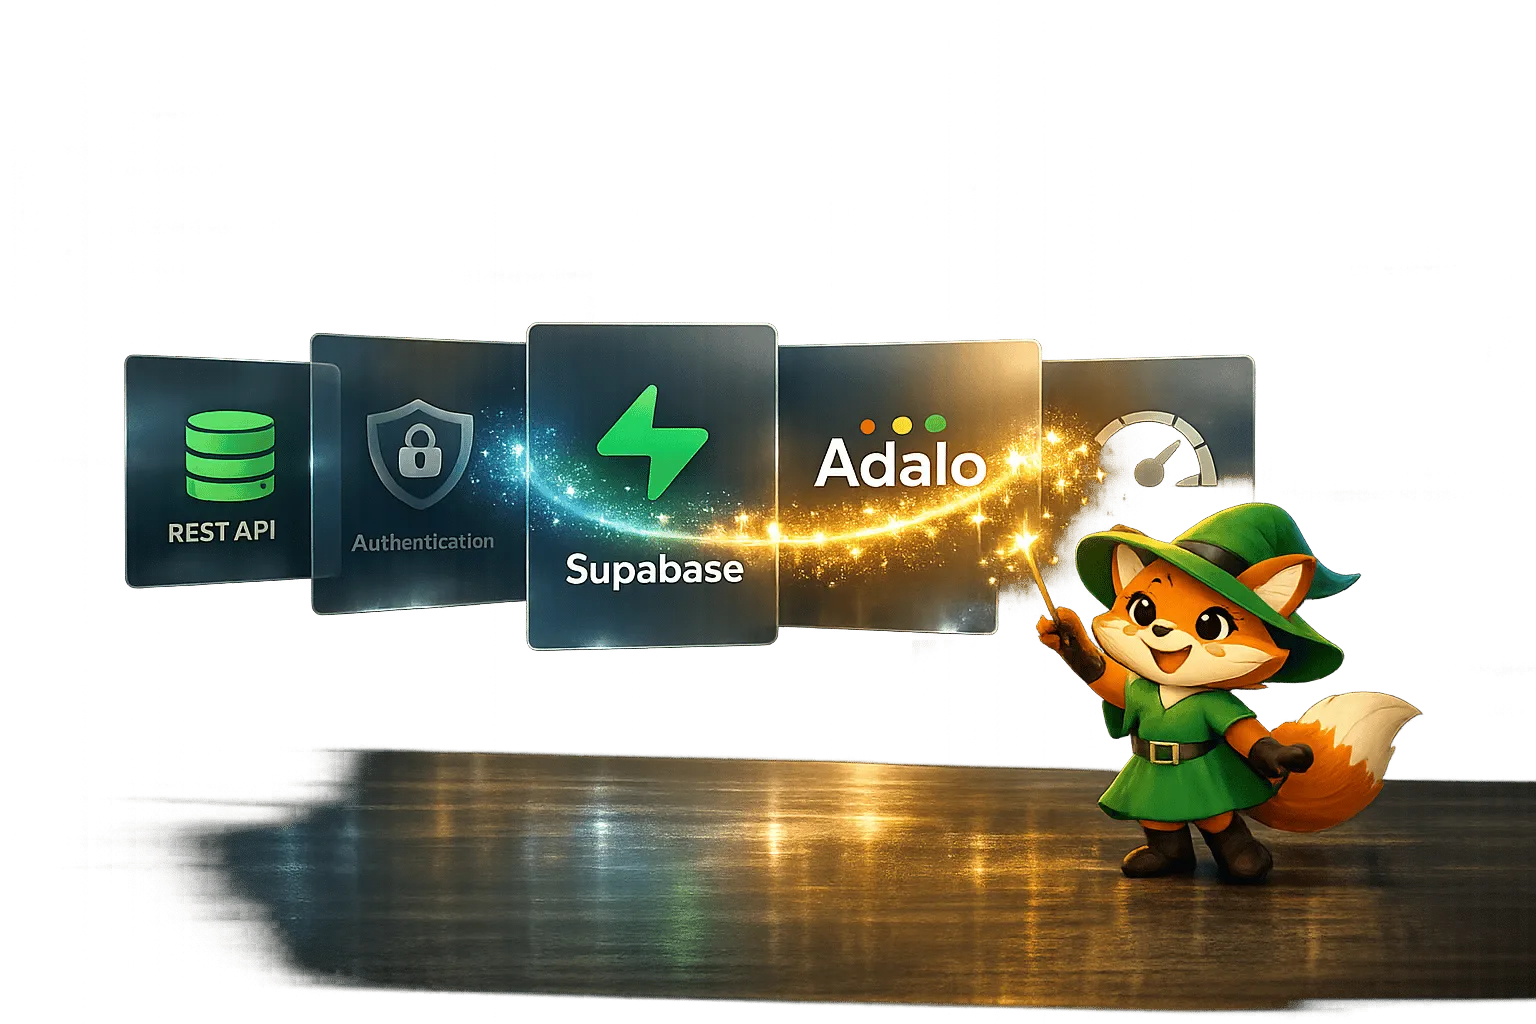
Want to combine Adalo's no-code app builder with Supabase's powerful backend? Adalo is a no-code app builder for database-driven web apps and native iOS and Android apps—one version across all three platforms, published to the Apple App Store and Google Play. This guide shows you exactly how to connect the two platforms, enabling you to manage complex data and scale your app efficiently.
- Adalo Requirements: You need a Professional, Team, or Business plan (starting at $52/month) to use External Collections.
- Supabase Setup: Create your database with numeric primary keys (not UUIDs), enable Row Level Security (RLS), and configure API access.
- Integration Steps: Use Supabase's REST API with Adalo's External Collections feature to fetch, update, and manage data directly in your app.
- Authentication: Supabase offers built-in email-based user authentication, which you can integrate with Adalo's External Users Database feature.
This step-by-step guide covers everything from configuring APIs to testing authentication, ensuring a smooth connection between the two platforms. Ready to make your app data-driven? Let's dive in.
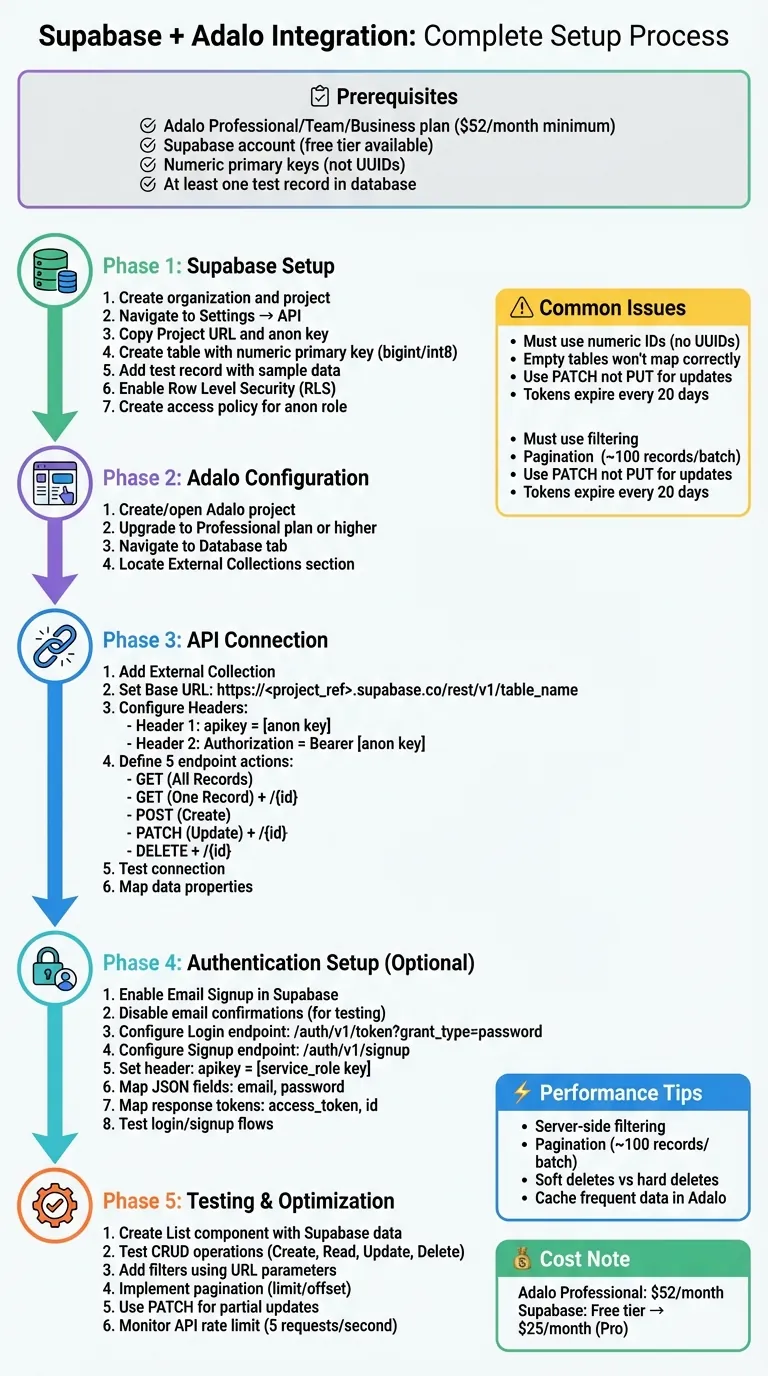
Complete Supabase-Adalo Integration Setup Process
Adalo x Supabase Integration Part 1
What You Need Before Starting
To connect Supabase with Adalo, you'll need accounts on both platforms and a few key details. First, ensure you're subscribed to an Adalo Professional, Team, or Business plan, as the External Collections feature required for this integration isn't available on the Free or Starter tiers. The Professional plan is priced at $36/month and includes unlimited usage—no caps on actions, users, records, or storage.
On the Supabase side, you'll need a project with at least one database table set up. Two key pieces of information are essential: your Project URL and service_role key, both accessible from the Supabase dashboard. These credentials are crucial for authenticating the connection and managing database access.
Make sure to store your API keys in a secure password manager immediately, as they grant extensive access to your database and may only be visible once for security reasons. With these preparations in place, you're ready to configure your Supabase account.
Setting Up Your Supabase Account
Start by visiting the Supabase website and creating a free account. Once logged in, create an organization and then a new project within that organization. This project will serve as the hub for your database tables and authentication settings.
After your project is initialized (usually within two minutes), go to the Settings section in the left sidebar and select API. Here, you'll find your Project URL and service_role key—copy both for use in Adalo's External Collections setup.
Before leaving Supabase, create a database table with a numeric primary key and add a test record. Adalo's API connector relies on actual data to detect field types, so empty tables won't map correctly during setup. Keep in mind that Adalo does not support UUID-based IDs, which are Supabase's default. To ensure compatibility, configure your tables with numeric primary keys like int8 or bigint.
Setting Up Your Adalo Account
Ada, Adalo's AI builder, lets you describe what you want and generates your app. Magic Start creates complete app foundations from a description, while Magic Add adds features through natural language.
If you don't already have an account, sign up at adalo.com and create a new app project. You can use the AI Builder with Magic Start to generate a complete app foundation from a simple description, or start from scratch—both options work for this integration. Magic Start creates your database structure, screens, and user flows automatically, turning what used to take days of planning into minutes of setup.
The next step is upgrading to a Professional plan or higher. Go to your account settings and select a paid tier. Without this upgrade, the External Collections menu won't appear in your app builder. At $36/month with no usage-based charges, Adalo offers predictable costs regardless of how many API calls your Supabase integration generates.
Once your plan is active, get familiar with the Database tab in the left panel. This is where you'll add Supabase as an external data source. Adalo's interface includes a built-in testing tool to validate your API endpoints during setup, helping you catch any authentication or formatting issues before you begin building your app screens.
Required Tools and Documentation
Keep the Supabase Management API Reference handy in a browser tab. You'll need it for configuring authentication headers and understanding response structures. Also, bookmark Adalo's Help Docs on External Collections for guidance on setting Base URLs, configuring endpoint actions, and identifying "Results Keys" for nested JSON responses.
When setting up authentication in Adalo, format your Supabase service_role key as a Bearer token using the following syntax:
Authorization: Bearer [YOUR_SERVICE_ROLE_KEY]Lastly, when configuring update endpoints in Adalo, use the PATCH HTTP method instead of the default PUT. This ensures you only modify specific fields without overwriting entire database records.
Preparing Supabase for the Connection
Now that your accounts are ready, it's time to set up Supabase so it can work seamlessly with Adalo. This involves creating database tables, setting up security rules, and gathering the credentials you'll need for the connection.
Creating Your Database Tables
Start by opening the Table Editor in your Supabase dashboard. Click on New Table to create your first table. Stick to lowercase names with underscores (like user_profiles) to align with Supabase's API conventions.
For the primary key, use a numeric type such as bigint or int8 and enable auto-increment. This ensures your IDs are sequential numbers (e.g., 1, 2, 3), which Adalo can easily interpret.
Add at least one test record using data types that correspond to Adalo's property types. For example:
- Use
textfor strings. - Use
boolfor true/false values. - Use
timestamptzfor timestamps with time zones.
Including sample data helps the API connector identify field types correctly.
If your app requires relationships between tables, set up foreign keys. For instance, if you have customers and orders tables, you might add a customer_id column in the orders table that references the id column in customers. This setup allows Adalo to recognize relationships between records.
Once your tables are ready, the next step is to secure API access.
Configuring API Access and Permissions
Supabase automatically creates a REST API for every table in the public schema.
"Supabase auto-generates an API directly from your database schema allowing you to connect to your database through a restful interface, directly from the browser."
While this is convenient, it also means your data is accessible through these API endpoints, so securing them is critical.
Enable Row Level Security (RLS) to protect your data. In the Table Editor, click the three dots next to your table, select Edit Table, and toggle on Row Level Security. Alternatively, you can enable it with the following SQL command:
alter table "your_table_name" enable row level security;Once RLS is active, your table will remain inaccessible until you define a policy. To allow Adalo to read data, create a policy for the anon role:
create policy "Allow public access"
on your_table_name
for select
to anon
using (true);
This policy permits any client using your API key to read data. If you need more control, you can add conditions like using (auth.uid() = user_id) to restrict access to specific rows.
Supabase's REST API has been shown to handle basic read operations over 300% faster than Firebase, as it resolves requests with a single SQL statement. Combined with Adalo's modular infrastructure—which processes 20 million+ daily requests with 99%+ uptime—this creates a performant foundation for data-intensive applications.
With API permissions configured, the final step is retrieving your project credentials.
Getting Your API Keys
In your Supabase dashboard, go to Settings and click on the API tab. Here, you'll find two key items: the Project URL and your API keys.
The Project URL typically follows this format: https://<project_ref>.supabase.co/rest/v1. This serves as the base for all API requests.
Under API keys, you'll see two types:
- Anon key: Use this for Adalo integrations. It respects RLS policies and only accesses data explicitly permitted.
- Service_role key: This bypasses RLS and should never be used in client-side applications.
For Adalo, copy the anon key and save it securely. You'll use it as the apikey header in your API calls. Supabase is also rolling out a new publishable key format (sb_publishable_), but both the legacy anon key and the new format work identically for now.
"Every Supabase project has a unique API URL. Your API is secured behind an API gateway which requires an API Key for every request."
If your keys are ever exposed, you can regenerate them in the API settings. Just remember to update all your integrations with the new keys afterward.
With these steps complete, your Supabase setup is ready to integrate with Adalo.
Connecting Supabase to Adalo
Now that Supabase is set up, it's time to link it to Adalo. Adalo's External Collections feature allows you to connect your Supabase tables directly to your app's visual builder, making data integration seamless. This is where Adalo's AI-assisted building capabilities shine—once connected, you can use Magic Add to describe new features that leverage your Supabase data, and the platform generates the necessary screens and logic automatically.
Note: External Collections are available only with Adalo's Professional, Team, or Business plans.
Adding Supabase as an External Collection
Start by opening your Adalo project and navigating to the Database tab on the left. Scroll down to External Collections and click Add Collection. For clarity, name the collection to match your Supabase table—this makes managing multiple data sources much easier.
Next, input your Base URL. This is the REST API endpoint from Supabase for the table you want to connect. It typically looks like this:
https://<project_ref>.supabase.co/rest/v1/your_table_name
Now, set up the authorization headers. Supabase requires two headers to ensure secure access:
- Header 1: Name =
apikey, Value = your Supabase anon key (found in API settings) - Header 2: Name =
Authorization, Value =Bearer [your_Supabase_anon_key]
This setup mirrors the API configuration you completed earlier in Supabase.
Once the headers are in place, define the five standard endpoint actions as shown below:
| Endpoint Action | Method | URL Structure |
|---|---|---|
| Get All Records | GET | Base URL |
| Get One Record | GET | Base URL + /{id} |
| Create a Record | POST | Base URL |
| Update a Record | PATCH | Base URL + /{id} |
| Delete a Record | DELETE | Base URL + /{id} |
Tip: Use the PATCH method for updates, as it allows you to modify specific fields without overwriting the entire record.
For proper field detection, ensure your Supabase table contains at least one record before proceeding.
Mapping Your Data Collections
Once your connection is configured, press Test Connection in the setup modal. If everything is set up correctly, a green success indicator will appear, along with a preview of your Supabase data.
During this step, Adalo analyzes the JSON response from Supabase and generates corresponding fields, referred to as Properties. These fields can be renamed within Adalo without breaking the connection to the API. You'll also be able to use them as Magic Text for dynamic content across your app.
Since Adalo places no caps on database records or storage, you can connect tables of any size without worrying about hitting limits. This is particularly valuable when working with Supabase's PostgreSQL backend, which excels at handling large datasets and complex queries.
Testing Your API Connection
After mapping your collections, it's time to test the connection using Adalo's tools.
Create a simple List component in the Adalo builder. Assign your new Supabase collection as the data source and add text elements to display various properties. Preview the app to confirm that data is being displayed correctly.
To ensure everything works as expected, try creating, updating, and deleting records directly in Adalo. This will help verify that all five endpoint actions are functioning properly.
If you encounter any errors, Adalo will display the specific message returned by the Supabase API. Most connection issues stem from incorrect authorization headers or improperly formatted URLs. Double-check your API keys and ensure the Base URL matches your Supabase table name exactly.
One thing to keep in mind: changes made directly in your Supabase database won't automatically update in Adalo. Instead, Adalo fetches fresh data when a screen loads or when an API call is triggered by an action in your app.
Setting Up User Authentication
Once your data connection is ready, the next step is configuring user authentication. Supabase simplifies this with dedicated API endpoints, and Adalo's External Users Database and Authentication (Beta) feature makes the integration process smooth.
Start by heading to the Authentication settings in your Supabase dashboard. Enable Email Signup and toggle on Disable email confirmations for easier testing during setup.
In your Adalo app, choose External Users Database and Authentication (Beta) under Advanced Options. This unlocks external authentication actions for your app.
Note: External authentication is only available with Adalo's Professional, Team, or Business plans.
Configuring Login and Signup Endpoints
Now, set up the endpoints for login and signup. Supabase uses two distinct endpoints for these actions:
- Login Endpoint:
https://<your-project-ref>.supabase.co/auth/v1/token?grant_type=password - Signup Endpoint:
https://<your-project-ref>.supabase.co/auth/v1/signup
Both endpoints require the same header setup. Use the apikey header key, with the value being your Supabase service_role key (not the anon key used earlier). The service_role key provides the permissions needed to manage user sessions and tokens.
The JSON body for both endpoints should include two fields: email and password. These fields are essential for Supabase to validate or create user accounts.
| Action | Endpoint URL | Header Key/Value | JSON Body Fields |
|---|---|---|---|
| Login | /auth/v1/token?grant_type=password |
apikey: [service_role_key] |
email, password |
| Signup | /auth/v1/signup |
apikey: [service_role_key] |
email, password |
When testing, use a real Supabase user account for login (avoid admin credentials) and a unique email address for signup. This ensures the API returns valid tokens instead of errors.
Managing User Sessions and Tokens
The access_token and id fields in the returned JSON are key to managing user sessions. The access_token keeps the user logged in across your app, while the id enables authenticated queries to your Supabase database. These fields need to be mapped correctly; otherwise, users won't stay logged in or access their data.
During the Adalo setup wizard, manually map these fields by selecting access_token and id from the dropdown menus. Adalo doesn't automatically detect these fields, so this step is critical.
Keep in mind that Supabase authentication tokens expire every 20 days for security. Users will need to log in again after this period, even if they've been actively using the app. Additionally, clearing browser cache or logging in from a new device can also log users out.
With session tokens properly mapped, you can move on to testing the authentication process in your app.
Testing User Authentication
In your Adalo builder, add Login and Signup buttons to the relevant screens. Instead of standard database actions, you'll now see External Login and External Signup options. Assign these actions to your buttons.
To verify everything works, create a test screen restricted to "Logged In Users" only. This allows you to confirm that the session is maintained after authentication. Using the mapped access_token and id, ensure the restricted screen is accessible only to authenticated users.
Run tests by signing up, logging in, and accessing the restricted screen. If errors occur, Adalo will display the API response from Supabase. Most issues are due to incorrect header values or mismatched email/password formats in the JSON body.
Once authentication is working, your app can support user-specific data views, personalized dashboards, and secure access controls—all powered by Supabase's robust auth system and displayed through Adalo's native iOS and Android interfaces.
Managing Data Between Supabase and Adalo
You can manage data flow between Supabase and your Adalo app using External Collections and PostgREST for real-time updates. Below, we'll cover how to map your fields and set up filters to simplify data integration.
Mapping Database Fields
When you connect Supabase to Adalo, the system identifies your database fields during the "Test Connection" step. This process depends on the JSON response from your Supabase API. If a column is empty, it won't show up, so you may need to reconnect later to include any newly populated fields.
Supabase fields are automatically linked to Adalo properties like Text, Number, Date, and Image. These mapped properties can then be used across your app with Magic Text, making it easy to display or manipulate data in lists, forms, or conditional visibility rules. To update specific fields, use the PATCH method for record changes. Keep in mind that primary keys must be numeric—UUIDs are not supported.
Once your fields are mapped, you can refine which records are displayed using filters and conditional logic.
Adding Filters and Conditional Logic
Filters are applied using URL parameters. Supabase's PostgREST API supports query strings like ?select=*&order=id.desc or ?column=eq.value, allowing you to sort, filter, and limit results before they're sent to Adalo. For example, adding ?status=eq.active filters records to show only active entries. This approach minimizes payload size and improves load times, especially with larger datasets.
For better performance, implement pagination using limit and offset. This method fetches records in smaller batches, reducing the risk of timeouts or errors caused by large payloads. Adalo 3.0's modular infrastructure—launched in late 2025—delivers significantly faster data-driven screen loads compared to earlier versions, making paginated Supabase queries feel responsive even on complex screens.
Instead of permanently deleting records, think about using soft deletes. Add a "Status" or "Archived" field in Supabase and filter out archived records in Adalo. Soft deletes make it easier to recover data and give you more control over what users can see, without losing important information.
Optimizing Queries for Scale
As your user base grows, query optimization becomes essential. Supabase's PostgreSQL foundation supports indexing, which dramatically speeds up filtered queries. Create indexes on columns you frequently filter or sort by—this is especially important for timestamp fields in activity logs or status fields in order management systems.
Adalo's infrastructure scales to support apps with millions of monthly active users, with no upper ceiling on growth. Unlike platforms that impose hard limits on records or charge usage-based fees for database operations, Adalo's $36/month Professional plan includes unlimited database records and zero usage-based charges. This predictable pricing model means your costs stay stable even as your Supabase-connected app scales.
For apps requiring real-time data synchronization, consider implementing Supabase's real-time subscriptions for critical updates while using standard REST calls for less time-sensitive data. This hybrid approach balances responsiveness with efficiency.
Troubleshooting and Performance Tips
Even with a well-prepared setup, connecting Supabase to Adalo can sometimes present challenges. Thankfully, most issues are straightforward to resolve, and there are ways to fine-tune performance. Below are some common problems and practical tips to help you maintain a smooth integration.
Fixing Common Integration Errors
A frequent issue involves numeric ID compatibility. Adalo's External Collections require numeric IDs, so you'll need to add a separate BigInt or Integer column in Supabase to ensure compatibility.
Authentication errors are another common hurdle. If users can't sign in, double-check your Supabase Authentication Settings. Make sure "Disable Signup" is turned off, "Enable Email Signup" is active, and "Disable email confirmations" is enabled. To confirm everything is working, test the login endpoint with an existing user's credentials to retrieve the access token and user ID.
If your data isn't showing up in Adalo, the problem might be with the Results Key in your "Get All Records" endpoint. Ensure you're specifying the correct top-level key that wraps the data array in your JSON response.
Keep in mind that Adalo's API has a strict limit of 5 requests per second. If you exceed this, you'll receive a 429 status code. To prevent this, reduce rapid or repeated API calls, or introduce short delays between requests.
Improving Data Transfer Speed
Optimizing data transfer can significantly improve your app's performance. Start by using server-side filtering in Supabase to limit the data being sent. Additionally, implement pagination with limit/offset parameters to handle records in smaller batches (around 100 per request). When updating records, opt for the PATCH method instead of PUT, as PATCH only sends the fields that have changed, cutting down on data transfer.
Another way to boost performance is by storing frequently accessed data in Adalo's internal database. This reduces the need for repeated external API calls during user sessions. Additionally, avoid using multiple nested lists that pull data from various tables simultaneously. These setups can create bottlenecks and increase the likelihood of hitting the API rate limit.
Debugging with Adalo Tools
When troubleshooting integration issues, Adalo provides several built-in tools to help identify problems. The External Collections setup modal includes a test function that shows the raw API response from Supabase, making it easy to verify your endpoints are returning expected data.
For more complex debugging, use browser developer tools to inspect network requests when previewing your app. This reveals the exact headers, payloads, and responses for each API call, helping you pinpoint authentication issues or malformed requests.
If you're experiencing intermittent failures, check Supabase's dashboard for rate limiting or connection issues on their end. Supabase provides real-time metrics on API usage and database performance, which can help identify whether problems originate from the backend or the Adalo integration layer.
Publishing Your Supabase-Connected App
Once your Supabase integration is working smoothly, you're ready to publish. Adalo creates native iOS and Android apps from a single codebase, publishing directly to both the Apple App Store and Google Play Store. This is often the hardest part of launching an app—handling certificates, provisioning profiles, and store guidelines—but Adalo's streamlined submission process handles these complexities automatically.
Before publishing, test your Supabase connection thoroughly in Adalo's preview mode across different scenarios: new user signup, returning user login, data creation, updates, and deletions. Verify that authentication tokens persist correctly and that data displays as expected on all screen types.
For production apps, consider implementing error handling for network failures. Add fallback screens or retry logic for cases where Supabase is temporarily unreachable. This ensures your users have a smooth experience even during brief connectivity issues.
Conclusion
Linking Supabase with Adalo combines Supabase's PostgreSQL backend with Adalo's AI-powered app builder. This connection allows Supabase data to work directly with Adalo collections, enabling features like Lists, Actions, and Forms—all without needing custom backend code. It's a powerful way to manage larger datasets, handle complex relationships, and run advanced queries beyond typical app builder limits.
As your app grows, scaling becomes essential. Supabase's entry-level paid plan supports up to 100,000 users, while Adalo's modular infrastructure scales to serve millions of monthly active users with no upper ceiling. Combined with Adalo's unlimited database records and zero usage-based charges, this pairing provides a cost-effective foundation for apps of any size.
"If you're experienced with PostgreSQL and want an open-source backend builder, shortlist Supabase. The platform is particularly well-suited for developers and development teams looking for a robust and flexible backend builder that lets you scale to the moon." - The Adalo Team
To use this integration, you'll need at least an Adalo Professional plan at $36/month, which unlocks access to External Collections and includes unlimited usage across all metrics.
Related Blog Posts
- How To Create An App using OracleDB Data
- REST API Integration with Adalo: Guide
- PostgreSQL Integration for No-Code Apps
- How APIs Connect No-Code Apps to Cloud Databases
FAQ
Why choose Adalo over other app building solutions?
Adalo is an AI-powered app builder that creates true native iOS and Android apps. Unlike web wrappers, it compiles to native code and publishes directly to both the Apple App Store and Google Play Store from a single codebase—the hardest part of launching an app handled automatically. At $36/month with unlimited usage, it offers predictable pricing without caps on actions, users, records, or storage.
What's the fastest way to build and publish an app to the App Store?
Adalo's drag-and-drop interface combined with AI-assisted building through Magic Start and Magic Add lets you go from idea to published app in days rather than months. Describe what you want to build, and the AI generates your database structure, screens, and logic automatically. Adalo then handles the complex App Store submission process, so you can focus on features instead of certificates and provisioning profiles.
What Adalo plan do I need to connect Supabase to my app?
You need an Adalo Professional, Team, or Business plan to use External Collections, which is required for Supabase integration. The Professional plan is $36/month and includes unlimited usage—no caps on actions, users, records, or storage—making it cost-effective for data-intensive Supabase integrations.
Why does Supabase require numeric IDs instead of UUIDs for Adalo integration?
Adalo's External Collections feature requires numeric primary keys to properly identify and manage records. Since Supabase defaults to UUIDs, you'll need to configure your tables with numeric types like bigint or int8 with auto-increment enabled to ensure compatibility.
How do I handle user authentication between Supabase and Adalo?
Use Adalo's External Users Database and Authentication feature combined with Supabase's auth endpoints. Configure separate login and signup endpoints with your service_role key, and map the access_token and id fields from Supabase responses to maintain user sessions across your app.
What should I do if my Supabase data isn't appearing in Adalo?
First, ensure your Supabase table contains at least one record, as Adalo needs sample data to detect field types. Check that your authorization headers are correct, verify the Base URL matches your table name exactly, and confirm you've specified the correct Results Key for nested JSON responses.
How does Adalo handle scaling for Supabase-connected apps?
Adalo's modular infrastructure scales to support apps with millions of monthly active users, with no upper ceiling. Combined with Supabase's PostgreSQL backend that supports up to 100,000 users on entry-level plans, this pairing handles growth efficiently. Adalo's unlimited database records and zero usage-based charges mean your costs stay predictable as you scale.
Can I publish my Supabase-connected app to both iOS and Android?
Yes. Adalo creates native iOS and Android apps from a single codebase and publishes directly to both the Apple App Store and Google Play Store. Your Supabase integration works identically across both platforms without any additional configuration.
How do I optimize performance for large Supabase datasets?
Use server-side filtering with Supabase's PostgREST query parameters to limit data before it reaches Adalo. Implement pagination with limit/offset parameters, use PATCH instead of PUT for updates, and create database indexes on frequently filtered columns. Store frequently accessed data in Adalo's internal database to reduce external API calls.
Build your app fast with one of our pre-made app templates
Begin Building with no codeRelated Content

REST API Integration with Adalo: Guide
Connect REST APIs to Adalo with External Collections: setup, auth, CRUD mapping, DreamFactory middleware, and practical performance tips.
Cloud ERP Integration with DreamFactory: Guide
Cloud ERP Integration with DreamFactory: Guide
Step-by-step guide to connect ERP databases to DreamFactory, auto-generate secure REST APIs, configure RBAC, test endpoints, and deploy inte
Custom Actions with Zapier: Integration Guide
Practical guide to connect Adalo apps with Zapier using Custom Actions and webhooks. Configure API access, build JSON payloads with Magic Te

How To Create An App using SAP Data
Step-by-step guide to connect SAP OData/REST APIs to a no-code app builder, configure auth, map data, test, and deploy to web and mobile.