


Publishing an app to the Apple App Store and Google Play Store requires navigating a maze of developer account configurations, platform-specific guidelines, and strict review criteria that can derail even the most prepared builders. A missing privacy policy, incorrectly configured permissions, or incomplete metadata can result in rejection notices and frustrating delays—turning what should be an exciting launch into weeks of back-and-forth with review teams.
The right no-code platform can transform this process from a technical obstacle course into a streamlined workflow. Adalo is a no-code app builder for database-driven web apps and native iOS and Android apps—one version across all three platforms. AI-assisted building and streamlined publishing enable launch to the Apple App Store and Google Play in days rather than months.
Why Adalo Simplifies App Store Submission
Adalo is a no-code app builder for database-driven web apps and native iOS and Android apps—one version across all three platforms, published to the Apple App Store and Google Play. This unified approach means you won't juggle separate codebases or navigate different submission workflows for each store—Adalo handles the technical complexity so you can focus on meeting Apple and Google's requirements.
Getting your app into the official stores unlocks access to billions of potential users and enables essential features like push notifications that keep your audience engaged. With Adalo's streamlined publishing process, you can move from finished app to live listing in days rather than weeks, provided you follow the right preparation steps.
Getting your app from idea to the Apple App Store and Google Play Store involves navigating strict requirements, developer account setups, and platform-specific guidelines that can trip up even experienced builders. Between Apple's detailed review process and Google's evolving policies, a single overlooked detail—like a missing privacy policy URL or improperly explained permissions—can delay your launch by days or weeks.
The right tools can eliminate much of this friction and get your app in front of users faster. Adalo, an AI-powered app builder, creates database-driven web apps and native iOS and Android apps—one version across all three platforms. AI-assisted building and streamlined publishing enable launch to the Apple App Store and Google Play in days rather than months.
Why Adalo Makes App Store Submission Simple
Adalo's unified approach eliminates the complexity of managing separate codebases and submission processes for each platform. Build once, and your app compiles to true native code for both iOS and Android—not a web wrapper that introduces performance constraints. This means you can focus on meeting store requirements rather than wrestling with technical configurations.
Successfully publishing to the app stores opens the door to millions of potential users and enables powerful features like push notifications to keep your audience engaged. Whether you're launching a business tool, community app, or marketplace, following this checklist will help ensure your Adalo app passes review on the first try.
Submitting your app to the Apple App Store and Google Play Store can seem challenging, but careful preparation simplifies the process. Here's a quick guide to ensure your Adalo app meets platform requirements and avoids common rejections:
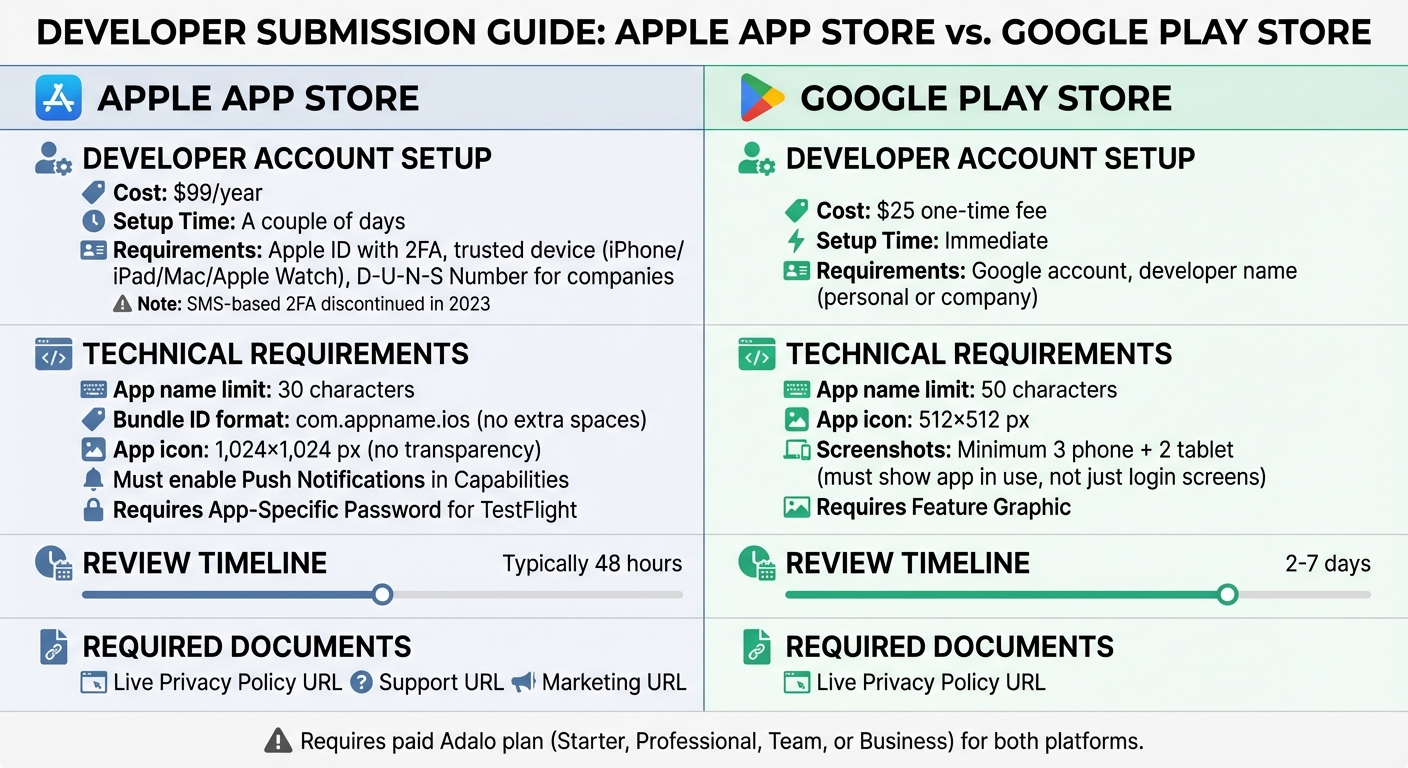
- Set Up Developer Accounts: Apple charges $99/year and requires two-factor authentication (2FA) and a D-U-N-S Number for companies. Google Play costs a one-time $25 fee.
- Prepare Legal Documents: Both platforms need a live privacy policy URL. Apple also requires a support and marketing URL.
- Follow Technical Guidelines: Apple limits app names to 30 characters, while Google requires functional app screenshots (not just login screens).
- Customize Permissions: Clearly explain why your app accesses features like the camera or location to avoid rejections.
- Test Thoroughly: Use real devices to test functionality, performance, and layout for both iOS and Android.
Adalo simplifies publishing by allowing you to build a single app and deploy it natively to iOS and Android app stores without rebuilding for each platform. With everything in order, iOS reviews typically take 48 hours, and Google Play reviews 2–7 days. Proper preparation ensures a smooth submission process.
Publishing Your Adalo App to the Google Play Store
Step 1: Set Up Developer Accounts and Pre-Submission Requirements
Apple App Store vs Google Play Store: Developer Account Requirements and Submission Timeline
Create Developer Accounts
To submit your Adalo app, you'll need active developer accounts for both Apple and Google. Here's what you should know:
- Apple Developer Program: Costs $99 per year and can take a couple of days to set up. You'll need an Apple ID with two-factor authentication (2FA) linked to a trusted device like an iPhone, iPad, Mac, or Apple Watch. Keep in mind that Apple discontinued SMS-based 2FA in 2026. If you're registering as a company, your business must have a D-U-N-S Number, which takes about 14 business days to obtain. A company account also lets you display your business name on the App Store and invite team members.
- Google Play Console: Requires a one-time fee of $25 and is much quicker to set up—activation is immediate. You'll only need a Google account and a "Developer Name", which can be either your personal name or your company name.
Adalo users, take note: Publishing to either store requires a paid Adalo plan (Starter, Professional, Team, or Business). Starting at $36/month, Adalo's paid plans include unlimited app store publishing with unlimited updates to apps once published—no additional charges for republishing or usage. You'll also need to generate an App-Specific Password in your Apple ID settings to securely upload builds to TestFlight. Save this password immediately, as Apple won't display it again. If you reset your iCloud password, you'll need to create a new App-Specific Password for continued publishing.
| Platform | Account Fee | Setup Time | Key Requirements |
|---|---|---|---|
| Apple Developer Program | $99/year | A couple of days | Apple ID with 2FA, trusted device, D-U-N-S Number (for organizations) |
| Google Play Console | $25 one-time | Immediate | Google account, developer name |
Once your accounts are ready, you'll need to prepare some legal documents before submission.
Prepare Required Legal Documents
Both app stores require a live online privacy policy that clearly explains your app's data collection and usage practices. You'll need to provide the URL for this policy when setting up your app in App Store Connect and Google Play Console. Apple also mandates disclosures about App Tracking Transparency and any data collection practices.
For Apple submissions, you'll also need a Support URL (usually your landing page's contact page) and a Marketing URL (your main landing page). These URLs must be live and accessible before you submit.
Review App Store Guidelines
Before submission, it's crucial to review the specific guidelines for each store to avoid common pitfalls:
- Apple: One frequent rejection reason is Guideline 5.1.1, which requires clear and specific "purpose strings" for permissions like camera or location access. If you're using Adalo's prefilled text for these permissions, customize it to match your app's functionality. Additionally, Apple enforces a strict 30-character limit for app names.
- Google Play: Your screenshots must show the app in actual use—screenshots of just the login screen won't suffice.
Apple also requires you to answer compliance and export questions in App Store Connect before submission. For better control, consider selecting "Manually release this version" for your app's release, so you can decide when it goes live after approval.
Lastly, ensure technical compliance to avoid build failures. For Apple, use the format com.appname.ios for your Bundle ID in Adalo, and make sure there are no extra spaces. Even if your app doesn't use push notifications, you must enable "Push Notifications" in the Capabilities section of the Apple Developer portal for the build to succeed.
Step 2: Prepare App Metadata and Visual Assets
App Icon and Screenshots
Visual assets are the first thing users notice, so they need to meet the technical requirements of each platform. For your app icon, Apple requires a 1,024×1,024 px image with no transparency, while Google Play's requirement is 512×512 px. If you're preparing an iOS app icon, make sure to export it without transparency (no alpha channel) to avoid errors during submission.
Screenshot specifications vary between platforms. For iOS, take screenshots on a physical device using TestFlight, and avoid editing them to ensure they meet Apple's resolution guidelines. On Google Play, you'll need at least three phone screenshots and two tablet screenshots. These images should showcase your app in action—screenshots of login or welcome screens alone won't pass review.
To make your visuals stand out, use professional mockup tools. For Android, rely on device previewers and capture tools to create clean, high-quality screenshots. Google Play also asks for a Feature Graphic to complement your icon and screenshots, so don't skip this step.
Once your visuals are ready, update your metadata to clearly showcase your app's features and benefits.
App Name, Description, and Keywords
When naming your app, keep it concise—Apple allows up to 30 characters, while Google Play permits 50. Avoid using special characters like "~" or double quotes ("") in your app name, as Apple may flag these and reject your build. Ensure the name is unique, avoids trademarked terms, and doesn't mimic popular app names, as these tactics can backfire by violating store policies.
Descriptions are your chance to highlight your app's features. Both stores allow up to 4,000 characters for the full description, but Google Play also requires a short description of around 80 characters. Use this space to summarize your app's value without cramming in unnecessary keywords. For iOS, you can use Apple Search Ads to identify relevant keywords, but remember to avoid spaces around commas and stick to the 100-character limit.
If your app is on iOS, take advantage of the optional subtitle field. This is a great place to include relevant keywords while clearly stating your app's purpose. Lastly, make sure to select the correct category for your app, such as "Travel" or "Booking", so it appears in the right user searches.
Localization for Multiple Languages
Planning to reach users in different countries? Translating your app's metadata and visual assets is a must. In App Store Connect, you can add localized versions of your app name, subtitle, and descriptions under the Localizable Information section.
Apple also requires customized explanation text for every permission request (e.g., camera, photos, or location access) in each supported language. This text should clearly explain why your app needs the requested permissions. Avoid using the default text provided by tools like Adalo—it's just a placeholder and could lead to rejection if not personalized. Additionally, if your app's interface includes text, prepare localized screenshots to ensure everything is clear and user-friendly for your target audience.
Step 3: Configure Compliance and App Settings
Privacy Settings and Data Collection Disclosures
Once your legal documents are in place, the next step is to configure your app's data collection disclosures. Be transparent about the specific user data your app collects and why. In App Store Connect, head to the App Privacy section and select "Yes, we collect data from this app." This step is required for Adalo apps because they rely on Adalo's servers to store and retrieve data.
For Adalo apps, you must disclose the collection of specific data types:
- User IDs (necessary for app functionality)
- Product Interaction data (used for analytics)
- Other Diagnostic Data (also used for analytics)
If your app includes email/password sign-in, you'll need to disclose the collection of Email Addresses. Apps with push notification features require disclosure of the Device ID, and if your app uses Google Maps, you must disclose both Precise Location and Coarse Location.
Additionally, make sure to provide the live URL for your privacy policy in App Store Connect. If you're using third-party services like Stripe, Google AdMob, or Mixpanel, check their documentation to ensure all required privacy labels are accurately marked.
App Permissions and Capabilities
After handling compliance settings, the next step is to ensure your app permissions and capabilities are clearly defined. Apple requires you to provide a detailed explanation, known as a "purpose string", for every permission your app requests, such as access to the camera, location, or photo library.
To do this in Adalo, go to the Launch tab, open your iOS App settings, and click on Update Settings. Replace any generic text with clear, user-friendly explanations. For example, instead of vague language, write something like, "This app uses your camera to capture and upload profile images." If Apple rejects your app due to unclear permission descriptions, update the text in Adalo, generate a new build, and resubmit it.
For apps on Google Play, ensure your permission requests align with your app's features. Once all permissions are properly defined, grant reviewers complete test access to your app.
Set Up Reviewer Test Access
Both Apple and Google reviewers need unrestricted access to test your app, including features behind login screens or paywalls. In App Store Connect, navigate to the App Review Information section and provide demo account credentials along with clear, step-by-step login instructions. For example, you might include details like: "Sign in with demo@test.com / password123; swipe left to access purchases". Create non-expiring demo accounts to make the testing process seamless.
Additionally, Apple requires you to answer compliance and export-related questions in App Store Connect before submitting your app. These questions include topics like encryption usage. If you want to control when your app goes live after approval, select the "Manually release this version" option under App Store Version Release.
Step 4: Test Your App Before Submission
Testing your app thoroughly before submission is crucial. Both Apple and Google reviewers meticulously evaluate every aspect of your app, so identifying and resolving issues beforehand can save you weeks of revisions. To ensure your app meets their standards, test it across various devices and platforms.
Test on Multiple Devices
The "Preview" feature in Adalo's editor only displays the web version of your app, which doesn't reflect how it will perform on actual devices. Testing on real mobile devices is essential to catch platform-specific problems. For iOS, use TestFlight to distribute builds, and for Android, leverage Google Play's Internal Testing Track.
Pay close attention to iPad compatibility. Under Apple's Guideline 2.1, apps that don't properly support iPad screen sizes will be rejected. Test your app on both 7-inch and 10-inch tablets to ensure the layout adjusts correctly. Additionally, confirm that any external libraries you've used function seamlessly on physical devices, as some may work fine on the web but fail on mobile.
Following the Adalo 3.0 infrastructure overhaul in late 2025, apps now run 3-4x faster than before. This improved performance translates to smoother user experiences during testing and in production. Once these device-specific issues are resolved, move on to testing your app's functionality and overall performance.
Check Functionality and Performance
Go through your app as if you're a first-time user. Test every screen and feature, ensuring that permission requests for the camera, location, and notifications appear with your customized explanation text. Using Adalo's default placeholder text for these permissions will lead to rejection. Double-check that all functions align with the guidelines established in Step 3.
During the app's initial loading phase, verify that your launch screen graphic and background color display correctly. If your app includes sign-in features, test the process thoroughly to ensure it's seamless. For iOS apps, clean your Xcode build to eliminate glitches, and review your entitlements and distribution settings.
Adalo's X-Ray feature can help identify performance issues before they affect users or reviewers. This AI-powered diagnostic tool highlights potential bottlenecks in your app's data relationships and screen configurations, allowing you to optimize before submission.
Verify Accessibility and Usability
After testing functionality, share your TestFlight or Internal Testing build with a small group of testers. Their feedback can help you identify any navigation or usability issues, particularly in screens where users spend the most time.
Ensure your app performs consistently across various screen sizes and operating systems. Enable native builds in Adalo through the "Publish" setting. Address any warnings flagged by the Google Play Console or Apple during the upload process, as these often highlight usability concerns that must be resolved before final submission.
Step 5: Submit Your App to the App Stores
After testing your app and ironing out any issues, the final step is submitting it to the Apple App Store and Google Play Store. This process includes generating build files, completing submission forms, and keeping an eye on the review process. Getting approval quickly is essential.
Create and Upload Build Files
Adalo simplifies the publishing process with its native workflow, but the steps differ depending on the platform.
For iOS, you'll need an active Starter, Professional, Team, or Business plan. In the Adalo editor, go to the Launch tab, expand the iOS App section, and click Update Settings. Provide your Bundle ID (double-check for extra spaces to avoid errors), Apple ID email, and the Adalo-specific "App-specific Password". Next, set your Display Name (30 characters max), upload a Launch Screen graphic, and customize the explanation text for permission requests—don't use Adalo's prefilled example text, as Apple will reject it. Once everything is ready, click Start New Testflight Build. You'll get an email when the build is complete.
For Android, head to the Publish tab, select Android App, and click Start new Android Build. Input your Package Name (case-sensitive and must match your Firebase Project), upload the google-services.json file, and include your Service Account Key file. Set your Display Name, upload a Notifications Icon (required even if push notifications aren't in use), choose your Version Number, and click Start Build. Once the build is ready, download the .AAB file and manually upload it to the Google Play Console.
Unlike platforms that charge per app update or limit republishing, Adalo's paid plans include unlimited app store publishing with unlimited updates. This means you can iterate quickly based on user feedback without worrying about additional costs.
Fill Out Submission Forms
When your iOS build is uploaded to App Store Connect, select the build, confirm the app icon, and complete all compliance and export-related questions. Write a description (up to 4,000 characters), choose suitable categories, and assign age ratings based on your app's content. Both Apple and Google require a hosted Privacy Policy URL—this is mandatory.
For Google Play, use the "Review Release" stage to address any warnings before final submission. While some warnings specific to Adalo apps are normal and won't block publishing, all errors must be fixed. Additionally, under the "Testers" tab, include a feedback URL so testers can report any issues during the testing phase.
Track Review Status and Respond to Feedback
Apple typically approves apps within 48 hours. For Google Play, you can monitor the review status in the All Apps Dashboard for tracks beyond "Internal Testing". If Apple rejects your app, common reasons include missing or generic permission descriptions or failure to support iPad screen sizes.
When launching on iOS, consider using the Phased Release option to gradually roll out your app over seven days. This gives you time to monitor performance and address any critical issues before reaching your full audience. On Android, take advantage of Internal, Closed, and Open testing tracks to gather feedback and fix bugs before promoting your build to Production. This staged rollout helps reduce the risk of widespread issues affecting all users at once.
Scaling Your App After Launch
Once your app is live, growth becomes the next challenge. Many app builders hit performance walls as user counts climb, but Adalo's modular infrastructure was rebuilt specifically to handle scale.
With the Adalo 3.0 infrastructure overhaul launched in late 2025, the platform now supports apps with over 1 million monthly active users. Paid plans include no database record limits—your app's data can grow without hitting artificial caps or triggering overage charges. This is a significant advantage over platforms like Bubble, which impose Workload Units that can create unpredictable billing as your app scales.
The platform processes 20 million+ data requests daily with 99%+ uptime across the over 3 million apps built on Adalo. This battle-tested infrastructure means your app benefits from the same reliability whether you have 100 users or 100,000.
For apps expecting significant growth, Adalo's purpose-built architecture outperforms app wrappers at scale. True native compilation means your iOS and Android apps run with native performance—no WebView layer adding latency between your users and your app's functionality.
Conclusion
Getting your app approved means covering all the basics: having active developer accounts, ensuring your metadata and screenshots meet the guidelines, writing custom permission texts, using a properly formatted Bundle ID, and completing all compliance forms. Double-check that your Bundle ID doesn't have extra spaces, and make sure permission descriptions are personalized instead of relying on Adalo's default examples. These small but crucial steps can save you from unnecessary delays and rejections during the review process.
Adalo simplifies the technical side of app development, letting you build iOS and Android apps directly from the Launch tab with centralized settings. The platform's AI-assisted building tools and streamlined publishing workflow handle the hardest part of launching an app—getting it into the stores where users can find it.
"Adalo is an intuitive and powerful app builder that requires absolutely zero coding or technical experience to create and publish an app on the App Store." - The Adalo Team
For approvals, iOS apps are typically reviewed within 48 hours, while Android builds take about 2–7 days. Consider using phased or staged rollouts to address any issues early before a full-scale launch. With everything in place, you're ready to launch your app with confidence.
Related Blog Posts
- Publishing Apps to App Stores: A Beginner's Guide
- How to Launch Your First Mobile App Without Coding
- How To Get a Vibe-Coded App To The App Store
- How To Create a Content Scheduling App
FAQ
Why choose Adalo over other app building solutions?
Adalo is an AI-powered app builder that creates true native iOS and Android apps. Unlike web wrappers, it compiles to native code and publishes directly to both the Apple App Store and Google Play Store from a single codebase—the hardest part of launching an app handled automatically. With paid plans starting at $36/month including unlimited database records and no usage-based charges, it's designed for builders who want to ship fast without surprise bills.
What's the fastest way to build and publish an app to the App Store?
Adalo's drag-and-drop interface and AI-assisted building let you go from idea to published app in days rather than months. The platform handles the complex App Store submission process—certificates, provisioning profiles, and store guidelines—so you can focus on your app's features and user experience. Magic Start can generate complete app foundations from a simple description, accelerating the initial build phase significantly.
What developer accounts do I need to publish my Adalo app?
You'll need an Apple Developer Program account ($99/year) and a Google Play Console account ($25 one-time fee). Apple requires two-factor authentication and a D-U-N-S Number for company accounts, while Google only requires a Google account and developer name with immediate activation.
Why might Apple reject my Adalo app submission?
Common rejection reasons include using Adalo's default placeholder text for permission descriptions instead of customized explanations, exceeding the 30-character app name limit, and failing to properly support iPad screen sizes. Always customize permission purpose strings to clearly explain why your app needs access to features like camera or location.
How long does the app review process take?
iOS app reviews typically take about 48 hours, while Google Play reviews take 2-7 days. Proper preparation of metadata, screenshots, privacy policies, and compliance forms helps ensure approval on the first submission attempt.
Do I need to test my Adalo app on real devices before submitting?
Yes, testing on real devices is essential because Adalo's editor preview only shows the web version. Use TestFlight for iOS and Google Play's Internal Testing Track for Android to catch platform-specific issues, especially iPad compatibility problems that can lead to rejection under Apple's Guideline 2.1.
How much does it cost to publish an app with Adalo?
Adalo's paid plans start at $36/month and include app store publishing to both iOS and Android with unlimited updates. Combined with Apple's $99/year developer fee and Google's one-time $25 fee, you can have apps live in both stores for under $200 in the first year. Unlike some platforms, Adalo has no usage-based charges or limits on republishing.
Can my Adalo app scale to handle many users?
Yes. Following the Adalo 3.0 infrastructure overhaul in late 2025, the platform's modular architecture supports apps with over 1 million monthly active users. Paid plans include no database record limits, and the platform processes 20 million+ data requests daily with 99%+ uptime. Apps run 3-4x faster than before the overhaul.
What's the difference between Adalo's native apps and web wrappers?
Adalo compiles to true native iOS and Android code, meaning your app runs with native performance without a WebView layer adding latency. Web wrappers essentially display a website inside an app shell, which can introduce performance constraints under load and may not pass stricter app store reviews. Native compilation also enables features like push notifications that work reliably across devices.
Do I need coding experience to publish an app with Adalo?
No coding experience is required. Adalo's visual builder has been described as "easy as PowerPoint," and the AI features Builder (releasing early 2026) will enable prompt-based app creation. The platform handles all the technical complexity of app store submission, including generating the proper build files and managing certificates.


