


Why Adalo Works for Building Real Estate Apps
Adalo is a no-code app builder for database-driven web apps and native iOS and Android apps—one version across all three platforms, published to the Apple App Store and Google Play. This makes it the perfect solution for real estate professionals who need to manage complex property databases, client information, and listing details while delivering a seamless experience to buyers and sellers on any device.
For real estate apps specifically, app store distribution is essential—your clients expect to find your app right alongside major platforms like Zillow and Redfin. With native push notifications, you can instantly alert buyers when a property matching their criteria hits the market or remind sellers about upcoming showings, keeping your business top-of-mind and driving engagement that web-only solutions simply can't match.
Real estate agents face a constant challenge: staying connected with buyers and sellers while managing dozens of property listings, scheduling showings, and closing deals. A dedicated mobile app puts your entire business in clients' pockets—but traditional app development costs tens of thousands of dollars and takes months to complete.
Adalo, an AI-powered app builder, eliminates these barriers entirely. The platform creates native iOS and Android apps from a single codebase, publishing directly to both the Apple App Store and Google Play Store. For real estate professionals, this means clients can browse listings on the go, receive push notifications when new properties hit the market, and contact you instantly—all through an app that looks and performs like it was built by a professional development team.
With over 3 million apps created on the platform and a visual builder described as "easy as PowerPoint," Adalo has become the go-to solution for professionals who need powerful apps without the technical complexity. Before diving into the building process, let's make sure you have everything planned for success.
Why Adalo Works for Building Real Estate Apps
Adalo's architecture is purpose-built for data-heavy applications like real estate platforms. The platform's modular infrastructure scales to serve apps with millions of monthly active users, with no upper ceiling on growth. This matters for real estate apps that may start with a handful of listings but grow to thousands of properties and users over time.
Ada, Adalo's AI builder, lets you describe what you want and generates your app. Magic Start creates complete app foundations from a description, while Magic Add adds features through natural language.
Unlike web wrappers that hit performance constraints under load, Adalo compiles to true native code. Your real estate app runs with the speed and responsiveness clients expect from professional applications. The platform's AI-assisted features—including Magic Start for generating complete app foundations and Magic Add for building features from natural language requests—accelerate development from months to days.
Before Building Your Real Estate App: Planning
Like any tradesperson starting a new project, you'll need a concrete plan to ensure no ideas are wasted. Your plan will serve as your app's blueprint, and you should have it by your side while building.
Ensure you have the following before you start:
- Sketches of how you want your app to appear: Grab some paper and a pencil (or your iPad). Draw out each of your app's screens and note what you want each screen to contain. For instance, do you want your logo at the top of every screen? Which screens will have lists and sign-up forms? Will you have a map of your properties? What colors do you want to use? Doing this will inspire ideas for your app's aesthetic, making the app-building process easier.
- Your App's Actions: Actions are the jobs and tasks your app will execute. Ask yourself: Will your users be able to call you directly from the listing? Do you want a chat feature so your clients can immediately contact you? How about a mortgage calculator? Grab the screen sketches you just drew and list the actions that your app can execute on each one. Listing the actions and where they occur should result in more organized and logical app-building, helping you avoid frustration.
- An Adalo membership: Adalo leverages a super intuitive drag-and-drop interface that lets you bring any app idea to life. And you don't need any coding or technical skills. Get started by signing up for Adalo's free version, which lets you get used to its building interface. Because Adalo prioritizes simplicity, you can start creating your app immediately after signing up. The platform also allows you to make a professional-looking app that will attract the attention of your clients.
How a Real Estate Agent App Works: The Parts
Before we jump into the nuts and bolts of building your app, here's an overview of the components found in every type of app. All apps, whether they be real-estate agent apps, restaurant apps, or news apps, are made up of these parts:
- The Frontend: This is the part of the app everyone sees: the screens, colors, text, pictures, and more all comprise an app's frontend. In fact, by reading this article, you're looking at a frontend right now. Having an aesthetically pleasing and logically structured frontend is crucial to your app's user experience (UX).
- The Backend: Your backend is where your app "thinks." It's responsible for pulling up data, like house pricing information, pictures, and more. The backend also connects with other apps like Zapier and Zillow and gathers data from them.
- The Database: Although it is part of the backend, it's crucial enough to get its own mention. The database stores all the info in your app so your backend can bring it to the user.
Some of the data that you'll find in your real estate app's database:
- Pictures of all your properties
- Each listing's details
- Properties for sale and properties for rent
- Property info, like square footage, date built, number of rooms, a description, etc.
- User profile information
- Any customized info you want to add
Adalo comes with its own easy-to-use database. It's baked into your app, so you don't need to worry about connecting it to your screens. Your backend functions automatically, storing freshly entered user data and retrieving requested info instantly.
Critically, paid plans include unlimited database records—no caps on how many property listings, user profiles, or transaction records you can store. This removes a common constraint that forces real estate professionals to delete old data or upgrade to expensive enterprise tiers on other platforms.
How To Build a Real Estate App in 7 Easy Steps
When you have your sketches in order and a list of your app's functionalities, it's time to get into the meat of your project: Using Adalo to build your own app!
While building your app, you might run into a few technical questions or get stuck. Don't worry; Adalo's got you covered with its thriving ecosystem full of help documents, video tutorials, and expert opinions. Check out Adalo's ecosystem right here:
- The Adalo Academy: Adalo's Academy offers online classes, courses, and tutorials to get you to the expert level when using Adalo's building interface.
- Adalo's Community Forum: Let seasoned Adalo vets answer the questions you post to the message board.
- Documents: If you want to delve into the nuances of connecting to APIs, integrating with third-party applications like Zapier, publishing to the app stores, and more, just read through Adalo's rich documentation.
It's building time, let's go!
Step 1: Adalo's Real Estate Agent App Template
Adalo lets users choose templates, which are models of their apps that they can edit and customize to their tastes when they start building. Conveniently, Adalo already has a real estate app template.
After you select the template, it will open in your app-building interface. Adalo's real estate template has several screens, each showing a separate property and relevant info like the number of bedrooms, bathrooms, and more. You'll also find a user login screen and a screen that lets users upload their own properties.
Don't fret if you don't like its appearance—you'll have all the power and design freedom to craft your app uniquely to your own tastes. You'll also be able to replace all of the preloaded property info with your own properties' data.
For even faster setup, Magic Start can generate a complete app foundation from a simple description. Tell it you need a real estate app with property listings, search filters, and agent contact features, and it creates your database structure, screens, and user flows automatically—what used to take days of planning happens in minutes.
Step 2: Using Adalo's Building Interface to Craft and Customize Your Real Estate App
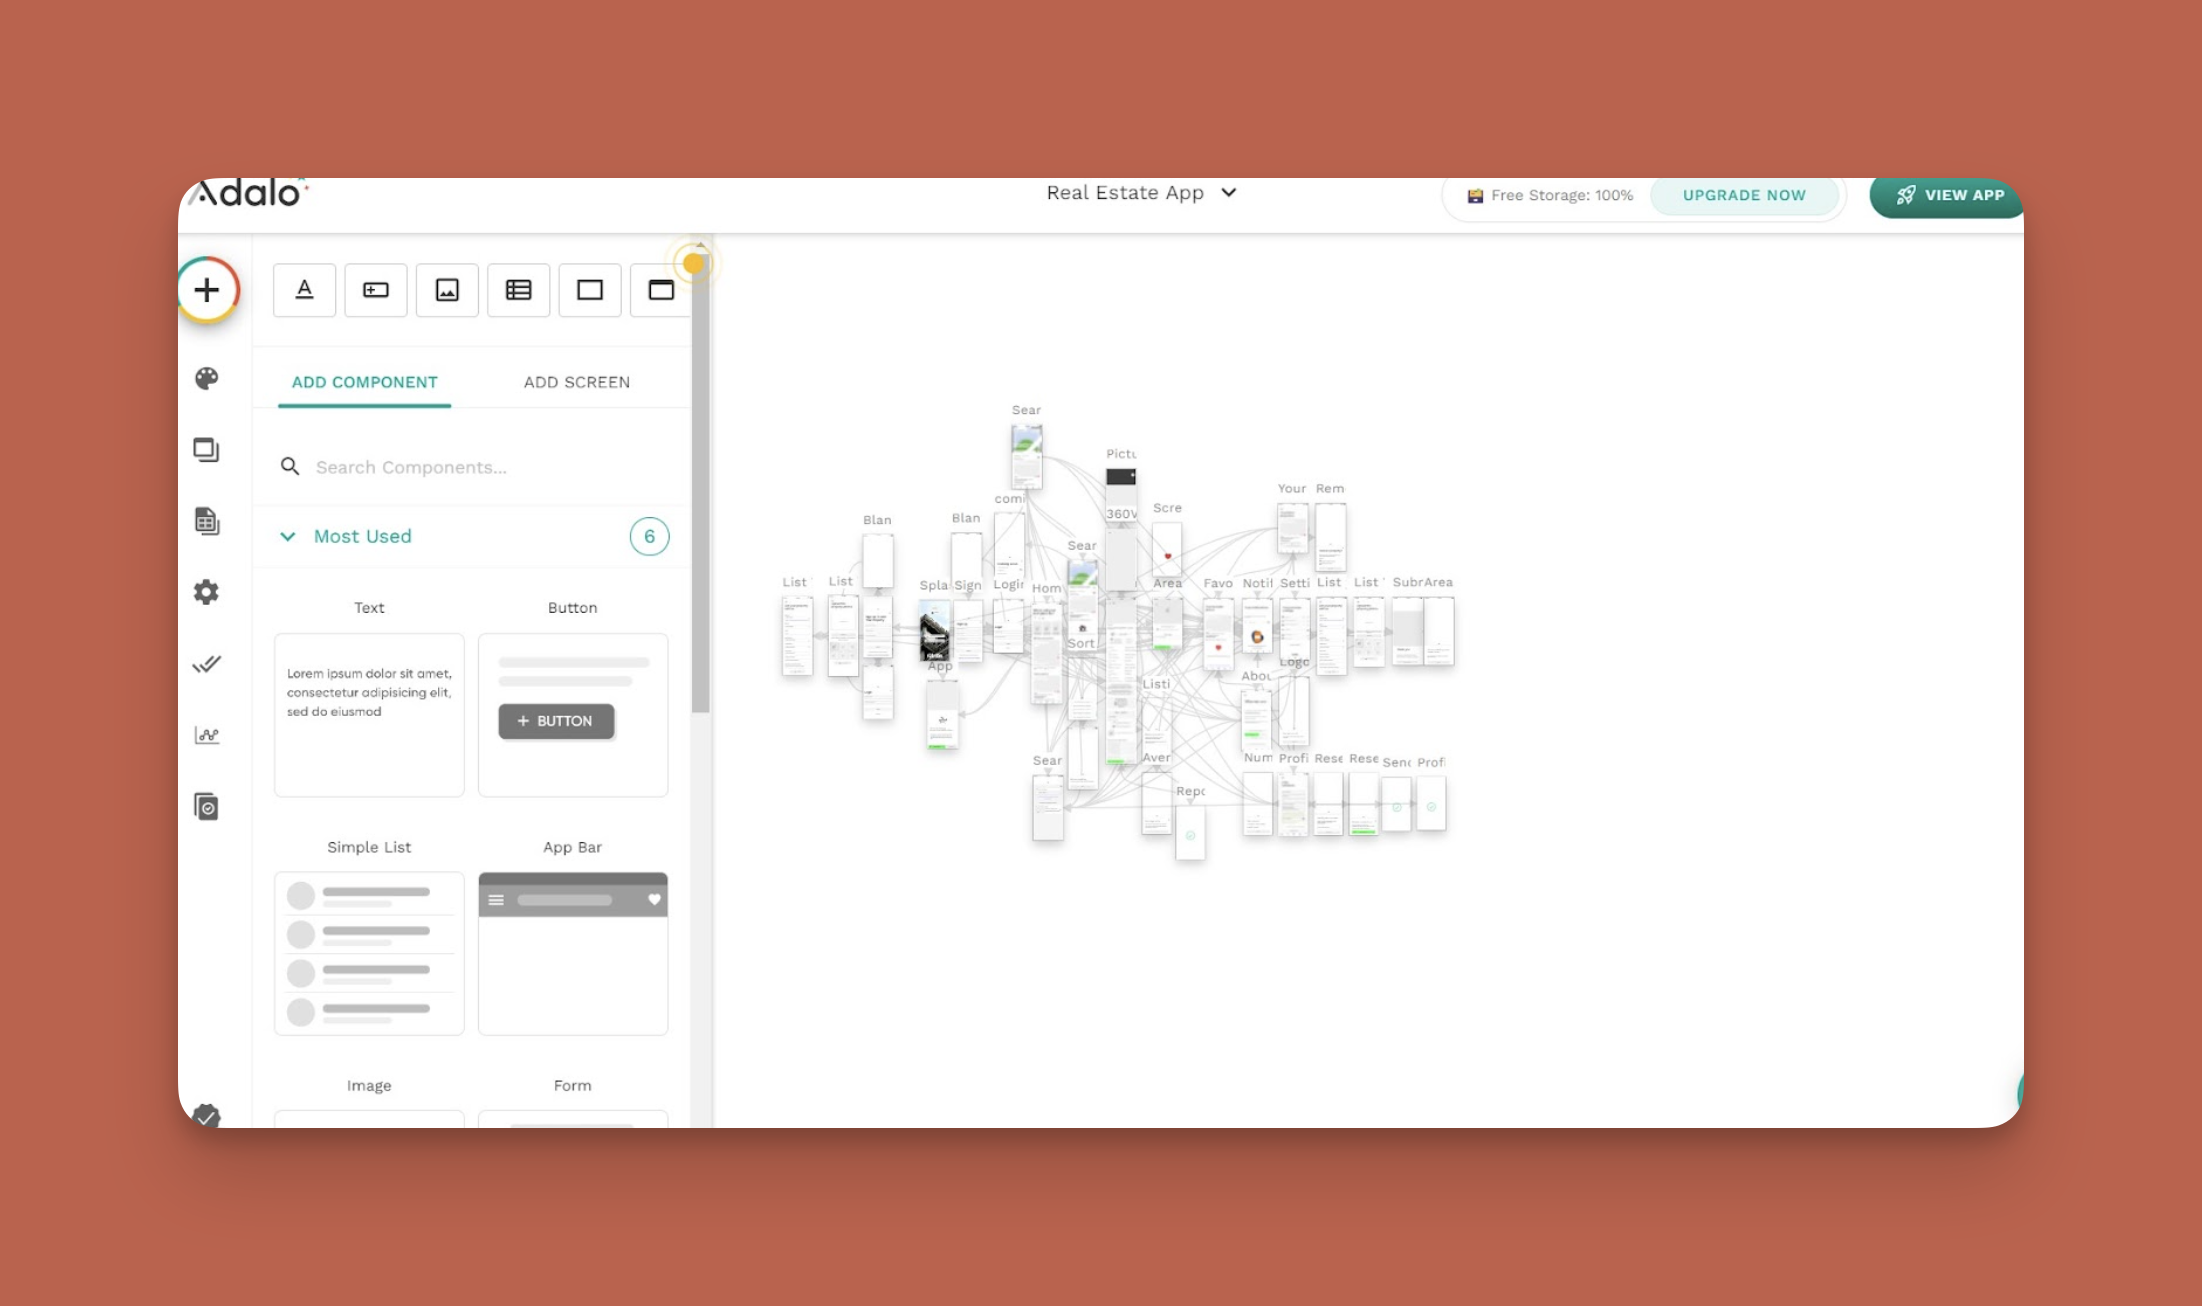
Before we start cobbling together your app, let's take a look at your toolbox: Adalo's building interface. Your most important tools live on the left-hand drop-down menu—you'll use these to build, customize, and edit your app.
At the center of your app building interface, you'll find your building canvas. Adalo conveniently places all the screens on your canvas at once—up to 400 screens visible simultaneously if needed—and lets you select and edit individual screens by hovering over each screen with your cursor.
Click on the screen, and you'll be able to edit it in the box that pops on the left-hand side of your screen. Here's a rundown of your tools:
Add Elements and Screens: Press this button to add or edit screens and elements such as lists, forms, buttons, and more.
Branding: Use this to apply different colors and fonts to your app.
Screens: This shows a list of all your screens, so you can easily access them.
Database Collection: This is your specialized built-in database, provided by Adalo. We'll talk more about it later.
Settings: This is your app's "housekeeping" function, which lets you edit your app's name, write a meta description for the web, and plug-in API keys for data gathering.
Publish: Use this when you've finished building and want to publish your app to the Apple App Store, Google Play Store, and the web. We'll delve into publishing in Step 6.
Analytics: Learn about your app's users, their locations, and key metrics about their performance.
Version History: Want to create up to 10 different versions of your app and publish the one you like best? You can create and access these here.
Tinker and experiment to familiarize yourself with Adalo's building interface. Remember, if you get stuck or have any questions, you've got access to a wealth of knowledge!
Step 3: Building Your App's Database
Click on the database icon found on the left-hand drop-down dashboard. All your database's components will appear in a new box to your left. Your database consists of two elements: collections and properties.
Collections are specific groups of data, like users, houses, bedrooms, bathrooms, and more.
Properties are the elements within each collection, such as the user name, house type (townhouse, apartment, etc.), number of bedrooms, and more.
You can view and edit your properties and collections by first clicking the vertical dots, and then clicking "View/Edit Records."
For real estate professionals who already track listings in spreadsheets, Adalo's SheetBridge feature connects your existing Google Sheets directly to your app's database. This provides the easiest control without database-related learning—your spreadsheet becomes your app's data source, updating in real-time as you add or modify listings.
With the right data relationship setups, Adalo apps can scale beyond 1 million monthly active users. The platform's modular infrastructure grows with your business, whether you're managing 50 listings or 5,000.
Step 4: Adding New Screens and Elements and Deleting Unwanted Ones
While Adalo's template has all the screens you'll need to build a kick-ass real estate app, we get it: your app conception might differ from what the template provides. We can't overemphasize just how customizable Adalo is.
Deleting Screens and Elements
To delete screens, press your "Screens" button on your left-hand drop-down dashboard. Click the vertical dots, and select delete. Deleting elements works similarly: Select your screen, then hover your cursor above the element until a yellow outline appears (this takes less than a second).
The element's properties will then appear in the editing box to your left. Click the vertical dots, select delete, and feel happy that the element that annoyed you has been erased.
Adding Screens, Elements, and More
You can add elements and screens by pressing the colorful button. It contains a healthy selection of lists, elements, forms, and more that you can add to your app by simply dragging over to the desired screen.
Customize the element's size by toggling your mouse over the element's edge. You can also edit for style and color by clicking on the element and customizing it using the drop-down dashboard to your left.
Magic Add accelerates this process further. Instead of hunting through menus, describe what you want: "Add a mortgage calculator that shows monthly payments based on listing price." The AI generates the component with the appropriate logic and styling, ready for you to customize.
Step 5: Previewing Your App
If you want to see how your app would appear live at any time during the building process, push the green "Preview App" button at the top right corner of your screen. You can even select a device to view your app, such as an iPhone 15 or a Samsung Galaxy S20.
When you preview your app, you can click through it as if you're actually using it. This will give you a pretty good feel of your user experience. Note any issues you encounter and fix them after you're done previewing.
X-Ray, Adalo's performance analysis tool, identifies potential issues before they affect users. It highlights database queries that might slow down as your listing count grows, helping you optimize your app's architecture proactively rather than reactively.
You can also share your app with others using the "Preview App" button. Select "Share Your App" from the drop-down menu, copy and paste the link, and send it to your friends or clients. This is a great way to get quality user feedback before publishing to the app stores.
Step 6: Publishing Your Real Estate Agent App in the App Stores
Before publishing to the app store, you'll want to make sure you have an attractive app store listing. Here is what will go into your app store listing:
- An App Icon: This will go on the left-hand side of your app title. Make sure you design a unique, attention-grabbing icon. Check out Looka for designing your icon.
- Your App's Description and Header: Before writing your description, do a bit of research by searching for keywords like "real estate agent apps" or "real estate apps" in the app stores. Pay attention to how your competitors describe their apps, and try to do a better job describing yours.
- Professional Screenshots: It goes without saying, but you'll want to present your app in a professional light. Do this by including screenshots that clearly show your app's features and functions.
For a more detailed guide about marketing your app, read our app promo guide.
After you know how you'll present your app in the app stores and after getting user feedback and making a few final adjustments, it's time to publish your app in the Apple App Store and Google Play Store.
Both app stores have different publishing procedures, and we'll give you a brief overview of both.
Google Play Store Procedures
To get started, you'll need to create an Android developer account. Follow the instructions, pay the one-time $25 set-up fee, and fill in all the required information. You'll have the option to onboard people who can test your app and provide feedback, which we highly recommend.
After you have sorted everything out with your Android developer account, return to Adalo and press the "Publish" button. You'll need to provide some information, like your Android developer key, to complete the publishing process on the Adalo side.
Once you finish, you can submit your app to the Google Play Console for publishing. Publishing to the Google Play Store takes as little as a few hours to as long as a few days.
Apple App Store Procedures
Just like with Google, you'll need to create an iOS developer account, follow the instructions, and pay the annual fee of $99. Make sure to register with Testflight (you can find this through your iOS developer account) to recruit people to test and offer feedback about your app.
When you've got your iOS developer account squared away, go back to your Adalo account, press the "Publish" button, and provide all the required information for setting up your app in iOS.
After checking all the Adalo-side boxes, return to your iOS developer account and submit your app for publishing. Apple takes notably longer to accept apps for publishing, from a few weeks to a few months.
A key advantage: Adalo handles the complex App Store submission process, so you can focus on your app's features and user experience instead of wrestling with certificates, provisioning profiles, and store guidelines. One build publishes to web, iOS, and Android—updates to your app automatically deploy across all three platforms.
If you have any questions about publishing your app, look no further than Adalo's detailed help guide. It covers every little step involved with publishing to the app stores.
Step 7: How to Get Payments With Stripe
If you need to get payments from your clients, like for rent or services, Adalo's Stripe integration has got you! To activate Stripe on your app, follow these 3 simple steps:
- After setting up your Stripe account, click on the "Add Elements and Screens" button in Adalo. Scroll down to the Stripe payment kit, and install it.
- In the "Components" section, you'll find your Stripe button. Drag it over to your desired screen, and enter in all the required information.
- You're all set to get paid!
This integration is particularly valuable for property managers collecting rent payments or agents processing deposits. The payment flow is secure, professional, and requires no additional coding or third-party payment setup.
Next Steps: Analytics, Users, and Maintaining Your App
Although you've already published your app, your work is far from over. You'll need to get more users by inviting clients and posting to your social media accounts. Follow some pointers we make in our app-marketing guide, such as running paid ads.
Run daily checkups on your app by clicking through it to make sure it works. Address any issues immediately—if your app starts malfunctioning, your app users and clients will become frustrated, and your professional reputation may suffer.
Use the "Analytics" button to track users and their engagement, which will give you key insights that can help your app reach a larger audience.
Don't forget to update your app periodically. This will keep your app sleek and modern looking—which should keep people more engaged in the long run. With Adalo's unlimited app updates on paid plans, you can push improvements as often as needed without worrying about republishing limits or additional charges.
How Adalo Compares to Other App Building Options
Real estate professionals evaluating app builders should understand how different platforms handle the specific demands of property listing apps: large image libraries, complex search filters, and the need for both web and mobile presence.
Bubble offers extensive customization but comes with trade-offs. Starting at $59/month with usage-based charges, Bubble's Workload Units can create unpredictable costs as your app scales. The platform's mobile solution wraps the web app rather than compiling to native code, which can introduce performance challenges under load. Many Bubble users building complex apps end up hiring experts to optimize performance—claims of millions of MAU often require significant professional help to achieve.
Glide excels at spreadsheet-based apps with fast setup times, but its template-focused approach limits creative freedom. Starting at $60/month for custom domain capability, Glide still restricts app updates and data rows, with additional charges for exceeding limits. Critically for real estate professionals, Glide does not support Apple App Store or Google Play Store publishing—your app remains web-only.
FlutterFlow targets technical users with its low-code approach. Starting at $70/month per user for app store publishing, the platform requires users to source, set up, and pay for their own database separately. This creates significant learning complexity, especially when optimizing for scale—suboptimal database setup can create performance problems that require expert intervention. The builder's limited view (showing only 2 screens at once) slows development compared to Adalo's canvas that can display up to 400 screens simultaneously.
Adalo's approach differs fundamentally. At $36/month with unlimited usage and no record caps, the platform includes a built-in database, native iOS and Android compilation, and direct app store publishing. One codebase updates web, iOS, and Android apps simultaneously. The 3.0 infrastructure overhaul (launched late 2025) made apps 3-4x faster with modular scaling that grows with your business.
Conclusion
Building a real estate app no longer requires a development team or a massive budget. With proper planning—sketching your screens, listing your app's actions, and understanding the frontend/backend/database structure—you can create a professional property listing app that serves your clients across web, iOS, and Android.
The seven steps covered here take you from template selection through app store publishing, with AI-assisted features accelerating each phase. Whether you're an independent agent showcasing a dozen listings or a brokerage managing thousands of properties, the platform scales with your needs while keeping costs predictable.
FAQ
Why choose Adalo over other app building solutions?
Adalo is an AI-powered app builder that creates true native iOS and Android apps. Unlike web wrappers, it compiles to native code and publishes directly to both the Apple App Store and Google Play Store from a single codebase—the hardest part of launching an app handled automatically. With unlimited database records on paid plans and no usage-based charges, costs stay predictable as your app grows.
What's the fastest way to build and publish an app to the App Store?
Adalo's drag-and-drop interface combined with AI-assisted building lets you go from idea to published app in days rather than months. Magic Start generates complete app foundations from descriptions, while the platform handles the complex App Store submission process—certificates, provisioning profiles, and store guidelines are managed for you.
Can I easily build a real estate app without coding experience?
Yes. Adalo's visual builder is described as "easy as PowerPoint," requiring no coding or technical skills. The platform includes a ready-made real estate template, and AI features like Magic Add let you describe features in plain language rather than building them manually.
How long does it take to build a real estate app?
With Adalo's template and AI-assisted features, you can have a functional real estate app ready for testing within a few days. Publishing to the Google Play Store takes hours to days; Apple App Store review typically takes one to several weeks.
How much does it cost to build a real estate app with Adalo?
Adalo's paid plans start at $36/month with unlimited usage, unlimited database records, and app store publishing with unlimited updates. This compares favorably to Bubble ($59/month with usage charges), Glide ($60/month with no app store publishing), and FlutterFlow ($70/month per user plus separate database costs).
Does Adalo provide a database for storing property listings?
Yes, Adalo includes a built-in database that's automatically connected to your app. Paid plans have no record limits—store as many property listings, user profiles, and transaction records as your business requires. SheetBridge also lets you connect existing Google Sheets directly as your data source.
Can I accept payments through my real estate app?
Yes, Adalo offers Stripe integration for collecting payments. Install the Stripe payment kit, drag the payment button to your screen, and configure your account details. This works for rent collection, deposits, or service fees.
Which is better for mobile apps, Adalo or Bubble?
For native mobile apps, Adalo has a clear advantage. Adalo compiles to true native iOS and Android code, while Bubble's mobile solution wraps the web app. This architectural difference affects performance under load and user experience. Adalo also offers simpler pricing without Bubble's Workload Unit calculations.
Can I publish to both the Apple App Store and Google Play Store?
Yes. Adalo publishes to both app stores from a single codebase, and updates deploy across web, iOS, and Android simultaneously. Some competitors like Glide and Softr don't support app store publishing at all.
What resources are available if I get stuck while building?
Adalo provides the Adalo Academy with courses and tutorials, a Community Forum where experienced users answer questions, and detailed documentation covering APIs, integrations, and publishing procedures. The ecosystem helps you become proficient quickly without hiring outside help.


