


Having spent my career writing software and often struggling mightily with design, since joining the Adalo team a few months ago I've been pretty much blown away by how easy it is to create and wire up user interfaces using the Adalo app builder. Adalo is a no-code app builder for database-driven web apps and native iOS and Android apps—one version across all three platforms, published to the Apple App Store and Google Play. Candidly I had always thought no-code app builders were limited to creating fairly simplistic CRUD-style (create, retrieve, update, delete) apps and dashboards.
With Christmas fast approaching, and being the type of nerd who likes to automate things for no particular reason, a few days ago I started to wonder if it would be possible to create an Adalo app that could control my family Christmas tree lights. They're already wired up with a smart plug and our kitchen Alexa device and so can be turned on and off with the command, "Alexa, turn on the Christmas tree", but you know what's better than one home automation integration? Two. What follows is a recap of my quest to create and launch a Christmas tree light management mobile app using Adalo, duct tape, and poor judgement.
The app will be available for a few days beginning Monday, December 16, and may be periodically offline due to me not being home (afraid of fire), my wife threatening to strangle me for making this public, or the obvious technical issues that may arise. Check it out at https://xmas.wjgilmore.com.
Introducing the App
The app is creatively called the Adalo XMAS Tree App. It consists of some theming, two buttons for toggling the Christmas lights, and a YouTube livestream so you can watch the action in realtime. But those buttons, oh those buttons are practically irresistible. You just can't help but press them and see that tree either light up in response or imagine my wife groaning after seeing it go dark yet again.
Last night we were catching up on the Apple series Silo (season 2, watch it, it's amazing), and I found myself in a death struggle with some unknown digital intruder. I think I know who it was (Allison don't think I don't know it was you!), but anyway the tree terrorist would click it off. And I would turn it back on. A few moments later the grinch was back and the lights were off again. And I would again valiantly fight back, illuminating the living room once again. They say heroes aren't born but forged in tinsel, and I'm living proof of it.
I'll bet you're salivating at the idea of pushing those buttons. Well have at it. Go to https://xmas.wjgilmore.com and give them a press. WARNING: I have no idea how long this is going to be available before it's knocked offline by my ISP, a programming error, or frankly my wife.

Why Adalo Works for Smart Home Apps
Building an IoT control app might sound complex, but Adalo's visual builder makes it surprisingly straightforward. The platform handles the heavy lifting—native app compilation, API integrations, and database management—while you focus on the fun parts like designing buttons that control your Christmas tree. With over 3 million apps created on the platform, there's a proven track record for projects ranging from simple utilities to complex business applications.
What makes Adalo particularly suited for this kind of project is the combination of easy API integration and the ability to publish directly to app stores. You're not building a web wrapper that feels sluggish on mobile—you're creating a true native app that responds instantly when someone across the world decides to mess with your holiday decorations.
Talking to the Smart Plug
Because in 2026 we can't be bothered with bending down to plug and unplug a string of lights, I used a TP-Link KP115 smart plug to control the lights via Alexa. This is a pretty straightforward process, but to my knowledge there is no official way to interact with the plug outside of Alexa and the horrible manufacturer app. GitHub to the rescue! As expected, a kind programmer reverse engineered the plug communication protocol and bundled it up into a convenient Python package called python-kasa. To install python-kasa run:
pip install python-kasa
Once installed you can begin interrogating your local network of supported devices using the discover command:
kasa discover
So not only can you easily identify each device's assigned IP address, you can also determine whether it's turned on, how long it has been in the on or off state, and how much power it has consumed both for the current month and since the last reboot. Pretty cool!
Once you know the device IP address, it's easy to turn it on and off:
kasa --host 192.168.1.100 on
kasa --host 192.168.1.100 off
Creating an API
My ultimate goal was to control this plug via an Adalo mobile app which could be conceivably accessed from anywhere in the world including the North Pole. This means opening up an Internet connection from my home network to the outside world. Let me be clear: there are right ways to do this, and there are wrong ways. The way I'm about to show you is very, very wrong, and my home internet services provider will likely shut off our connection for doing it this way.
The simplest version of this API needs by my estimation three endpoints: status, on, and off. The status endpoint tells us whether the plug is on or off, while the on and off endpoints are self-explanatory. I used Flask to create the API, and found it to be very easy to use. To create an endpoint you just define the route URI and then the method that immediately follows is executed when that endpoint is requested.
Believe it or not this is enough to create a functioning Flask API:
from flask import Flask
app = Flask(__name__)

@app.route('/status')
def status():
    return 'hello'
Save this file as status.py or whatever and then start the Flask server like this:
flask --app status run
Because Flask routes are by default GET requests, you can just open your browser and go to http://127.0.0.1:5000/status to test it out. Presuming there are no syntax errors you should see the string hello displayed in the browser.
In the case of my project, I needed the API endpoints to execute python-kasa commands, and so I used Python's subprocess module to run shell commands. For the sake of this project I can get away with playing things a bit fast and loose, however if you ever try something similar and need to pass parameters into the shell command then it is critically important that you validate the data before doing so. Here is the complete Flask script used for this project:
from flask import Flask
import subprocess

app = Flask(__name__)

@app.route('/status')
def status():
    result = subprocess.run(['kasa', '--host', '192.168.1.100', 'state'],
                          capture_output=True, text=True)
    return result.stdout

@app.route('/on')
def turn_on():
    subprocess.run(['kasa', '--host', '192.168.1.100', 'on'])
    return 'Tree is ON'

@app.route('/off')
def turn_off():
    subprocess.run(['kasa', '--host', '192.168.1.100', 'off'])
    return 'Tree is OFF'
Talking to the Outside World
You probably noticed that the Flask API is running on localhost, meaning it's not accessible to the outside world. To make this API accessible elsewhere I use a service called ngrok. ngrok has been around for as long as I can remember, and long story short it will expose a local development server to the internet (among many other things). Using ngrok we can expose port 5000 of my local server to an ngrok.app subdomain as easy as running this command:
ngrok http 5000
Now I can go to my ngrok endpoint from any network and it will forward the requests to and from my API!
Proxying the Requests Through DreamFactory
For both security and flexibility reasons I then routed the ngrok endpoint through DreamFactory. DreamFactory is best known as a database wrapper capable of quickly exposing an enterprise-grade REST API, however it can do all sorts of other interesting things such as extending the capabilities of existing APIs. I used DreamFactory's scripted service connector because I thought it might be fun to eventually integrate other capabilities into the app such as the current temperature at the North Pole. Doing this is incredibly easy using DreamFactory because I can just add new endpoints to my scripted service.
DreamFactory's scripted services connector supports the PHP, Python, and NodeJS languages, and because I'm most familiar with the platform's PHP-based API I went with that:
$api = $platform['api'];
$get = $api->get;
$post = $api->post;

$api->get('/status', function() {
    // Call ngrok endpoint for status
    return file_get_contents('https://your-ngrok-url.ngrok.app/status');
});

$api->get('/on', function() {
    return file_get_contents('https://your-ngrok-url.ngrok.app/on');
});

$api->get('/off', function() {
    return file_get_contents('https://your-ngrok-url.ngrok.app/off');
});

$api->get('/temperature', function() {
    return 'Freezing';
});
Just for sake of illustration I've extended what's exposed through the Flask API by adding a /temperature endpoint which when requested will return "Freezing".
After saving these changes I added a role-based access control to the DreamFactory API and then generated an API key. The DreamFactory API endpoints are now only accessible by providing the API key which is provided via a secure HTTP header.
Integrating the API and Adalo App
One of my favorite Adalo builder features is how easy it is to tie events to user actions. For instance when clicking on the "Turn tree on" button an API call to the /on endpoint needs to happen. This is accomplished as easily as adding an "action" to the button and indicating what kind of event needs to occur in order for that action to execute. Further, you can define multiple actions as shown in this screenshot (taken from the actual app):
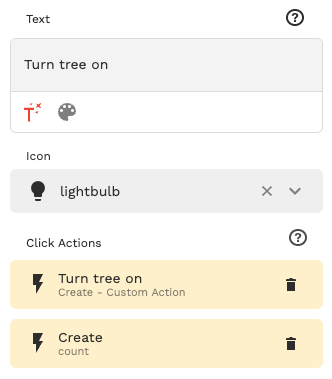
The API call is sent to the aforementioned DreamFactory endpoint. Again, the call is secured by passing along an API key via the HTTP header. Defining this call is accomplished via a simple web wizard, one step of which is shown in the following screenshot:

This visual approach to API integration is what makes Adalo's platform feel so accessible. You're not writing fetch requests or debugging CORS errors—you're clicking through a wizard that handles the technical complexity. The platform's 3-4x speed improvements since the Adalo 3.0 infrastructure overhaul mean these API calls execute quickly, keeping the app responsive even when controlling hardware halfway around the world.
Counting Light Toggle Frequency
I thought it would be fun to keep track of the number of times users have turned lights on and off. I could do this within the local Flask API using SQLite, but thought it made sense to keep this tally closer to the app and so used Adalo's Collections feature instead.
I created a single collection called counts consisting of four fields: ID (the usual auto-incrementing primary key), name (which stores the strings on and off), and the usual timestamps. Usual caveats apply here, I could have probably set this up a bit more efficiently but we're just bulldozing our way through the project. Here is an example of a few records stored in the table:

One thing worth noting: Adalo's paid plans now include unlimited database records, which means I don't have to worry about this silly Christmas project hitting any storage caps. Whether it's tracking a few hundred light toggles or scaling to millions of user interactions, the platform handles it without additional charges or record limits.
Charting the Results
My friend Nic over at DreamFactory suggested creating a chart depicting the toggling frequency. I didn't feel like writing any custom code to implement this however it's trivial to export data out of an Adalo collection and so I did that and uploaded it along with an example chart into ChatGPT:

Yes I am always polite when talking to AI these days. I for one welcome and appreciate our robot overlords. I didn't like how the chart turned out though and so after a few more attempts I asked it to create a pie chart instead:

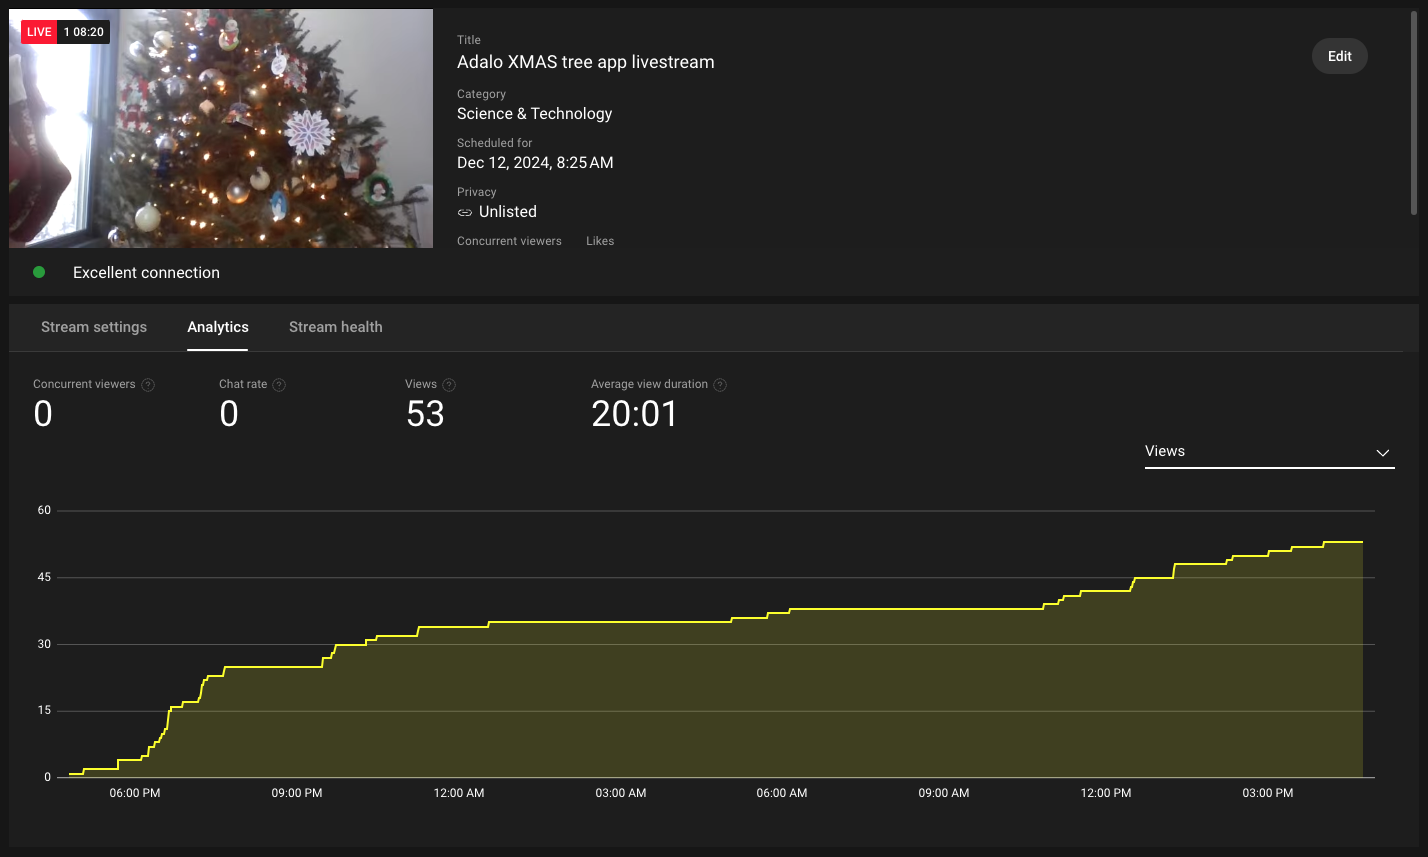
Setting Up the YouTube Livestream
Setting up the YouTube livestream was really straightforward; I used Adalo's YouTube marketplace component, pasted in the livestream URL, and it just worked. Plus I get to watch the livestream status using this fun YouTube Studio interface:
The marketplace component ecosystem is one of those features that saves hours of development time. Instead of figuring out YouTube's embed API and handling responsive sizing across devices, you just drag, drop, and configure. The component handles the rest, and because Adalo compiles to native code, the video playback performs smoothly on both iOS and Android.
Creating the App Icon
I have no design skill whatsoever, and so just relied on DALL-E to generate one for me. I used the prompt "Please create a 1024 x 1024 px icon for a mobile app used to Control Christmas tree lights". DALL-E ignored the dimensions and created the two options found in the screenshot:

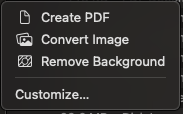
In the interests of time, I selected the very first icon it created, downloaded it to my Mac, and then used macOS' little-known remove background feature to remove the background gradient:
Ada, Adalo's AI builder, lets you describe what you want and generates your app. Magic Start creates complete app foundations from a description, while Magic Add adds features through natural language.
This combination of AI-generated assets and Adalo's visual builder represents the modern approach to app development. You don't need to be a designer or a developer to create something functional and fun. The platform's AI features Builder will take this even further—early 2026 promises prompt-based app creation where you can describe what you want and have the platform generate screens, logic, and database structures automatically through features like Magic Start and Magic Add.
Publishing and Performance
One aspect of this project that deserves mention is how seamlessly Adalo handles the path from idea to published app. The platform publishes directly to both the Apple App Store and Google Play Store from a single codebase. This is genuinely the hardest part of launching an app—dealing with certificates, provisioning profiles, and store guidelines—and Adalo handles it automatically.
The app's performance has been solid throughout this experiment. Since the Adalo 3.0 infrastructure overhaul in late 2025, the platform runs 3-4x faster than before, with modular infrastructure that scales with your app's needs. For a silly Christmas project this might seem like overkill, but it means the button presses register instantly and the livestream loads without lag, even when multiple people are fighting over the tree lights simultaneously.
Adalo's pricing also makes projects like this accessible. Starting at $36/month with unlimited usage and no record caps, you can experiment freely without worrying about bill shock from unexpected charges. Compare this to alternatives like Bubble (starting at $59/month with usage-based Workload Units and record limits) or Glide (which doesn't even support App Store publishing), and the value proposition becomes clear.
Conclusion
This was a very fun project that made my kids and neighbors laugh, and aggravated my wife to no end. Sometimes the best projects are those which have no real purpose other than to have a few laughs. Hopefully by the time you read this my house hasn't burned down.
Perhaps in a later post I'll document some of the other funny things which popped up during development, such as Treehouse instructor Laura Coronel writing an automated script to interact with the user interface and toggle the tree lights 100 times in one minute. The fact that Adalo's infrastructure handled that kind of rapid-fire interaction without breaking a sweat speaks to the platform's reliability—even for projects that exist purely to annoy your spouse during the holidays.
FAQ
Why choose Adalo over other app building solutions?
Adalo is an AI-powered app builder that creates true native iOS and Android apps from a single codebase. Unlike web wrappers, it compiles to native code and publishes directly to both the Apple App Store and Google Play Store—handling the hardest part of launching an app automatically. With unlimited database records on paid plans and no usage-based charges, you can build and scale without unexpected costs.
What's the fastest way to build and publish an app to the App Store?
Adalo's drag-and-drop interface and AI-assisted building let you go from idea to published app in days rather than months. The platform handles the complex App Store submission process—certificates, provisioning profiles, and store guidelines—so you can focus on your app's features instead of wrestling with Apple's requirements.
Can I easily integrate external APIs and smart home devices with Adalo?
Yes, Adalo makes it simple to tie API calls to user actions like button clicks through a straightforward web wizard. You can connect to services like DreamFactory, custom Flask APIs, or any REST endpoint with secure HTTP headers—no coding required.
How do I add button actions and user interactions in Adalo?
Adding button actions is incredibly easy—you simply add an 'action' to any button and specify what event triggers it. You can define multiple actions per button, such as making an API call and updating a database record simultaneously. This makes creating interactive apps with real-world functionality straightforward even without coding experience.
Can I store and track data in my Adalo app?
Yes, Adalo includes a built-in Collections feature that lets you create database tables to store and track data. You can easily set up collections with custom fields, timestamps, and relationships, then export data whenever needed. Paid plans include unlimited database records, so you never hit storage caps.
How do I embed YouTube videos or livestreams in my Adalo app?
Adalo offers marketplace components including a YouTube component that makes embedding videos incredibly simple. You just add the YouTube marketplace component to your screen, paste in your video or livestream URL, and it works immediately—no custom coding required.
Do I need design skills to create a professional-looking app with Adalo?
No, you don't need design skills to create a great-looking app. The platform includes theming capabilities and pre-built components that help you create polished interfaces. You can also use AI tools like DALL-E to generate custom app icons and graphics.
How much does it cost to build an IoT control app with Adalo?
Adalo's paid plans start at $36/month with unlimited usage and no record caps. This includes the ability to publish to both the Apple App Store and Google Play Store. Compare this to alternatives like Bubble ($59/month with usage-based charges) or FlutterFlow ($70/month per user, plus separate database costs).
Can Adalo handle high traffic and rapid user interactions?
Yes, since the Adalo 3.0 infrastructure overhaul in late 2025, the platform runs 3-4x faster with modular infrastructure that scales to serve apps with millions of monthly active users. The architecture maintains performance even under rapid-fire interactions.
What AI features does Adalo offer for app building?
Adalo currently offers Magic Start (generates complete app foundations from descriptions) and Magic Add (adds features from natural language requests). The AI features Builder, due in early 2026, will enable full prompt-based app creation and editing throughout the development process.


